Advanced C++ programming features
Features:
- Connecting ports using the Port Wizard
- Adding an ACF library version and description
- Using multiple namespaces
- Using multiple source folders
- Additional build, deploy, or generate options
- Disabling build steps
- Custom CMake flags
- Using namespaces with IEC 61131‑3 code
Connecting ports using the Port Wizard
Available from PLCnext CLI 2022.0 LTS
The Port Wizard helps to have all necessary attributes at hand, and builds the comment for the port generator around your selected variable.
The C++ project templates already provides some information about ports and their desired location as comments in the *.hpp files. If you want more information about ports, see the description for program ports and for component ports.
- In your IDE interface, move your cursor to the line of the variable your want to link to a port.
Note: The Port Wizard does not verify the selected line. The comment can be created anywhere. So be sure to add it to the proper line.
- Right click on the worksheet area and select

The Port Wizard opens.
- Give your port a name.
If the Port Name text box stays empty the name of the field is used by default. - Set attributes according to your needs.
Tip: Mouse over the attribute names to see a tooltip information, or see program ports and component ports for more details.
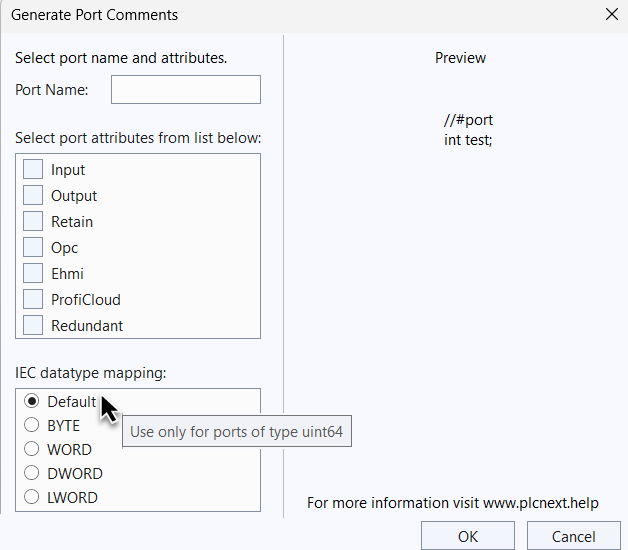
- Check the comment that will be created In the Preview area.
- To apply the previewed setting, click Finish or OK (depending on your IDE).
Configuring a PLCnext Engineer library
Available from PLCnext CLI 2022.0 LTS
A PLCnext Engineer library (*.pcwlx) can be configured either via the IDE plug-in or manually in the project files. Shared libraries can be excluded so they are not downloaded to the device by PLCnext Engineer. The information is stored in an XML configuration file.
If you're working with Eclipse® or Visual Studio® IDE, the regarding PLCnext Technology add-in/extension provides a dialog for adding the information to the XML configuration file. If you prefer working with another IDE or without any, you need to add the XML configuration file and its information manually.
To see what is prepared, just mouse over a library name in the PLCnext Engineer COMPONENTS panel and a large tooltip pops up, showing e.g. the Library Version and the Description:

Here are the steps needed for all three ways:
Adding the information with an IDE plug-in
-
To show the dialog box in Visual Studio, right-click on your project in the Solution Explorer and select PLCnext Technology → Project Configuration;
hide the screenshotshow a screenshotTo show the dialog in Eclipse open Project → Properties, then navigate to PLCnext Configuration.
Show screenshotShow screenshot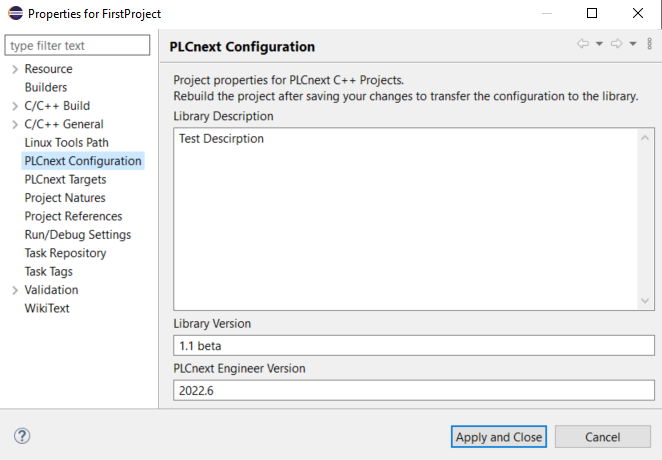
-
Enter the needed information for your library:
- Library Description allows to add a brief description to the PLCnext Engineer library file and is shown in the PLCnext Engineer on mouse over. It is just an information to the user and is not checked in any way.
- Library Version allows to add a version to your *.pcwlx file and is shown in the PLCnext Engineer on mouse over. It is like the description just information to the user and is not checked in any way.
- PLCnext Engineer Version sets the minimum PLCnext Engineer version to use. It must be in the format 202x.x or 202x.x.x and is checked for availability of that version.
- 🗹 Available from PLCnext Technology Toolchain 2025.6:
Library Infos can contain explanatory text in key/value pairs. - Excluded Files contains a list of all external libraries of the project that could be found by CMake (displayed in black letters). Further elements can be those which are listed inside the projects configuration file as external library, but which were not found by CMake (displayed in gray letters). Those grayed libraries will not be added to the *.pcwlx file and are not downloaded via PLCnext Engineer. If a library is excluded, it must be made available on the controller on another way.
-
To apply the setting, click Save & Close (Visual Studio) or Apply and Close (Eclipse).
Adding the information without an IDE
- Create a file named PLCnextSettings.xml in your project's root folder.
- Add the following template content to it:
<?xml version="1.0" encoding="UTF-8" standalone="yes"?>
<ProjectConfiguration xmlns="http://www.phoenixcontact.com/schema/projectconfiguration">
    <EngineerVersion>2025.6</EngineerVersion>
    <LibraryDescription>Library Description</LibraryDescription>
    <LibraryVersion>Library Version</LibraryVersion>
    <LibraryInfo name="MySecondDesciption">More Description</LibraryInfo>
</ProjectConfiguration>
- Change the template settings to your needs:
EngineerVersionsets the minimum PLCnext Engineer version to use with this library:
The entry must be in the format202x.xor202x.x.x.LibraryVersionandLibraryDescriptionare format-free text entries.- With the PLCnext Technology Toolchain release 2025.6 it is possible to set further
LibraryInfoelements with a name and a free text.
Using multiple namespaces
Available from PLCnext CLI 2022.0 LTS
It is possible to use multiple namespaces. That means that helper classes e.g. from external libraries can be in a completely different namespace than the actual components or programs which use them. No special treatment is required in order to work with multiple namespaces, but there are a few constraints to that feature:
- All components and programs must be in one root namespace. Meaning, if there is a component
A::Componentthen all other components and programs must be in the namespaceAor any subordinate namespace ofA. - Structures for ports can be in a different namespace than the class which defines the port, but each structure name must be unique.
- Not allowed: a structure
A::B::Structand a structureA::C::Struct - Allowed: a structure
A::B::BStructand a structureA::C::CStruct
- Not allowed: a structure
Using multiple source folders
Available from PLCnext CLI 2022.0 LTS
It is possible to use multiple source folders in a build configuration. Each source folder can contain helper classes as well as components, programs and port structures. In addition to the configuration in the Eclipse or Visual Studio IDE, or using the PLCnext CLI option, it is necessary to adapt the CMakeLists.txt accordingly.
Adapting the CMake configuration
The following folder structure will be used as an example:
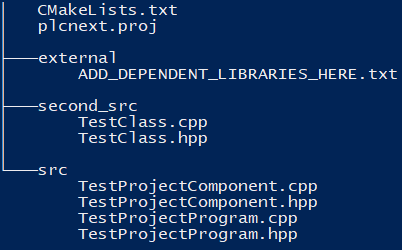
In the above example there are two source folders second_src and src. To work with these two source folders, do the following changes to the CMakeLists.txt:
-
Find the following lines:
file(GLOB_RECURSE Headers src/*.h src/*.hpp src/*.hxx intermediate/code/*.h intermediate/code/*.hpp intermediate/code/*.hxx)
file(GLOB_RECURSE Sources src/*.cpp intermediate/code/*.cpp)and add
file(GLOB_RECURSE Headers src/*.h src/*.hpp src/*.hxx intermediate/code/*.h intermediate/code/*.hpp intermediate/code/*.hxx second_src/*.h second_src/*.hpp second_src/*.hxx)second_src/*.h second_src/*.hpp second_src/*.hxxfor the header files,
and addsecond_src/*.cppfor the source files:
file(GLOB_RECURSE Sources src/*.cpp intermediate/code/*.cpp second_src/*.cpp)
-
Using this example:
target_include_directories(ExternalSourceIncludeTest
    PUBLIC
    $<BUILD_INTERFACE:${CMAKE_CURRENT_SOURCE_DIR}/intermediate/code>
    $<BUILD_INTERFACE:${CMAKE_CURRENT_SOURCE_DIR}/src>)
...add the following section:
PRIVATE
$<BUILD_INTERFACE:${CMAKE_CURRENT_SOURCE_DIR}/second_src>
...resulting in:
target_include_directories(ExternalSourceIncludeTest
PUBLIC
$<BUILD_INTERFACE:${CMAKE_CURRENT_SOURCE_DIR}/intermediate/code>
$<BUILD_INTERFACE:${CMAKE_CURRENT_SOURCE_DIR}/src>
PRIVATE
$<BUILD_INTERFACE:${CMAKE_CURRENT_SOURCE_DIR}/second_src>)
Configuring Eclipse for multiple source folders
There is also an option added for the Eclipse IDE, which have to be set in case an additional folder should be used. This sets automatically the --sources in all generate steps.
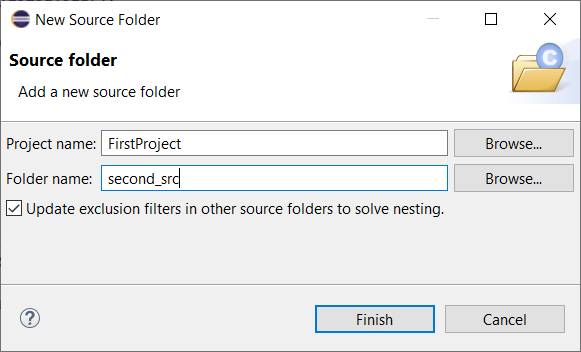
- To add a source folder select File → New → Source Folder.
- Enter your new folder name or Browse... for an existing one.
Configuring Visual Studio for multiple source folders
You can add another source folder with Visual Studio® IDE as well. This sets automatically the --sources in all generate steps.
Multiple source folders are set in the project's Configuration Properties at the PLCnext Technology branch, which comes with the Visual Studio extension. If the option contains a value, the entered folders will then be used as source folders during a build.
- Right-click your project in the Solution Explorer and select Properties.
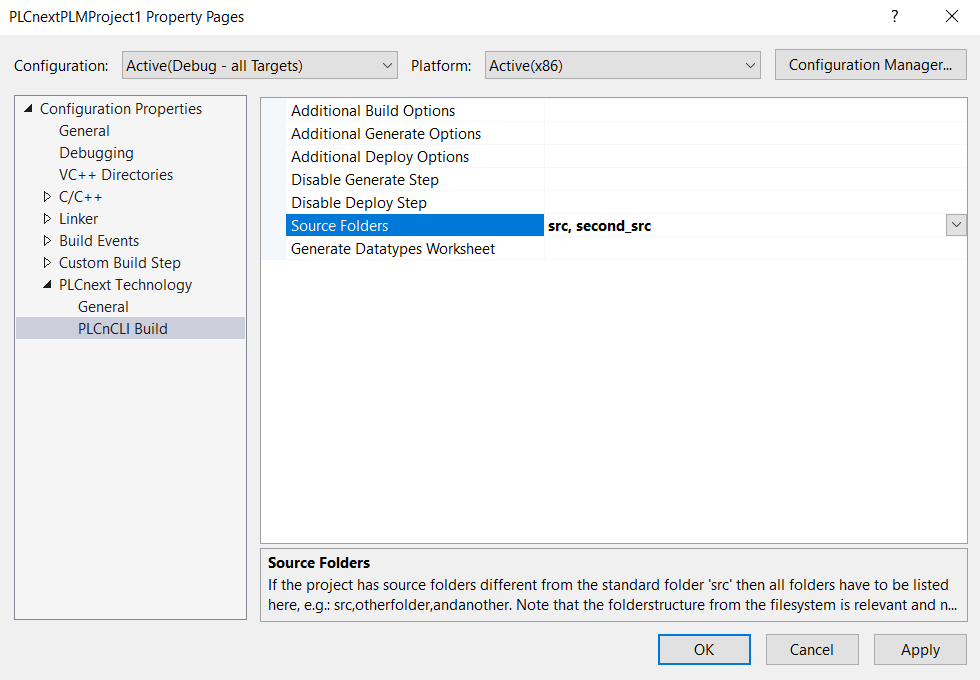
- In the left-side menu of the dialog box, navigate to PLCnext Technology → PLCnCLI Build.
- At Source Folders , enter the source folders as a comma-separated list.
Note: Do not forget to addsrcto the list if you want to keep the default source folder.
Using the PLCnext CLI --sources option
The --sources option is available with the plcncli generate commands (code, config, all, library). Working with more than a single source folder, the --sources option must be used to pass each source folder to the commands.
This would be the PLCnext CLI option with both source folders:
plcncli generate all -p "C:/Temp/ExternalSourcesTest" --sources "second_src,src"
Additional build, deploy, or generate options
Available from PLCnext CLI 2022.0 LTS
There are several options which can be activated or deactivated to meet special requirements in the development process for PLCnext Technology.
These options are part of the project properties in the Eclipse® add-in as well as in the Visual Studio® extension.
Working with Eclipse®
- Open up the Project Properties
- In the left-side menu navigate to C/C++ Build → Settings and there to the Tool Settings tab of the selected build configuration.
Working with Visual Studio®
- Right-click your project in the Solution Explorer and select Properties.
- In the left-side menu of the dialog box, navigate to PLCnext Technology → PLCnCLI Build.
Note: These additional options are added to the end of the CLI command sent by the IDE. They are only meant for workarounds, or in case of issues.
Disabling build steps
Available from PLCnext CLI 2022.0 LTS
The build action of the IDEs always perform the whole sequence generate all, build all and deploy all. If the generate step is active it always generates the datatype worksheet. That can be deactivated separately. If it is necessary to skip a step, the following options can be used.
Via PLCnext CLI just use the necessary intermediate commands instead of generate all, build all and deploy all. To disable the datatype worksheet generation, use the option --no-datatypes-worksheet with plcncli generate config or with plcncli generate all.
Working with Eclipse®
- Open up the Project Properties
- In the left-side menu navigate to C/C++ Build → Settings and there to the Tool Settings tab of the selected build configuration.
- In the PLCnCLI - Metadata Generation --> Meta Generation Settings it is possible to just uncheck the Generate IEC datatype worksheet step.

To edit the order of steps, to remove or add build steps in Eclipse you have to navigate to C/C++ Build → Tool Chain Editor. There you can open up a wizard via the Select Tools... Button on the right of the Used tools list.
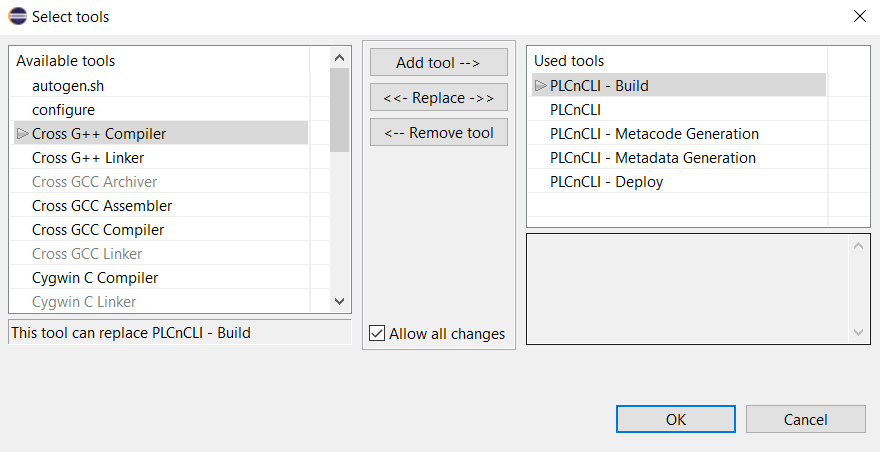
- Check the box to
Allow all changesand configure the tools as necessary.
Working with Visual Studio®
In Visual Studio open up the project properties and navigate on the left side menu to PLCnext Technology --> PLCnCLI Build. Here you can set the options Disable Generate Step (default value No), Disable Deploy Step (default value No) or Generate Datatype Worksheet (default value Yes).
Changing the project path
If the project path has changed, e.g. the project has been moved, or the project is coming from a version control system (like Git), then includes and macros need to be updated. These updates can be performed manually:
- via Visual Studio®: see the project's context menu
- via Eclipse®: Project Properties → PLCnext Technology → Update includes and Macros
The same update will be performed on a project import.
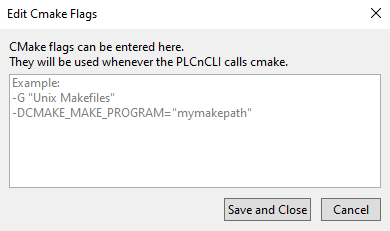
Custom CMake flags
Available from PLCnext CLI 2021.6
To make use of additional CMake options, you can add a CMakeFlags.txt file to the project's root folder.
Add a single option per line, e.g.:
-G "Unix makefiles"
-DCMAKE_MAKE_PROGRAM="mymakepath"Working with Eclipse®
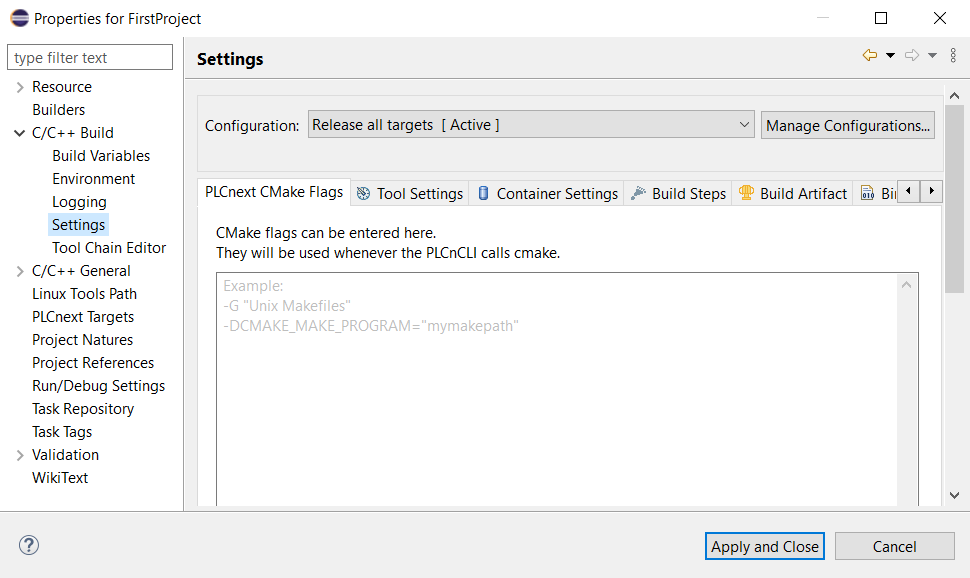
With the Eclipse® PLCnext Technology add-in, go to Project → Properties and navigate on the left side menu to C/C++ Build → Settings. In the dialog on the right, go to the PLCnext Cmake Flags tab:
Working with Visual Studio®
The same file can be edited via the Visual Studio extension. If you need to add CMake flags to your build, right click on your project in the Solution Explorer, select PLCnext Technology → CMake Flags: