System time
Default time zone
All PLCnext Control devices are set by default to UTC0 which is UTC±00:00 of the Coordinated universal time (UTC).
Using the Network Time Protocol
It is possible to connect to Network Time Protocol (NTP) servers. NTP servers can be configured via Web‑based Management, PLCnext Engineer or via RSC services.
Valid from firmware 2025.0
A chrony daemon is integrated into the operating system. Settings are done via the Date & Time WBM 2 page and saved in the chrony.conf file on the controller.
For more features and differences to the former ntpd see the chrony project website.
Valid up to firmware 2024.6
A ntp daemon is integrated into the operating system. Settings are done via the Date & Time WBM page and saved in the ntp.conf configuration file on the controller.
NTP configuration via Web-based Management
Available from 2022.0 LTS
The controller's time setting by means of a network time protocol server can be configured directly on the controller via a Web-based Management page:
- with WBM 2 (Firmware releases from 2025.0), the Date & Time WBM 2 page is largely self-explanatory
- for the legacy WBM (Firmware releases 2022.0 LTS up to 2024.6) see the Date and Time WBM page description
NTP configuration via PLCnext Engineer
Setting up an NTP server via PLCnext Engineer
- In the PLANT area, click on PLCnext
- In the Online Parameters tab, select the NTP section
- Enter up to three NTP servers (separated by spaces) in the input field
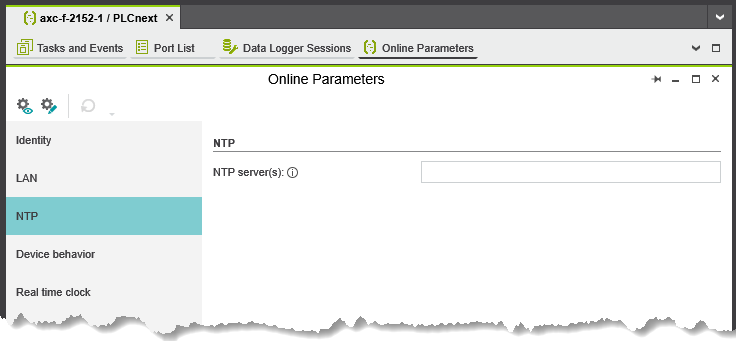
- Reboot the PLCnext device for changes to be effective
NTP and time settings via PLCnextBase library
Another way to set the system time is the PLCnextBase library, provided in the PLCnext Store for free and without needing a license. After importing this library into PLCnext Engineer, it provides several functions, function blocks, and programs that are helpful in developing PLCnext-based automation solutions. It comes with instructions for import and setup, as well as detailed descriptions of the IEC 61131‑3 interface and all components.
For the system time, the PLCnextBase library depends on the native Linux® features. After importing this library in PLCnext Engineer, you can work with local time settings by reading the time zone along with the local offset to UTC, and automatically switch to and from daylight savings time.
NTP server setup via shell commands
Valid from firmware 2025.0
Valid only with firmware 2022.0 LTS up to 2024.6
An ntpd (network time protocol daemon) is integrated into the operating system.
- To have sufficient rights to modify the data, connect to the controller as the
adminuser. - Navigate to the /etc/ directory.
- In the ntp.conf configuration file, specify IP addresses and names.
- To restart the
ntpdaemon, execute the commandsudo /etc/init.d/ntpd.
- The PLCnext Runtime System already contains the
ntputilities (e.g.ntpqandntpdc) for diagnostic and monitoring purposes. - Find a general overview to the
ntpdfeatures in the developer's introduction. - Find a detailed description of the configuration options in the developer's documentation.
Setting the real-time clock
You can set the system time of PLCnext Control devices using the free-of-charge PLCnext Engineer software.
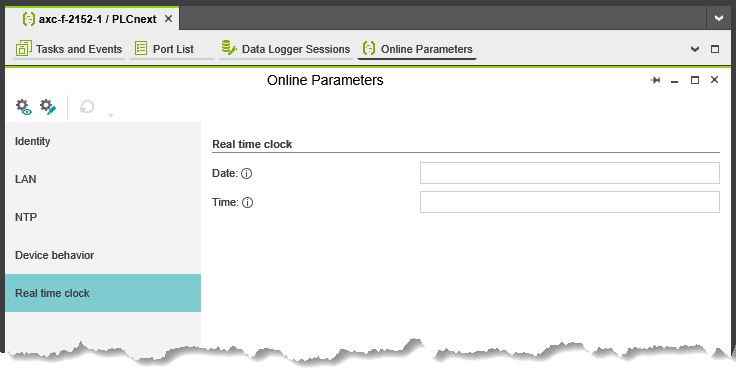
Defining RTC parameters
- Open PLCnext Engineer and connect to the controller (requires authentication with a user name and password).
- In the PLANT area, click on PLCnext.
- In the Online Parameters tab, select the Real time clock section.
- Enter the desired values in the corresponding input fields (see the circled ℹ for date formats)
Synchronizing with the host system time
You can write the current system time of your host computer to the real-time clock on the controller:
- Open PLCnext Engineer and start a project template corresponding to your firmware version on the controller.
- In the PLANT area, unfold the project branch and double-click the device.
- In the Cockpit tab, click the
 button and connect to the controller as the
 adminuser. - In the Cockpit tab, press the clock-shaped button.

↪ The controller's clock matches the host system's clock.
UTC0 time and ignore any given offset or time zone. Currently, the only way to work with an offset to UTC0 or with a specific time zone (which automatically switches to/from daylight savings time) on PLCnext Control devices is to use the PLCnextBase library out of the PLCnext Engineer.Setting the system time via shell commands
Use the Web-based Management page or the PLCnext Engineer for settings.
Authentication with user name and password is necessary for SSH access to the shell. Access with administrator rights:
- User name: admin
- Password: The default password is printed on the controller's housing.
 Security note: Use the default
 adminuser password only for initial access and change it as soon as possible!
Requesting the system time
- Open the shell.
- Request the system time via the
datecommand.
Setting the system time
- Enter shell command
sudo date -s "YYYY-MM-DD hh:mm:ss", withYYYY: yearMM: monthTT: dayhh: hoursmm: minutesss: seconds