Using Security Profiles
Available from 2022.0 LTS for the PLCnext Control AXC F x152 series, and from 2023.0 LTS for RFC 4072S
Security configurations can be edited and stored by users in persistent profiles which need to be activated and deactivated via the Web-based Management (WBM) on demand via the Security Profile WBM page (up to firmware 2024.6) or the Security Profile WBM 2 page (from firmware 2025.0).
If no Security Profile is active all security-related settings are managed by the Security Profile Manager (SPM).
Prerequisites and limitations
- an IP configuration is retained
- a TLS certificate for HTTPS communication is retained
- all licenses are retained
After reset, the System Services WBM page may show less services due to inactive services for the current Security Profile.
Make sure the Netload Limiter service stays active for further configuration!
 Please note the guidelines in our PLCnext Technology ‑ Security Info Center.
For developing secure-by-design, IEC 62443‑2 compliant applications with PLCnext Technology, get a good grasp of the concepts used in the Security context.
Configuring a Security Profile
Activating a Security Profile generates an XML file with settings for the Secure Shell (ssh) to be used for the connection. The default is port number 22.
This XML file should not be altered manually. An additional to the WBM page for this will be available soon.
Activating a Security Profile
If the above steps are done properly, you're ready to activate a Security Profile on your PLCnext Control.
This is done by means of the Security Profile WBM page, or - from firmware release 2025.0 on - by means of the respective WBM 2 page.
Changes to the Security Profile with firmware ≥2025.0
The Security Profile WBM 2 page now shows a toggle button for activating and deactivating the feature in the all long-standing PLCnext Control devices AXC F 1152, AXC F 2152, AXC F 3152, RFC 4072S, as well as the BPC 9102S, EPC 1502, and EPC 1522.
These details are different when activating the Security Profile under firmware 2025.0 (in comparison to former firmware releases) on the first generation of PLCnext Control device types:
- A reset type 1 is performed automatically; but if you had activated the Security Profile in a previous firmware version and update to firmware 2025.0, you must manually perform the reset after the firmware 2025.0 update.
- The
Adminuser remains (in previous firmware versions, activating the Security Profile removed this user).
Anyhow, this configuration must be adapted to a minimum configuration feature set needed for the application. It is highly recommended to deactivate theAdminuser during productive operation. See the PLCnext Security Info Center for further information on risk analysis and secure-by-default configuration. - The firewall configuration still allows incoming and outgoing ICMP requests ("pings").
- These system services are staying active (in comparison to firmware 2024.6):
- App Manager
- DataLogger
- gRPC Remote Procedure Calls (Local)
- Netload Limiter
While the Security Profile is active, the following services can still be deactivated and activated via WBM 2 System → System services page (or by an app):
- App Manager
- DataLogger
- gRPC Remote Procedure Calls (Local)
- PLCnext Syslog adapter
- Modbus Client TCP
- Netload Limiter
- OPC UA Client
- PLCnext Store
- Proficloud
- Software Update via Device and Update Management
Licensing the Security Profile
Note: This step is only necessary if working on PLCnext Control devices running on 2022.0 LTS firmware.
Getting a Security Profile license
Before activating a Security Profile:
To enable the Security Profile, you must activate the license for the PLCnext Security Profile. To get the Security Profile license, proceed as follows:
- Please contact Phoenix Contact.
- Your personal contact will send you a ticket ID.
- Go to the CodeMeter License Central WebDepot, enter your ticket ID and click the button.
- Follow the further instructions.
Activating a Security Profile license
- Log in to the WBM.
Return to topicHow do I get to the WBM again? Click here for more information...
Establishing a connection to the Web-based Management (WBM):
- Open a web browser on your computer.
- In the address field, enter the URL https://<IP-address-of-the-controller>/wbm,
for example: https://192.168.1.10/wbm.
For further information, see WBM.
- Open the License Management page (Administration → License Management).
- Open the Offline Activation tab.
On the Offline Activation tab, licenses can be activated and deactivated offline with license files provided by the PLCnext Store.
![]() The Offline Activation Wizard will guide you through the activation process and provides further information.
The Offline Activation Wizard will guide you through the activation process and provides further information.
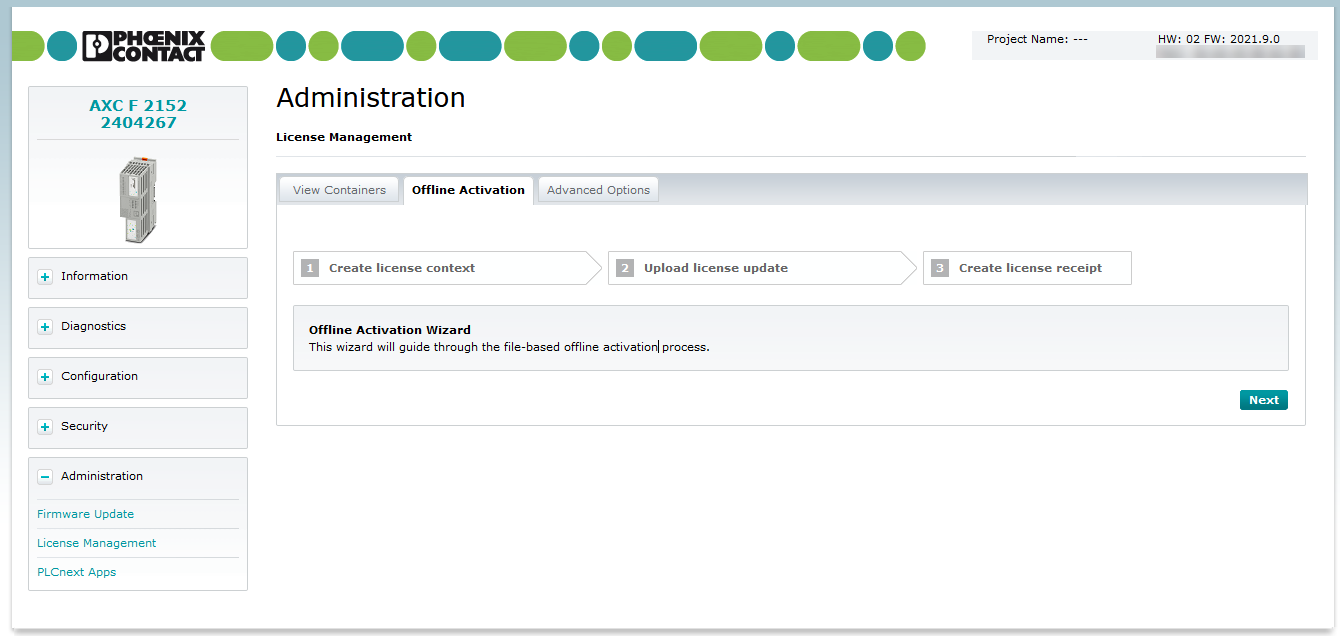
- Offline Activation step 1: Create license context
Note: There are two options to create a license container. Option 1 is the standard procedure. Option 2 is the alternative approach. Only use Option 2 when you are asked to do so by the Phoenix Contact support.
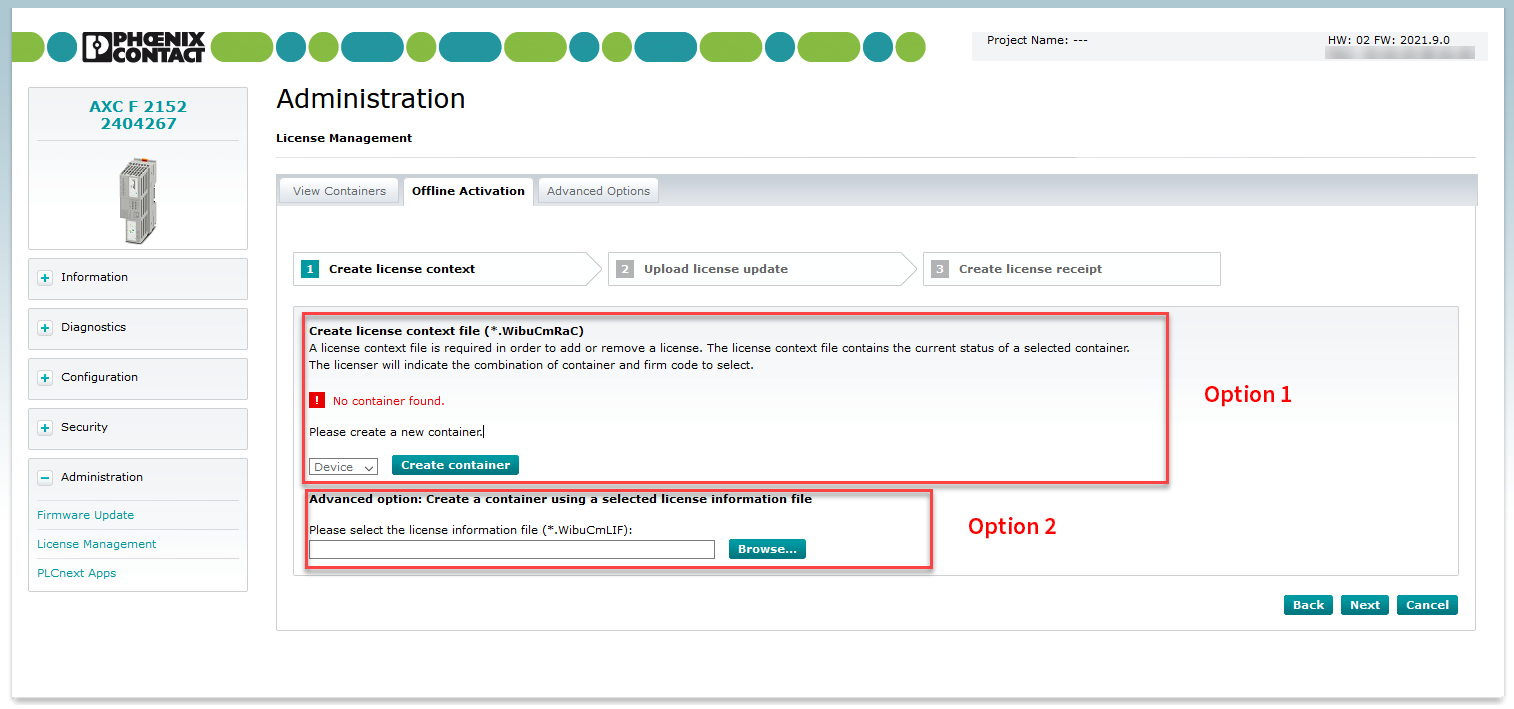
Option1
If no container was found, create one directly via the standard procedure Option 1.
- Select from the drop-down menu whether you want to create a license container for the PLCnext device or the SD card (available from 2021.9).
- Click on .
Option2
Option 2 is only needed when you are asked by the licenser to import a specific *.WibuCmLIF file.
A *.WibuCmRaC license context file will be created.
- Download the license context file and save it on your PC.
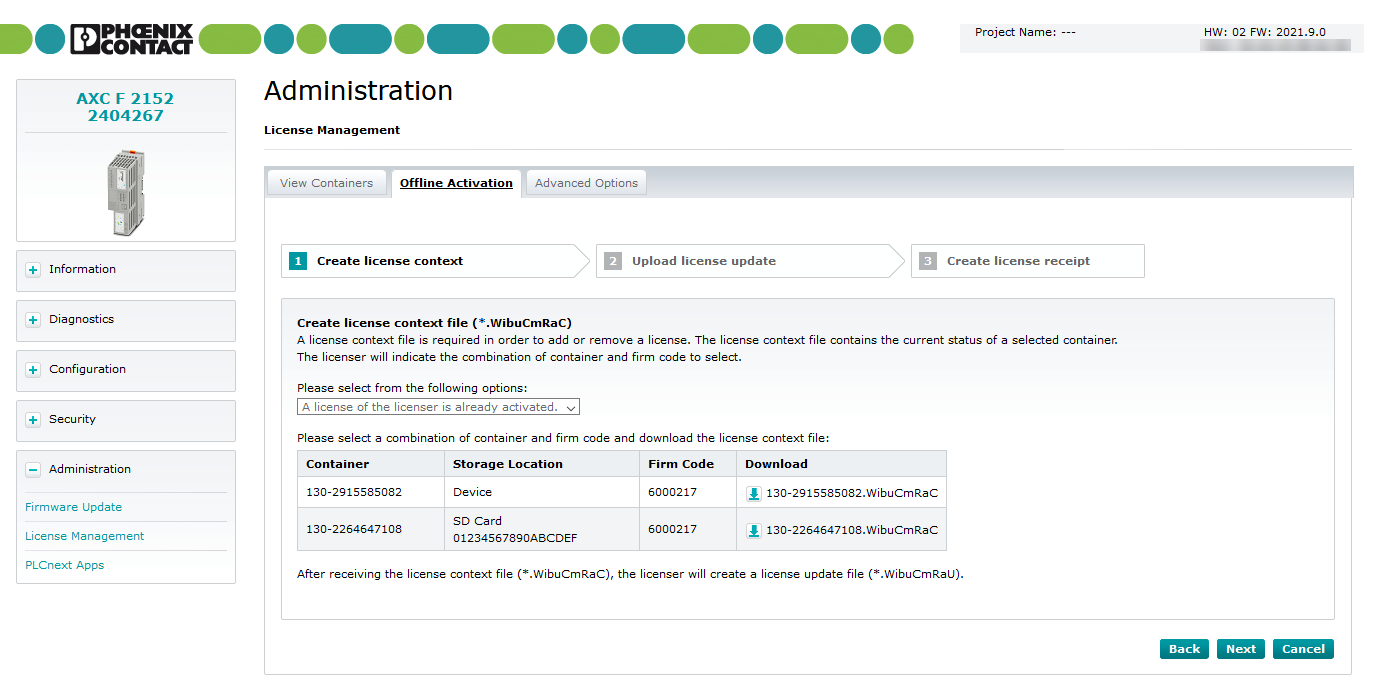
- Switch to the PLCnext Store
- Upload the *.WibuCmRaC license context file in the PLCnext Store.
The PLCnext Store will generate a *.WibuCmRaU (license update) file based on the information from the uploaded license context file.
- Download the generated update file and save it on your PC.
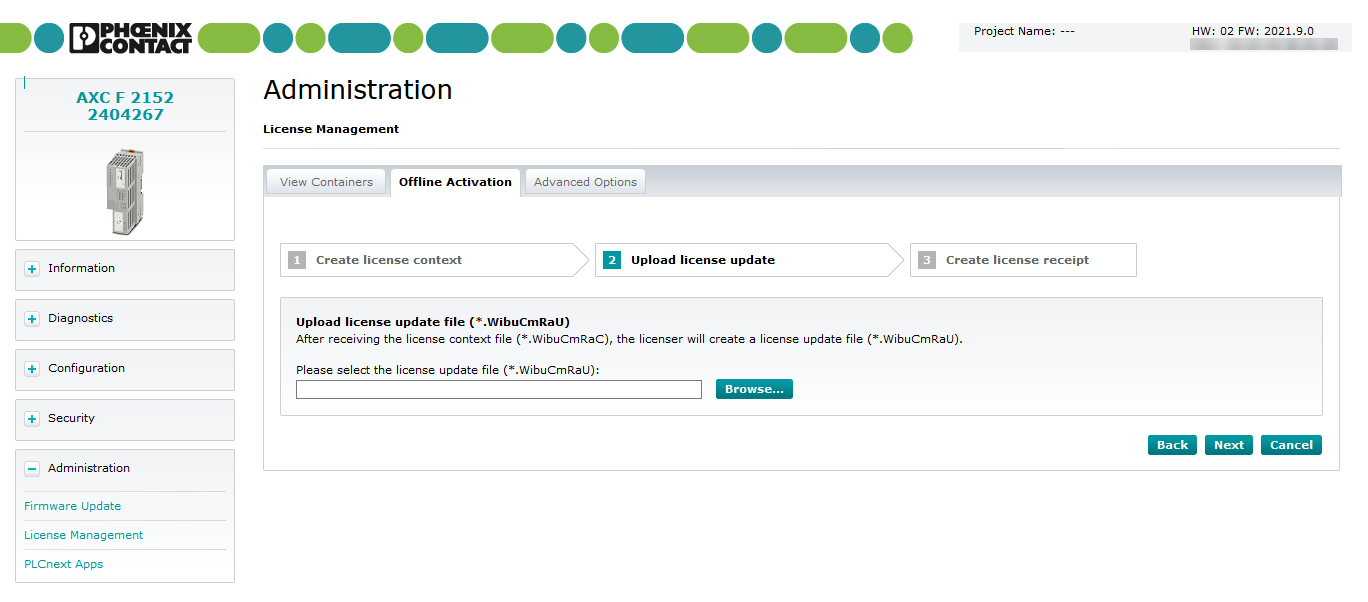
- Offline Activation step 2: Upload license update
- Upload the *.WibuCmRaU license update by clicking on the button.
- Offline Activation step 3: Create license receipt
A *.WibuCmRaR (license receipt) file is generated and provided for download. 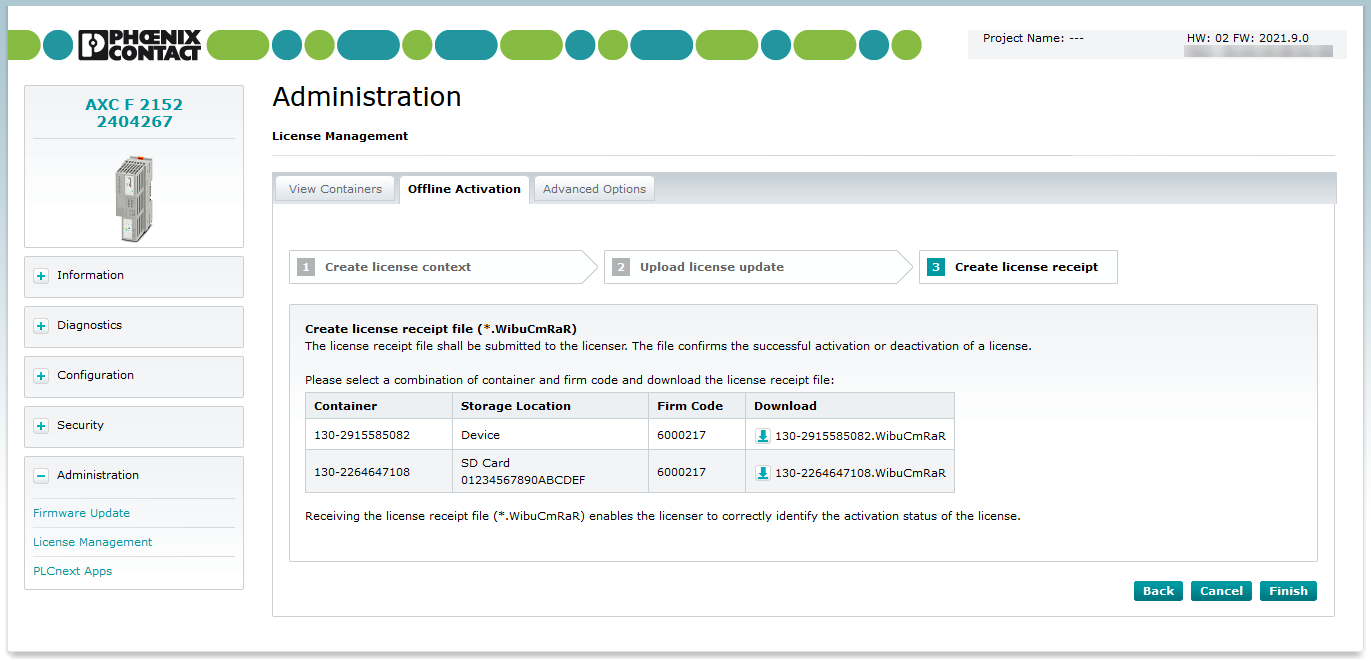
- Download the *.WibuCmRaR license receipt file from the WBM and save it on your PC.
- Switch to the PLCnext Store
- To complete the offline licensing, upload the license receipt file (*.WibuCmRaR) in the PLCnext Store.
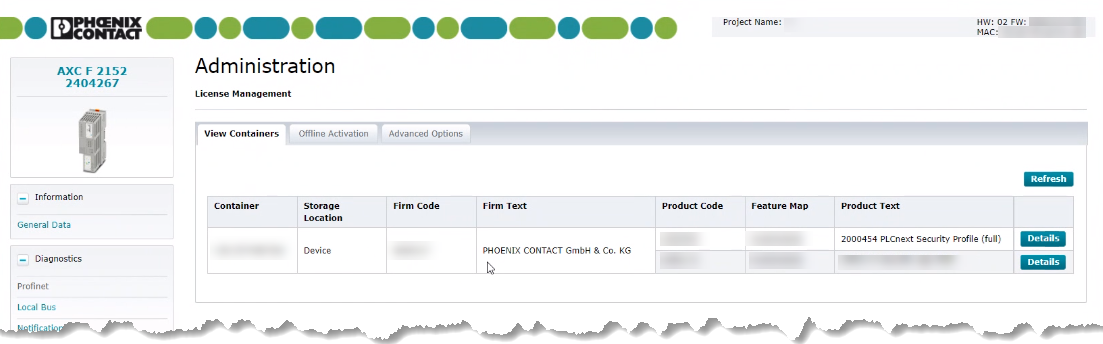
If activating the license was successful, it is listed on the View Containers tab on the License Management page:
After activating a Security Profile, a newly generated Netload Limiter configuration contains default values with all limits disabled (depending on the controller type). These configuration should be checked and adjusted.
Note: If your PLCnext Control uses an SD card and you want to use data from that SD card on another controller, make sure that controller is also equipped with firmware 2022.0 LTS or higher!
See also