Managing SDKs for C++ programming
A Solution Development Kit (SDK) contains all of the important toolchains and libraries required for creating a C++ program for a specific PLCnext Control type.
Compatibility:
SDKs are specific not only to devices but also to firmware releases and to the operating system on the computer you're using for programming. So downloading, installing and uninstalling SDKs might be a frequent task when programming.
Where to get the tool:
PLCnext Technology SDKs are separate installation packages for each device, firmware release and operating system (Windows®/Linux®).
- Find an installation package free-of-charge in the download area of the product page for each PLCnext Control at phoenixcontact.com/products.
- For a version overview and direct links to the respective product pages, see the Tools topic in this Info Center.
SDKs can be managed by means of
- the PLCnext CLI out of the PLCnext Technology Toolchain
- the Visual Studio® extension
- the Eclipse® add-in
Those former SDK installation packages are still available at each product page, just in case you need to stick to a specific firmware release on your PLCnext Control device for reasons.
Managing SDKs by means of the PLCnext CLI
Obtaining an SDK
- Move the downloaded SDK file to the directory for further use:
- On a Windows® development machine, a .tar.xz.zip file is provided; unpack the .zip file for the next step.
- On a Linux® development machine, an .sh file is provided that can be used directly for the next step.
Tip: To easily identify an SDK it is recommended organizing the SDKs for different devices and firmware releases in a set of nested directories like /target name/firmware release/file on your computer. - Install the SDK on the console use the following command:
plcncli.exe install sdk –d [Installation path] –p [Path to archive file]
E.g.:plcncli.exe install sdk -d C:\CLI\SDKs\AXCF2152\2019_0\ -p C:\CLI\pxc-glibc-x86_64-axcf2152-image-mingw-cortexa9t2hf-neon-toolchain-2019.0.tar.xz- The
-doption sets the installation path which needs to be empty or non-existent. - The
-poption sets the path to the SDK archive file. On Windows®, a .tar.xz file is expected; on Linux® an .sh file is expected.
- The
Introducing an SDK
Using the PLCnext CLI for SDK installation automatically makes the installation known to the PLCnext CLI.
- To introduce already unpacked SDKs to the CLI, enter the following command:
plcncli.exe set setting –a SdkPaths [Path to SDK]
E.g.:plcncli.exe set setting -a SdkPaths C:\CLI\SDKs\AXCF2152\2019_0\ - To receive a list of all available settings and the set values, enter the following command:
plcncli.exe get setting –a
Getting a list of installed SDKs
- Use the following command to get information about all installed SDKs:
plcncli get targets - Use the following command to get all information about installed SDKs including the path to each SDK:
plcncli get sdks
Adding or removing a project target
- Use the following command to add or remove a project target:
plcncli set target - Add the following mandatory options to the command:
-n→ name of a target-a→ add a target or
-r→ remove a target
- Add the following option to the command to specify the version to add/remove (if the target name is not exclusive):
-v→ version of target - Add the following option to the command to set the project path (if the current directory is the targeted project, this is optional):
-p→ project path for installation
Getting a list of all SDKs set for a project
- Use the following command to get all project information including the project targets:
plcncli get project-information - The following command returns all information regarding the SDKs set for a project:
plcncli get project-sdks
Uninstalling an SDK
- To uninstall an SDK, enter the following command:
plcncli.exe set setting -r SdkPaths [Path to SDK]
E.g.:
↪ The uninstalled SDK is removed from the PLCnext CLI, but will be retained in the folder system.plcncli.exe set setting -r SdkPaths C:\CLI\SDKs\AXCF2152\2019_0\
Managing SDKs by means of Visual Studio®
- To open the SDK management from the PLCnext Technology Toolchain tools, go to Tools → Options.
- Search for PLCnext Technology and open the SDKs submenu.

↪ You get a list of paths of all installed SDKs.
Installing an SDK from an archive file
The Options dialog box provides two different buttons:
- Add... is used for adding an SDK again to the Visual Studio® IDE that has previously been installed and is unpacked already.
- Install... is used directly with the downloaded archive file.
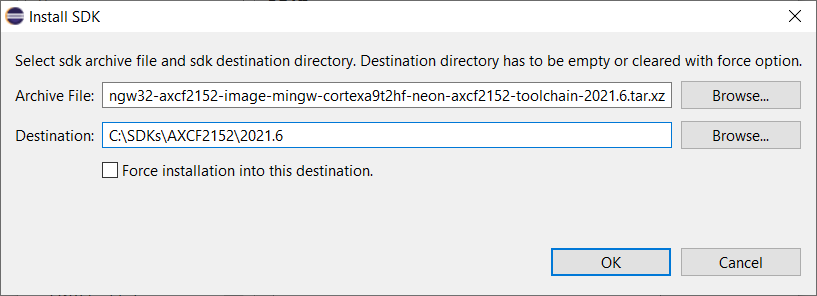
Installing an SDK from an archive file
- To install an SDK, press Install....
- Browse... to the folder containing the archive file.
- Browse... to the destination path for the installation.
- If you want to clear the original folder content so it's empty before installation, check ☑ Force installation into this destination.
- Click OK to apply the changes.
↪ The newly added SDK will appear in blue letters in the Options dialog box.
Removing an SDK
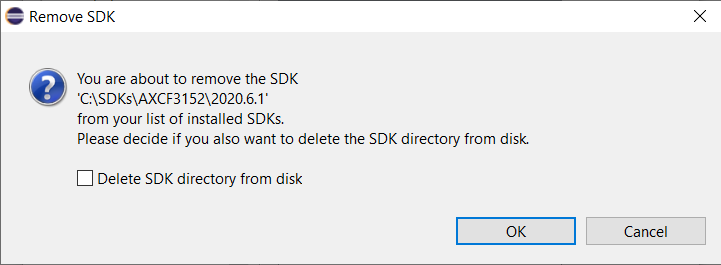
- To remove an installed SDK, select the dedicated SDK from the list and click Remove.
↪ The entry in the list will appear in gray letters. - Click OK to apply the change or click Cancel to revert all changes.
↪ A pop-up dialog asks you for confirmation.
☑ Delete SDK directory from disk removes the unpacked data if you won't need that SDK any more.
Adding, changing or removing a project target
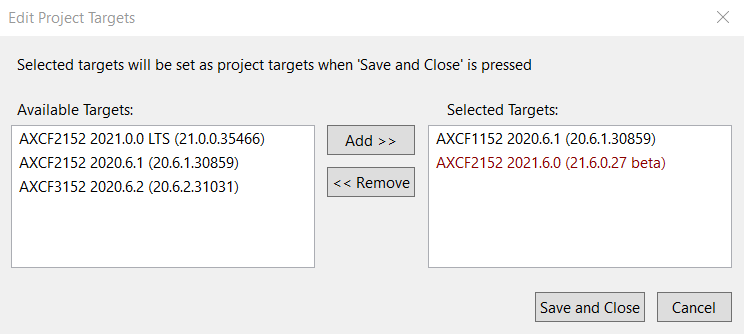
- To change the project targets, right click on your project in the Solution Explorer and select PLCnext Technology → Set Targets.

↪ The Edit Project Targets dialog pops up.- The Available Targets list on the left window side shows all installed SDKs.
- The Selected Targets list on the right window side shows all targets added to the project.
- Add new targets by selecting an available target on the left and move it to the right via Add >>.
- Remove targets by selecting an entry on the right and move it to the left side via << Remove.
- Save and Close applies the setting.
↪ The targets with a red-letter entry do not have an SDK installed on your computer any more, e.g.:
Managing SDKs by means of Eclipse®
- In Eclipse®, go to Window → Preferences, search for PLCnext and open the SDKs submenu.
↪ In the Preferences dialog box, a list of paths to all installed SDKs is displayed.
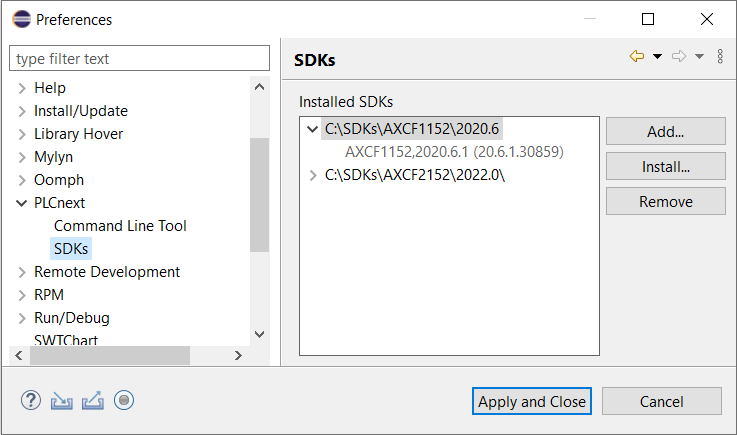 Tip: To easily identify an SDK it is recommended organizing the SDKs for different devices and firmware releases in a set of nested directories like target name/firmware release on your computer (also visible in the above screenshot).
Adding an SDK
The Preferences dialog box provides two different buttons:
- Add... is used for adding an SDK again to the Eclipse® IDE that has previously been installed and is unpacked already.
- Install... is used directly with the downloaded archive file.
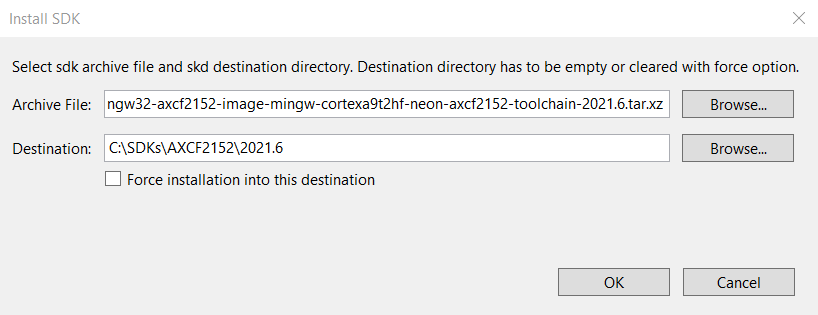
Installing an SDK from an archive file
- To install an SDK, press Install....
- Browse... to the folder containing the archive file.
- Browse... to the destination path for the installation.
Note: ☑ Forcing the installation into a destination clears the original folder content to be empty before installation. - Click OK to apply the changes.
↪ The newly added SDK will appear in blue letters in the Preferences dialog box.
Removing an SDK
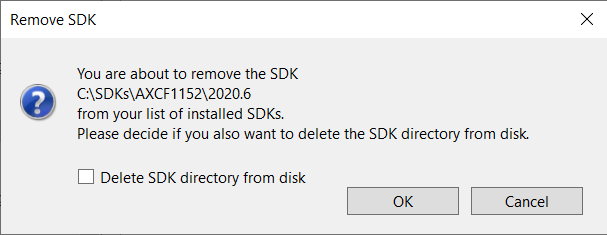
- To remove an installed SDK, select the dedicated SDK from the list and click Remove.
↪ The entry in the list will appear in gray letters. - Click OK to apply the change or click Cancel to revert all changes.
↪ A popup will ask you for confirmation.
- If you won't need that SDK any more, check the ☑ Delete SDK directory from disk to remove the unpacked data.
Adding, changing, or removing a project target
- To change the project targets, go to Project → Properties, search for PLCnext Targets.
- The Available Targets list on the left window side shows all installed SDKs.
- The Selected Targets list on the right window side shows all targets added to the project.
- Add new targets by selecting an available target on the left and move it to the right via Add.
- Remove targets by selecting an entry on the right and move it to the left side via Remove.
- Apply and Close applies the setting and Cancel reverts all changes.
↪ The targets with a red-letter entry do not have an SDK installed on your computer any more, e.g.:

See Also