Working with Eclipse®
Valid from toolchain 2021.6
(for former releases see Creating a C++ project with Eclipse)
This section describes the general approach to C++ programming on PLCnext Technology with Eclipse® IDE.
Prerequisites
- Have a rough understanding of C++ programming in PLCnext Technology
- Know the differences between PLCnext ACF and PLM project types as well as Consumable Libraries
- Check if the Required installations for Eclipse® are done.
- Have at least one SDK for a PLCnext Controlinstalled.
Creating a C++ project from a PLCnext template
- In Eclipse®, open the → → menu.

The window opens.
- Select the wizard from the selection list and confirm your selection with .
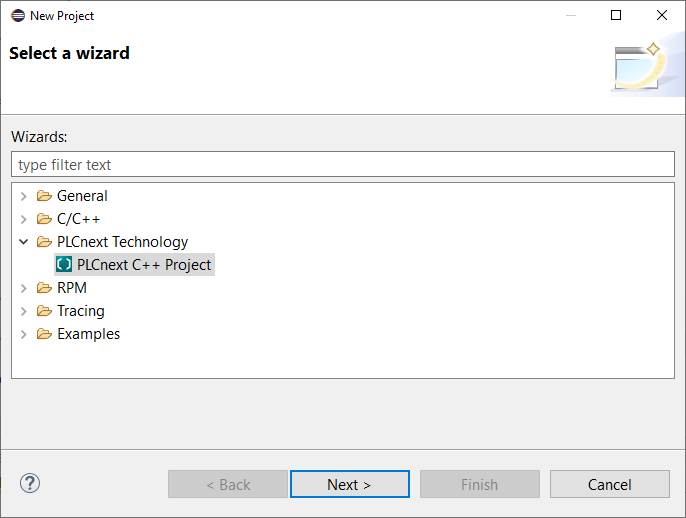
The C++ Project window opens.
- Enter a project name in the input field.
- For this example select PLCnext C++ Project; find more information on the different project types at Structure of a C++ program.
- In the area, select the entry and confirm with .

- Enter a name for the program and component in the corresponding input fields
Note: Observe the Naming conventions.

- Select the controller and firmware version for the project.

Note: If several SDKs are installed on your computer, you can select multiple targets and firmware versions to be supported by the project. The PLCnext CLI will build your project for all of them automatically and put them into a single PLCnext Engineer library. - Finish the wizard and start creating the program.
Changing the settings later
You can change the above described settings after the project has been created:
- Open the Project → menu.
- Select the PLCnext Targets option.
- Remove controllers or add new controllers and their firmware version.
- Click the Finish button.
Creating a C++ program
To create a C++ program which can be imported as a library into PLCnext Engineer, you must first prepare a new project in accordance with the description above.
The new project has a defined structure in which the C++ program is created, as shown in this example:
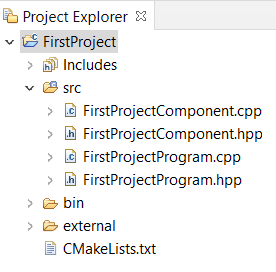
Note: The Includes for the selected targets are sorted by lowest build number first, and then regarding alphabetical order. This only affects IntelliSense to provide the smallest common feature set of all setup project targets.
To create a program, proceed as follows:
- Open the *.cpp source file.
- Program the code to be executed during each ESM task cycle in the
Execute()function (search for this comment://TODO implement program).
↪ After instantiation of a program, the assigned ESM task calls theExecute()function of the program instance in each cycle.
For additional information on programming in C++, please refer to the other C++ topics on this platform. Example projects and their associated documentation can be downloaded at github.com/PLCnext/CppExamples.
Adding or removing components and programs
Here's how to add or remove components or programs properly in a C++ project for PLCnext Technology when working with Visual Studio®.
Adding a component
- Right click on the project.
- Select New → PLCnext C++ Component.

- Give the component a name. The namespace is by default the project namespace.
- Assign the component to a project and click Finish.

Adding a program
- Right click on the project.
- Select New → PLCnext C++ Program.
- Give the program a name. The namespace is by default the project namespace.
- Assign the program to a project and select a parent component.
- Click Finish and you will get the program source and header file.

Removing a component
Removing a C++ component from your project requires three steps exactly in this order:
- Deleting the component itself
- Reassigning all programs of the deleted component
- Deleting all intermediate files of the deleted component
Now go ahead:
- Delete the corresponding source and header file of your component.

- Delete all programs assigned to this component or reassign them to another existing component.
To reassign a program, open the header file of the program and change the references to the component that owns this program. Use the Find/Replace function of Eclipse and search and replace all references by the new component name.

- Remove all intermediate files from previous builds.
For this simply right click on your project and select Clean Project.

Removing a program
- To remove a program simply delete the corresponding source and header file.
- Select the two files, right click on them and choose delete in the menu.

Compiling the project
Prerequisites
Note: We recommend to make the following setting so that your files are saved automatically before you execute the option:
- In Eclipse®, open the → menu.
- Select → → .
- Enable the checkbox.
- Make this setting separately for each workspace.
Procedure
- Switch to the to compile the project.
- Right-click to open the context menu for the project folder
(in the example: FirstProject1). - In the context menu, click on the Build Project option (Screenshot belowshow that) or click on the
 button in the tool bar (Screenshot belowshow that)
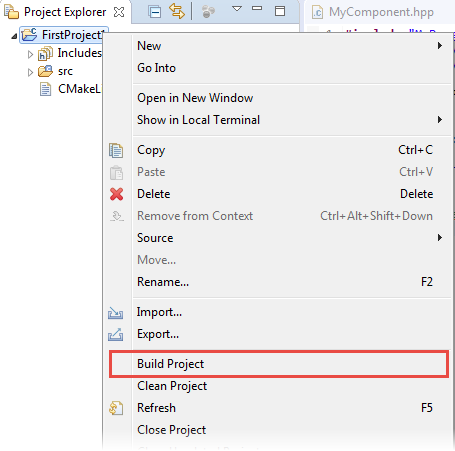

Successful compilation of the project or possible error messages are displayed on the tab.

Note: Usually, you receive a warning: offsetof within non-standard-layout type for every defined port, e.g.:
[cmake]: /home/user/Workspace/Counters/intermediate/code/Counters Library.meta.cpp:22:47:
warning: offsetof within non-standard-layout type ‘Counters::CppRetain’ is undefined [-Winvalid-offsetof]
To suppress these warnings, add the following line to your project's CMakeLists.txt and replace NameOfYourLibrary with the actual name of your library:
target_compile_options(NameOfYourLibrary PRIVATE $<$<CXX_COMPILER_ID:GNU>:-Wno-invalid-offsetof>)
If compilation was successful, a shared object (*.so) file for each target is generated. Otherwise, refer to the error and warning messages for remedy.
Using a C++ program with PLCnext Engineer
To be able to use your C++ program in PLCnext Engineer, you need it compiled into a*.pcwlx library for use with PLCnext Engineer . The LibraryBuilder (which is part of the C++ toolchain installed by PLCnext CLI) automatically generates the library within the process of compilation. The file is located in the project folder, e.g. C:/Users/<username>/workspace/FirstProject/Bin.
- Import the library into your PLCnext Engineer project.
- Assign the C++ program to a task.