Importing a library into PLCnext Engineer
Prerequisites
- Download your copy of the PLCnext Engineer from the Phoenix Contact website
- Learn the PLCnext Engineer Basics in this interactive online training
- Find additional information on PLCnext Engineer in the Online Help function, and the Quick Start Guide.
Concept
Once you have generated a *.pcwlx library from a C++ library, a C# library, or Simulink®, then you need to import this library into the PLCnext Engineer software for implementing the code into an IEC program.
In PLCnext Engineer, imported libraries are treated as an IEC 61131‑3 program or as a function or function block, and are processed in tasks.
How to import a library into PLCnext Engineer
- Adding a library
- Open your PLCnext Engineer project or create a new project from template.
- In the COMPONENTS area, open the Libraries branch.
- Right-click the Libraries folder to open the Add User Library context menu.
Show screenshotShow screenshot
- In the dialog that opens, select the desired *.pcwlx library and click Open.
↪ The function/function block or component/program are now available in the COMPONENTS area under Libraries. The library is a part of the PLCnext Engineer project. The POUs contained therein can be used in the project, for example in the Function Block Diagram (FBD).
- Adding functions or function blocks
- Open the Main code worksheet via the COMPONENTS area.
- Open the Code program editor in the center of the workplace.
- Add the new function block by dragging it from the COMPONENTS area under Libraries to your code worksheet.
Show screenshotShow screenshot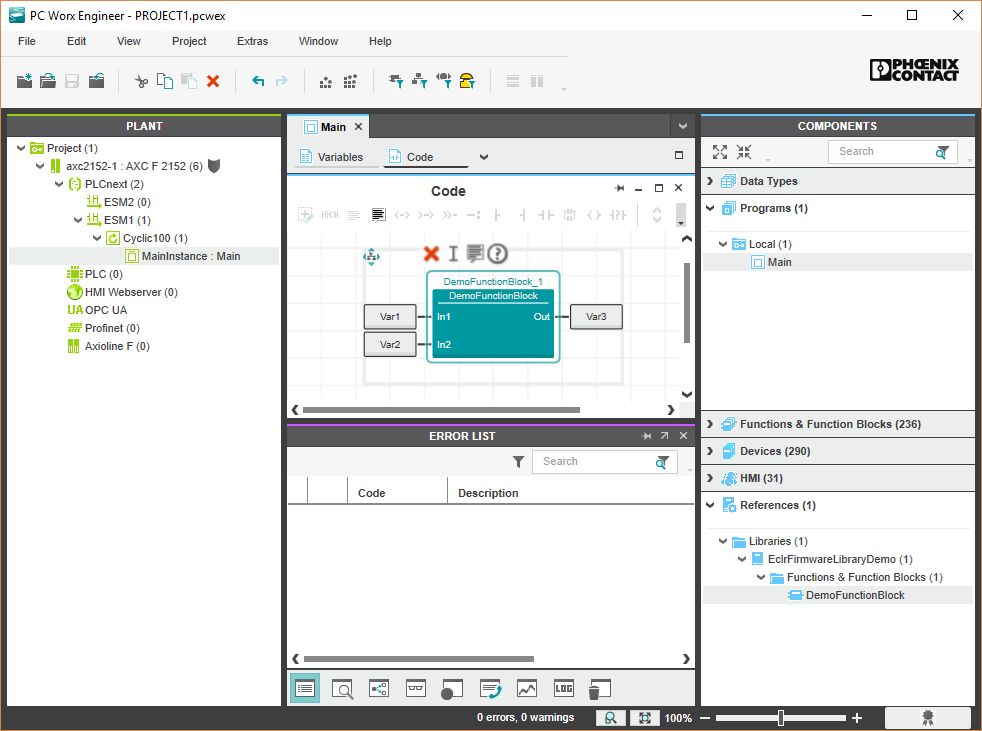
- Assign the inputs and outputs of the function block.
- Instantiating a program contained in a library
- In the PLANT area, select the PLCnext node.
- Open the Tasks and Events editor.
Show screenshotShow screenshot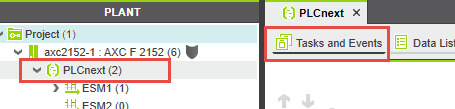
- In the editor, create a new task or open an existing task.
- To generate a program instance, drag-and-drop the program from the COMPONENTS area to the Name column below the desired task.
Show screenshotShow screenshot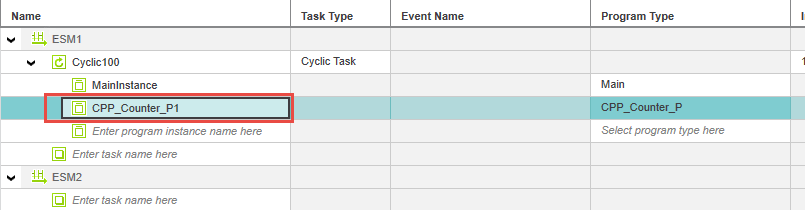
Note: The programs in the COMPONENTS area are displayed at different locations, depending on the programming language they were written in:
- Programs that were created in an IEC 61131‑3 language can be found under Programming. A distinction is made between:
- Programs from the same project are located in Local→Programs
- Programs from an IEC 61131‑3 library are located in the [Library name] folder.
- Functions and function blocks created with C# are located in the [Library name]folder.
- Programs that have been created in C++ or MATLAB®/Simulink® are located in
PLCnext Components & Program→Library name→ Component name.
Show screenshotShow screenshot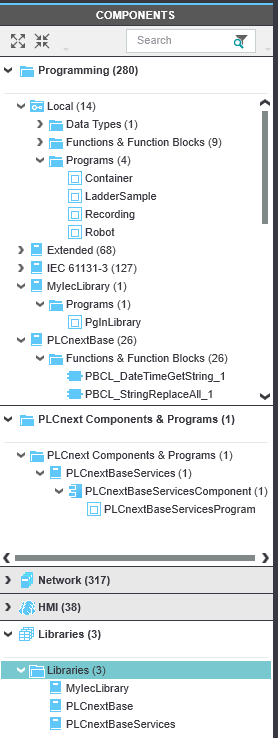
- In the PLANT area, select the PLCnext node.
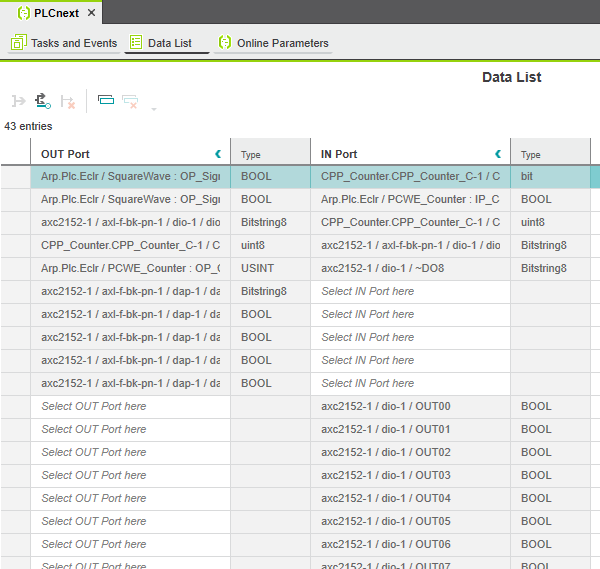
- Open the Data List editor. Here, all IN and OUT ports of the controller saved to the GDS are displayed. The IN and OUT ports of the newly instantiated program are displayed. To use the IN and OUT ports of the imported library, you must assign the IN and OUT ports of the imported libraries to the IN and OUT ports of other program instances so that consistent data exchange can take place.
Click to hide this paragraph Assigning an IN port to an OUT port
- To assign an IN port to an OUT port, click on Select IN Port here in the IN Port column.
The role picker opens. Only the IN ports that you can actually assign to the respective OUT port are displayed in the role picker.
- Select the IN port that you want to assign to the relevant OUT port in the role picker.
↪ The IN port is assigned to the OUT port. - Proceed as described for other IN ports.
Click to hide this paragraph Assigning several IN ports to an OUT port
- Assign an IN port to an OUT port as described in the previous section.
- To assign further IN ports to an OUT port, you have to duplicate the OUT port.
- Right-click on the OUT port and select the Duplicate Output Port option in the context menu.
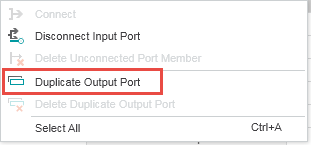
- To assign an IN port to the duplicated OUT port, proceed as described in the previous section.
Click to hide this paragraph Assigning an OUT port to an IN port
- To assign an OUT port to an IN port, click on Select OUT Port here in the OUT Port column.
↪ The role picker opens. Note: Only the OUT ports that you can actually assign to the respective IN port are displayed in the role picker.
- Select the OUT port that you want to assign to the relevant IN port in the role picker.
↪ The OUT port is assigned to the IN port. - Proceed as described for other OUT ports.
- Transfer the project to the controller
- Once you have assigned all IN and OUT ports to be used with the program, transfer the PLCnext Engineer project to the controller.
See Also
- User interface
- Creating a new project
- Configuring the IP settings
- Connecting PLCnext Engineer to the controller
- Configuring Axioline F modules
- Configuring PROFINET devices
- Configuring PROFINET controller and device
- Programming in IEC 61131-3 languages
- Instantiating a program
- Assigning process data
- Specifying the refresh interval for Axioline F I/O data
- Transferring a project to the controller
• Published/reviewed: 2026-05-11 ✿ Revision 094 •