Configuring PROFINET devices
Requirements:
- PLCnext Control
- PLCnext Engineer (always use the current release)
- PROFINET device from the Axioline F or Inline series by Phoenix Contact
Tip: For short tutorial videos of these instructions, jump to the bottom section.
Adding PROFINET Devices
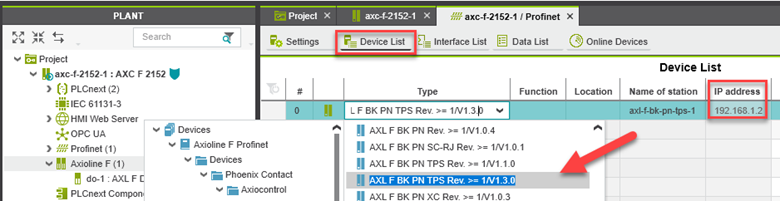
- Double-click the Profinet (x) node in the PLANT area.
↪ The / Profinet controller editor group opens. - Select the Device List editor.
- Select Select type here in the first row of the Device List editor.
↪ The Role Picker opens. Here, the elements from the COMPONENTS area are displayed which that you can actually use.
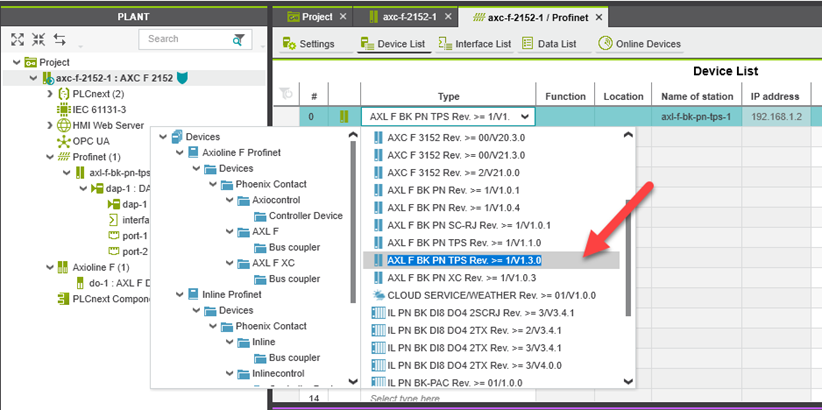
- Select the relevant PROFINET device in the Role Picker.
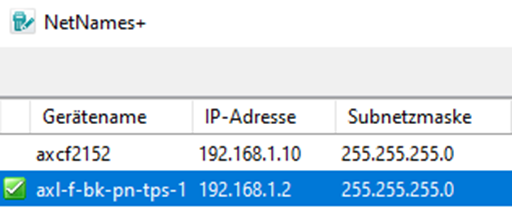
↪ The PROFINET device is automatically added and mapped under the Profinet (x) node in the PLANT area. - Check the IP address (e.g. with NetNames+ by Phoenix Contact and adjust if necessary.
- To add more PROFINET devices proceed as described above.
Assigning online devices
- When starting up the PROFINET device for the first time, choose the device under Name of Station (Online) by means of the Role Picker (see section above: "Adding a device").
After adding PROFINET devices to the project, you must assign each configured PROFINET device to the corresponding PROFINET device of your current bus configuration (Online Device editor). By performing this assignment, you are giving the PROFINET devices their IP settings and their PROFINET device names. That is critical for setting up a PROFINET communication!
To do this, proceed as follows:
- Double-click the Profinet (x) node in the PLANT area.
↪ The / Profinet controller editor group opens. - Select the Online Devices editor.
- Select the appropriate network card from the drop-down list in the header bar.
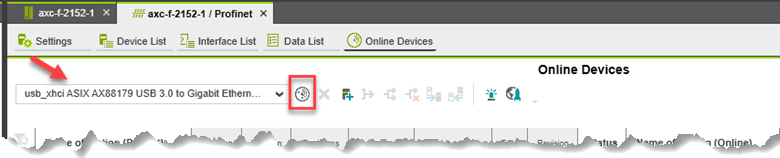
- Click on the
 button beneath that drop-down list to search the network for connected PROFINET devices.
↪ The PROFINET device receives the IP settings of the configured PROFINET device.
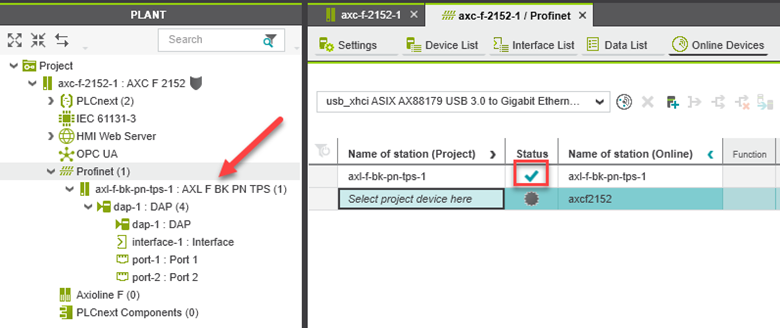
↪ You can see already configured PROFINET devices in the Name of station (Project) column on the left.
↪ You can see the PROFINET devices that have been found in the network ("online devices") in the Name of station (Online) column on the right.
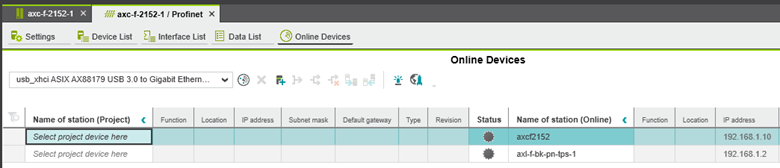
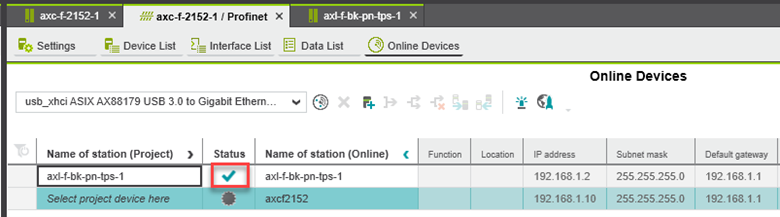
- Select the desired device.
↪ The PROFINET device in your PLCnext Engineer project configuration (Name of station (Project)) has now been assigned to an online device.
The icon in the Status column indicates that the assignment was successful.
Fetching settings from an online device
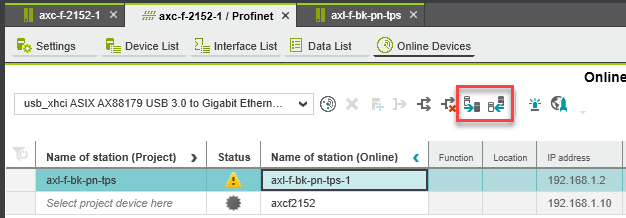
Synchronizing IP addresses
- If the IP settings in the Project and the Online device do not match, synchronize them by means of the buttons in the header bar.
You can choose the direction to keep either Project or Online settings .
Shortcut for including a device into an empty PROFINET branch
If your PROFINET node in the PLANT tree is empty then you can include an online device directly and take over its settings into the project.
To do this, proceed as follows:
- Double-click the Profinet (x) node in the PLANT area.
↪ The / Profinet controller editor group opens. - Select the Online Devices editor.
- Select the appropriate network card from the drop-down list in the header bar.
- Click on the button beneath that drop-down list to search the network for connected PROFINET devices.
↪ The PROFINET device receives the IP settings of the configured PROFINET device.
- Select the desired device, then press the
 button in the header bar:
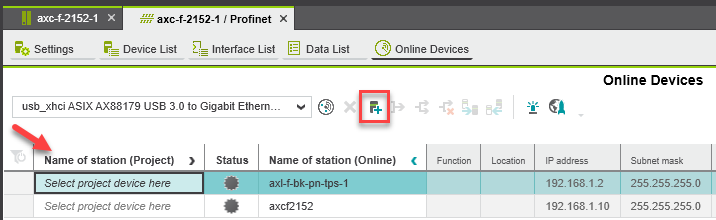
↪ The Station structure preview dialog shows the details of the selected device.
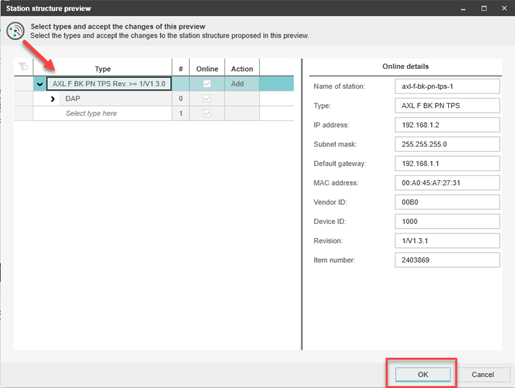
- Press OK to insert the device into the PROFINET branch in your PLANT tree.
↪ The device is now available in the Profinet (x) node with the settings from the Station structure preview dialog.
Adding I/O modules
Once you have added all the PROFINET devices from your bus configuration to the project, you can add the I/O modules connected to the PROFINET device. There are two ways to add I/O modules. You can add I/O modules manually or have them read automatically.
Adding I/O modules manually
To add I/O modules manually, proceed as follows:
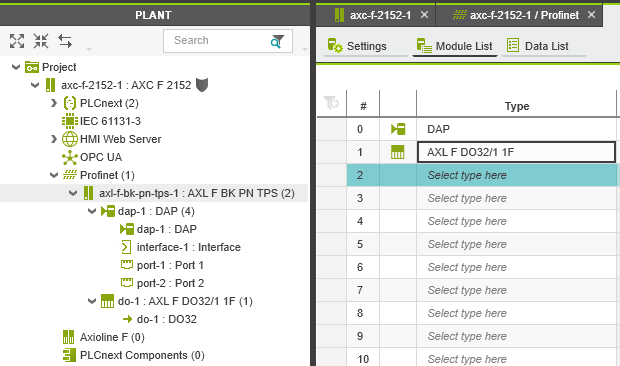
- In the PLANT area, double-click on the PROFINET device whose I/O modules you wish to add.
↪ The editor group for the selected PROFINET device opens; axf-f-bk-pn-tps in the example. - Select the Module List editor.
- Select Select type here in the first row of the Module List editor.
↪ The role picker opens. Only those elements from the COMPONENTS area that you can actually use are displayed in the role picker.

- Select the relevant I/O module in the role picker.
↪ The I/O module is added and shown in the PLANT area under the Profinet (x) node for the respective PROFINET device.
- Proceed as described above to add more I/O modules.
Reading I/O modules automatically
The following requirements must be met before you can read the I/O modules of a PROFINET device automatically:
- The controller has valid IP settings.
- The PROFINET device has valid IP settings and is connected to PLCnext Engineer (see Assigning online devices above).
To read the I/O modules of a PROFINET device automatically, proceed as follows:
- Under the Profinet node in the PLANT area, right-click on the PROFINET device whose I/O modules you want to read.
- Select Read Profinet modules from the context menu.
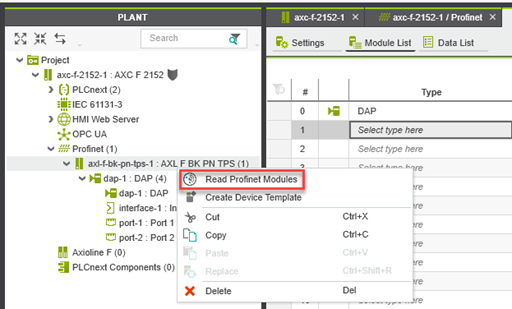
↪ The Station structure preview dialog shows.
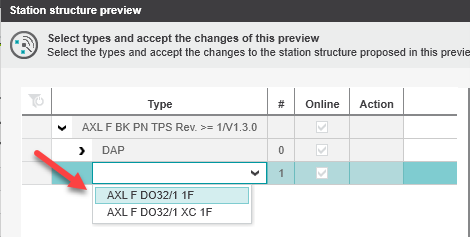
- Select the connected I/O module in the Role Picker and press OK.
↪ The I/O modules connected to the PROFINET device are now read automatically.
Tutorial videos
Configuring PROFINET devices from PLCnext Engineer (offline)
| 02m:19s | HDTV 720p | none | none |
Configuring PROFINET devices from the network (online)
| 00m:40s | HDTV 720p | none | none |
Configuring PROFINET devices and syncing settings
| 01m:25s | HDTV 720p | none | none |
Adding PROFINET I/O modules
| 00m:31s | HDTV 720p | none | none |
See also
- Diagnostics - PROFINET
- Configuring PROFINET controller and device
- User interface
- Creating a new project
- Configuring the IP settings
- Connecting PLCnext Engineer to the controller
- Configuring Axioline F modules
- Programming in IEC 61131-3 languages
- Instantiating a program
- Assigning process data
- Specifying the refresh interval for Axioline F I/O data
- Transferring a project to the controller