Web-based Management 2:
Introduction
Valid from firmware 2025.0 - for earlier firmware see the former Web-based Management
The Web-based Management is the user interface on each PLCnext Technology device. Here you can access static and dynamic controller information and modify certain controller settings. You can access the Web-based Management via one of the Ethernet interfaces of your PLCnext Technology device.
From firmware 2025.0 on, the Web‑based Management is rebuilt from the ground up and is now called "WBM 2". Some pages have been moved to other places in the left-panel navigation, and some more pages were added for a more convenient user experience when handling PLCnext Control devices.
Show a comparison of the WBM/WBM 2 navigationShow a comparison of the WBM/WBM 2 navigation

Accessing the Web‑based Management
Note: Access to the specific pages in the WBM 2 depends on user roles and their rights - see WBM 2: Accessibility for details.
Connecting to the device
To establish a connection to WBM 2 on the device, proceed as follows (assuming that the https port 443 of your host computer has not been blocked by a firewall rule):
- Connect the device to your computer via one of the device's Ethernet interfaces.
- Make sure your computer and the device are in the same network.
- Open a web browser on your computer.
- Enter the URL https://<ip address>
(for example: https://192.168.1.10 - check the default setting for your device in the respective hardware documentation).
↪ The WBM 2 start page opens.
(In case a "502 Bad gateway" error is displayed then the runtime system is still starting up. Just wait a little and refresh the browser by pressing Ctrl+R.)
- To call the WBM 2 directly in that case, enter the URL https://<IP address>/wbm.
↪ The WBM 2 start page opens.
Differences when initially accessing the Web‑based Management
For secure communication, the device's web server initially uses a self-signed certificate for HTTPS communication that is generated by the device during the boot phase. Before the controller's web server can be accessed securely, that TLS certificate needs to be authorized in your web browser. When first tryining to access the Web‑based Management, that certificate is not known to your web browser. Therefore, a security warning is displayed in the web browser even though it is not necessarily a unsecure connection.
In a strictly local network (e.g., only the device attached to that Ethernet interface on your computer) and when first accessing the device it is okay to skip this warning once. You can access the Web‑based Management by clicking the button in the browser message and then a text link in the explanation.
![]() Security note
Security note
You still need to set up a secure connection to the device eventually, and a Not secure marker in the address bar of your browser reminds you of that circumstance as long as you're accessing the Web‑based Management by skipping the browser warning.
Logging in to the Web-based Management
When accessing the WBM 2, usually a startup dialog is displayed that states the need for authorization. If the user authentication has been disabled then the WBM 2 Overview page is displayed immediately. Note: Disabling the user authentication is not possible when working with an active Security Profile or on Secure-by-default devices (e. g., AXC F 1252).
The startup dialog also provides a language selection in the upper-right corner, the button for navigating to the login page, and a switch to skip that startup dialog during further access to the WBM 2 and to go directly to the login page.
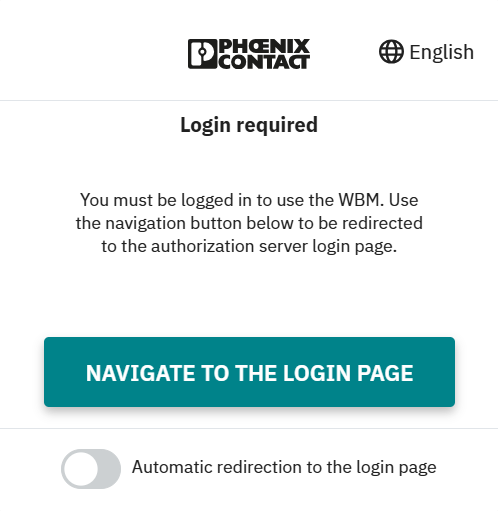
- Adjust the language settings to your needs.
- Click the button.
The login page shows the input fields for your credentials. As a default setting, the password is obfuscated while typing.
In addition, the login page shows a (customizable) system use notification.

Initial login
If you're accessing WBM 2 for the first time on a new device, log in with the default admin user credentials:
- Enter the user name
adminin the Username input field. - Enter the default password (printed onto the device's housing) in the Password input field.
- Click on the button.
↪ The Overview WBM 2 page opens.
Once you have logged in successfully with the initial password, change the password for that admin user to prevent unauthorized access (Setting a password). You'll be notified of this recommendation each time you log in to the WBM 2 until you do that:

![]() Security note
Security note
After performing a reset type 2 the device the password printed on the device's housing will be valid again, and the above notification is displayed again.
Logging in with other user roles
If user authentication for accessing the WBM 2 is enabled, you can also log in using user credentials that have been assigned by means of the User management and grant access according to specific user roles.
- Enter your user name in the Username input field.
- Enter your password in the Password input field.
- Click on the button.
↪ The Overview WBM 2 page opens.
Start page – areas and functions
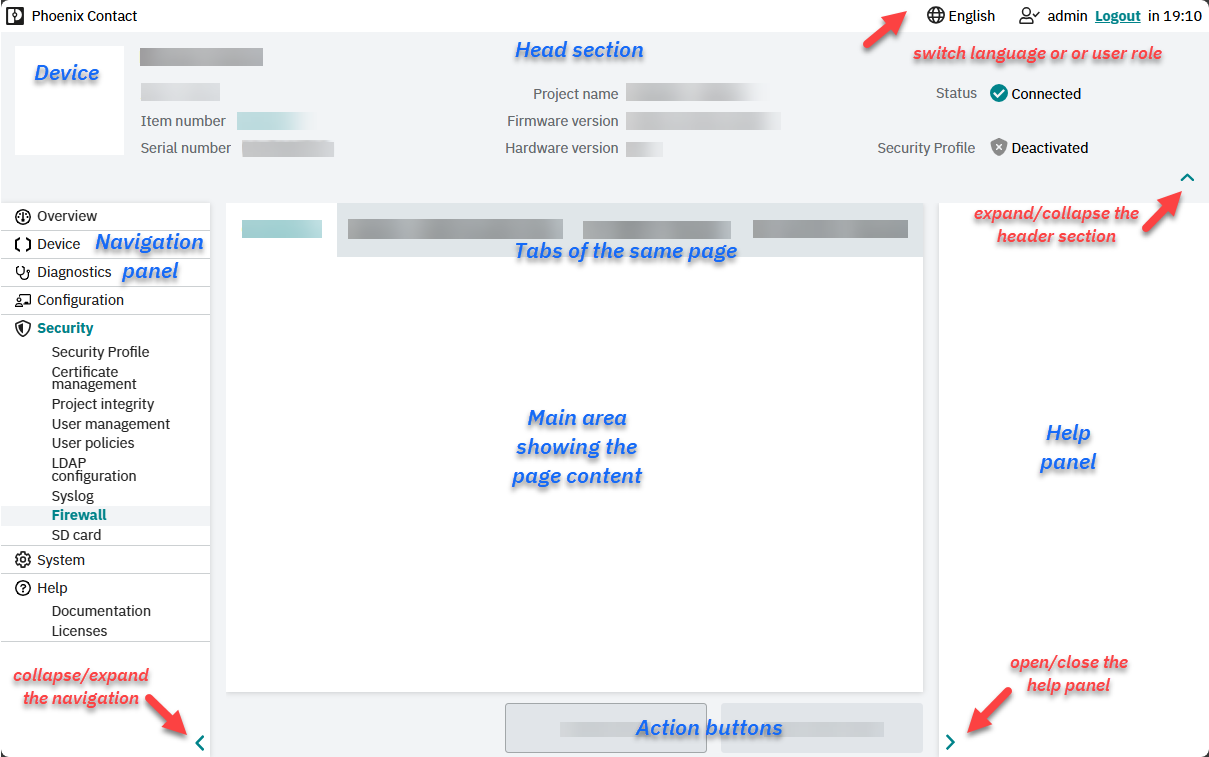
- Head section: Find details to your device and the automation project on your device. If invisible, expand the head section by clicking the
 icon at the head section's right side.
 - Security Profile activation state: The security profile is only available with devices of the first PLCnext Control product family if they are used in a security context according to IEC 62443. A Security Profile may be active or prepared to be activated; in that case the security state is displayed. With secure-by-default devices, this section is empty.
- Integrity Check outcome:
If a Security Profile is active, the boot-up Integrity Check outcome is also displayed in the head section. - Navigation panel: The WBM 2 pages that are available on your device are pooled into sections of this panel. To show a different page content, just click at the page name. On smaller displays it might be useful to collapse the navigation panel by means of the
 icon at its bottom-right edge.
 - Main area and tabs: The page content is displayed here. To switch to another tab in the page, just click at its title.
- Help panel: see Sources of help.
Sources of help in the user interface
Within the user interface
The WBM 2 pages are largely self-explanatory. Find help by these means:
- Links to other sources of information in the Help → Documentation page.
- Very short bits of information in tooltips when hovering over
 icons
icons - Short descriptions in a panel on the right edge;
if that panel is invisible, expand the left panel by clicking the icon in the lower-right corner.
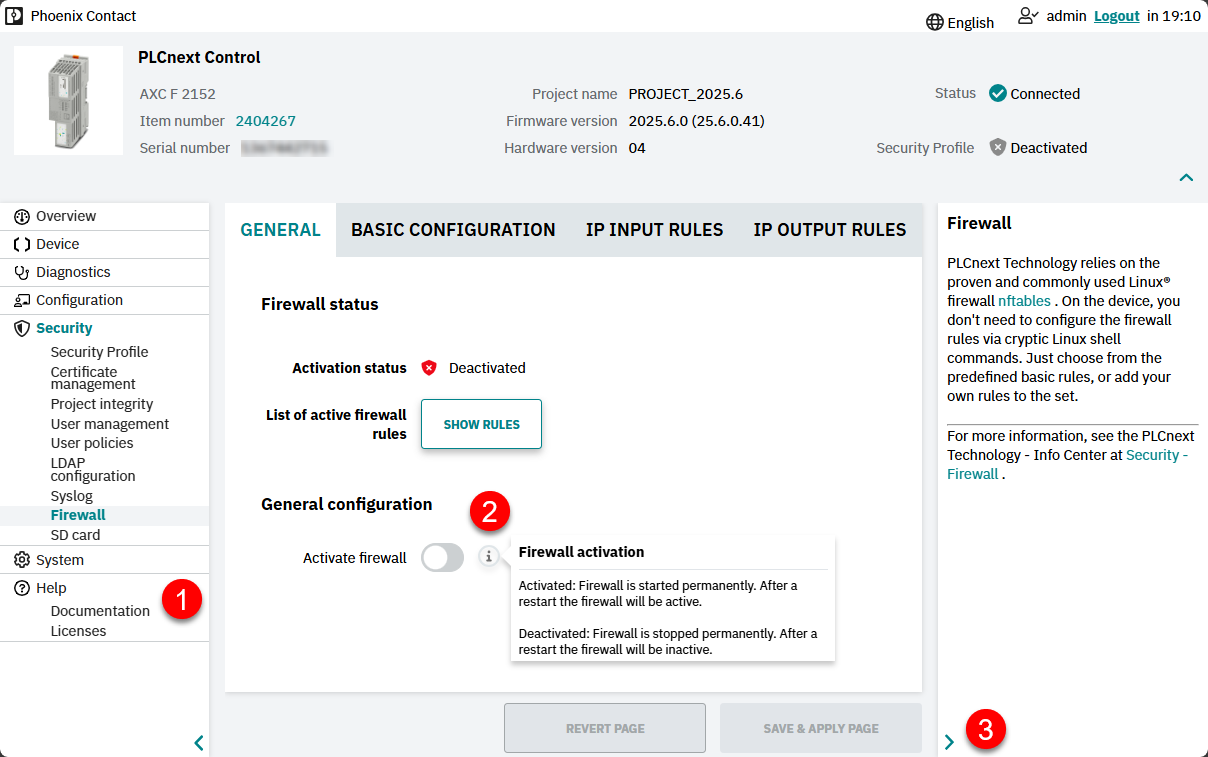
Additional descriptions to WBM 2 pages
If there's a lot to consider before setting up parameters, or if users should be aware of a complex concept behind some functions, for some functions the above means of help wouldn't suffice. In that case, this Info Center provides companion pages. See the links in the Pages column of the table showing the available WBM 2 pages.
You'll also find links to these companion pages in the right-side panel of the regarding WBM 2 pages on your device (if a panel was implemented for that page).
Available WBM 2 pages
Which WBM 2 pages are visible and accessible in your specific device depends on multiple conditions:
- the device type you're using
- the user role of the user you've taken for logging in to the WBM 2
- the system services that are currently active (check the System → System services WBM 2 page)
- a license that might be necessary for optional pages or tabs
In addition, the Web‑based Management 2 is modularly extendable by customers. Therefore, a list of WBM 2 pages can never be complete.
| WBM 2 section | Pages | Restrictions | |
| Overview | |||
| Device | General data | – | |
| Diagnostics | PROFINET | – | |
| Axioline | (AXC F x152, AXC F 1252 only) | ||
| INTERBUS | (AXC F 2152 or AXC F 3152 with AXC F XT IB extension only) | ||
| Intregrated UPS | (AXC F 3152, RFC 4072S, RFC 4072R only) | ||
| Notifications | – | ||
| ESM statistics | (from firmware 2026.0 LTS) | ||
| Configuration | Web services | – | |
| Proficloud | – | ||
| Date and Time | – | ||
| Network | – | ||
| PLCnext Store | – | ||
| SPLC | (AXC F 3152 with SPLC extension, RFC 4072S only) | ||
| Fan control | (RFC 4072S, RFC 4072R only) | ||
| RPLC | (RFC 4072R only) | ||
| Security | Security Profile | – | |
| Certificate management | – | ||
| Project integrity | – | ||
| User management | – | ||
| User policies | – | ||
| LDAP configuration | – | ||
| Syslog | – | ||
| Firewall | – | ||
| SD card | – | ||
| System | Device maintenance | – | |
| License management | – | ||
| Backup & restore | – | ||
| Update | – | ||
| App management | – | ||
| System services | – | ||
| Help | Documentation | – | |
| Licenses | – | ||