

Firmware version 2023.0 includes a long-awaited OPC UA Client component. The PLCnext Info center includes a good technical reference for this feature.
This tutorial is a step-by-step guide showing how to configure the OPC UA client in a PLCnext Control device so that it exchanges data with an OPC UA server.
You will need:
- A PLCnext Control device running firmware version 2023.0 or later to act as the OPC UA Client. If you need to upgrade the firmware on your PLCnext Control device, you can follow the procedure shown in the Info Center.
- PLCnext Engineer version 2023.3 or later.
- An OPC UA server. This article uses a second PLCnext Control device as the OPC UA server, but you can use the same PLCnext Control device as you're using to host the Client, or alternatively any third-party OPC UA server running (for example) on a Windows PC. For third-party servers, you will need to figure out how to adapt the "server" steps below for your server.
- UaExpert from Unified Automation, which is needed to get information about OPC UA Server tags that we will use in the configuration of our own OPC UA Client.
One of the key points to remember when configuring OPC UA communications is that, for security reasons, the OPC UA Client and the OPC UA Server must trust each other. Therefore, security certificates must be exchanged between the Client and Server devices. This procedure involves jumping between the Client device and the Server device, which can get a bit confusing. If you have suggestions for how to make the procedure simpler (without disabling the security checks!), please feel free to add them in the comments.
Procedure
OPC UA Server device
-
Open the Web Based Management (WBM) site by browsing to the IP address of the PLC.
-
Select the System Services item from the Configuration menu.
-
Activate the OPC UA Server service, if it is not enabled already.
-
Press the Apply and reboot button if necessary.
-
Open PLCnext Engineer.
-
Create a new PLCnext Engineer project using the template for your PLCnext Control device.
-
Set the IP address of the PLC in the PLCnext Engineer project.
-
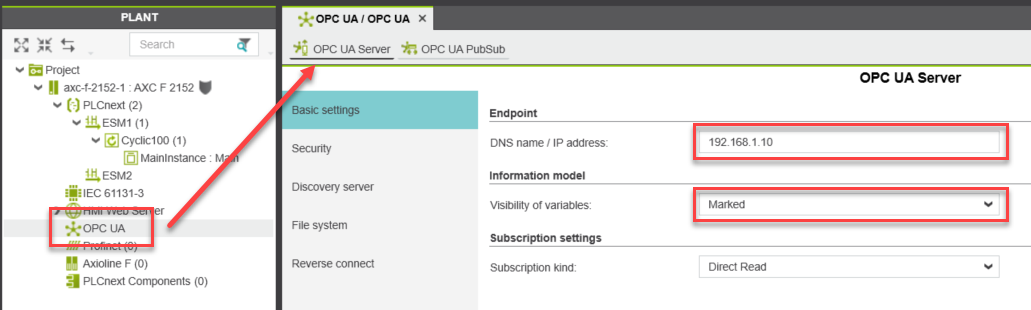
On the OPC UA Server configuration page:

-
set the DNS name / IP address to the DNS Name or the IP address of the PLC, depending on whether the OPC UA client will access the server using a DNS name or the IP address of the server. This information will be included in the OPC UA Server security certificate. Many OPC UA Clients will reject the server certificate if this information in the certificate does not match the server URL.
-
set Visibility of variables to Marked. This means that all the variables marked with the OPC attribute will be accessible through the OPC UA Server.
-
-
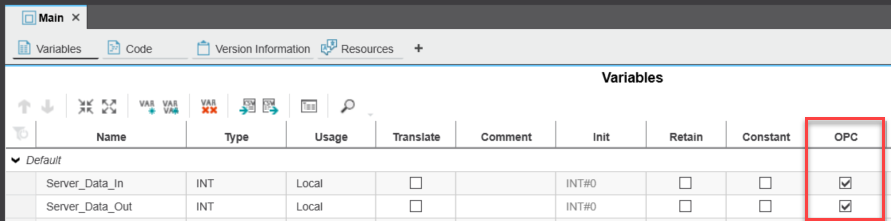
Create variables that will be exposed by the OPC UA Server. Make sure the OPC check box is ticked for those variables. In the example below, two variables have been created in the Main program.
-
Add logic to change the Output variable when a new Input value is received. In this example, the Main program executed the following code:
Server_Data_Out := Server_Data_In + 1; -
Write and start the project.
Note that PLCnext Engineer version 2025.0 and later includes a "browse" feature that can be used to create variable entries in the OPC UA Client. If that browse feature is used, then it is not necessary to use UaExpert to obtain information about server variables, and the next three steps can be skipped.
-
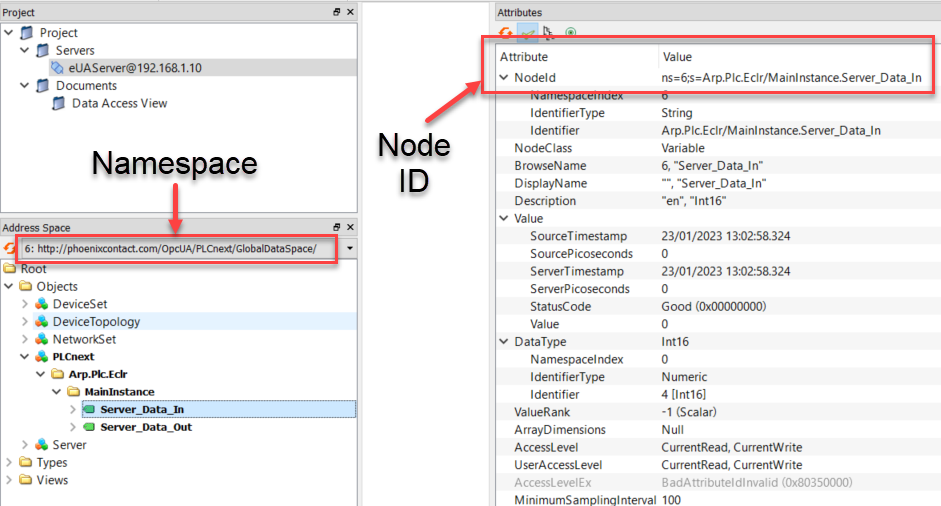
Use UaExpert to connect to the OPC UA Server using the PLC username and password. You should see a warning that the certificate is "Untrusted", but there should be no other warnings.
-
Trust the server certificate, either permantently or just for this session.
-
For each server variable, write down the name of the Node ID and the Namespace for that variable.
-
Open the WBM site for the Server PLC again.
-
Select the Certificate Authentication item from the Security menu.
-
Select the Identity Stores tab.
-
Download the Certificate from the OPC UA-self-signed [server] Identity Store. The Key Pair does not need to be downloaded.
OPC UA Client device
-
Open the Web Based Management (WBM) site by browsing to the IP address of the PLC.
-
Select the System Services item from the Configuration menu.
-
Activate the OPC UA Client service, if it is not enabled already.
-
Press the Apply and reboot button if necessary.
-
When the reboot is complete, log back in to the WBM site and select the Certificate Authentication item from the Security menu.
-
Select the Trust Stores tab.
-
Add the OPC UA-self-signed [server] certificate (downloaded earlier) to the Trust Store named OPC UA Client. Now, the OPC UA Client will trust the security certificate used by the OPC UA Server to verify its identity. This step will need to be repeated every time the Server certificate changes.
-
Select the Identity Stores tab .
-
Download the Certificate from the OPC UA Client self-signed Identity Store. The Key Pair does not need to be downloaded.
OPC UA Server device
-
Open the Web Based Management (WBM) site by browsing to the IP address of the PLC.
-
Select the Certificate Authentication item from the Security menu.
-
Select the Trust Stores tab.
-
Add the OPC UA Client self-signed certificate (downloaded earlier) to the Trust Store named OPC UA-configurable. Now, the OPC UA Server will trust the security certificate used by the OPC UA Client to verify its identity. This step will need to be repeated every time the Client certificate changes.
OPC UA Client device
-
Open PLCnext Engineer.
-
Create a new PLCnext Engineer project using the template for your PLCnext Control device. If you are using the same device for both the OPC UA Client and the OPC UA Server, then the same PLCnext Engineer project will be used.
-
Set the IP address of the PLC in the PLCnext Engineer project.
-
Only required for PLCs running firmware versions prior to 2023.6: On the OPC UA Server configuration page, set Visibility of variables to Marked. Yes, it does seems strange to require this OPC UA Server setting for the OPC UA Client. This is fixed in firmware versions 2023.6 and later.
-
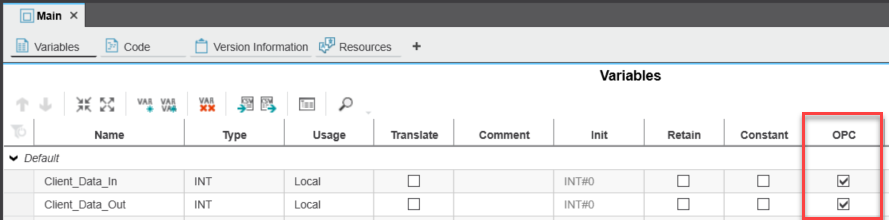
Create variables that will be connected to variables in the OPC UA Server. Only required for PLCs running firmware versions prior to 2023.6: Make sure the OPC check box is ticked for those variables (the check box is not required to be ticked for PLCs running firmware version 2023.6 or later).
In the example below, two variables have been created in the Main program.
-
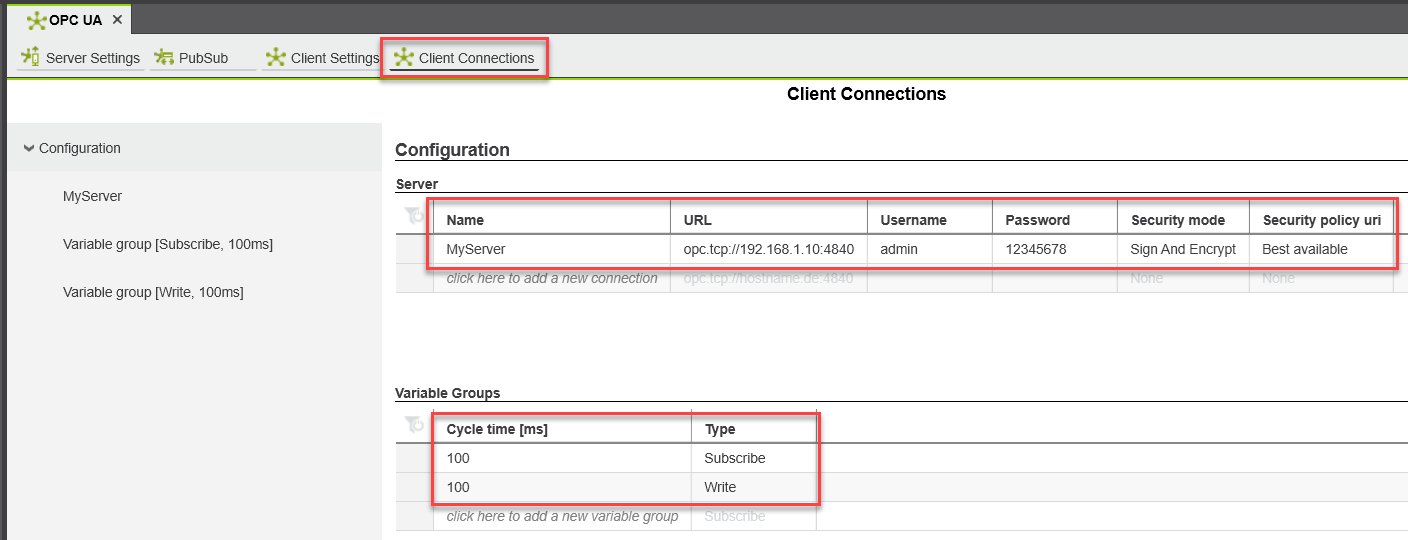
In the OPC UA Client Connections tab, add one Server and two Variable Groups, as shown below.
The server URL, username, and password should be changed to suit the OPC UA Server you are using.
-
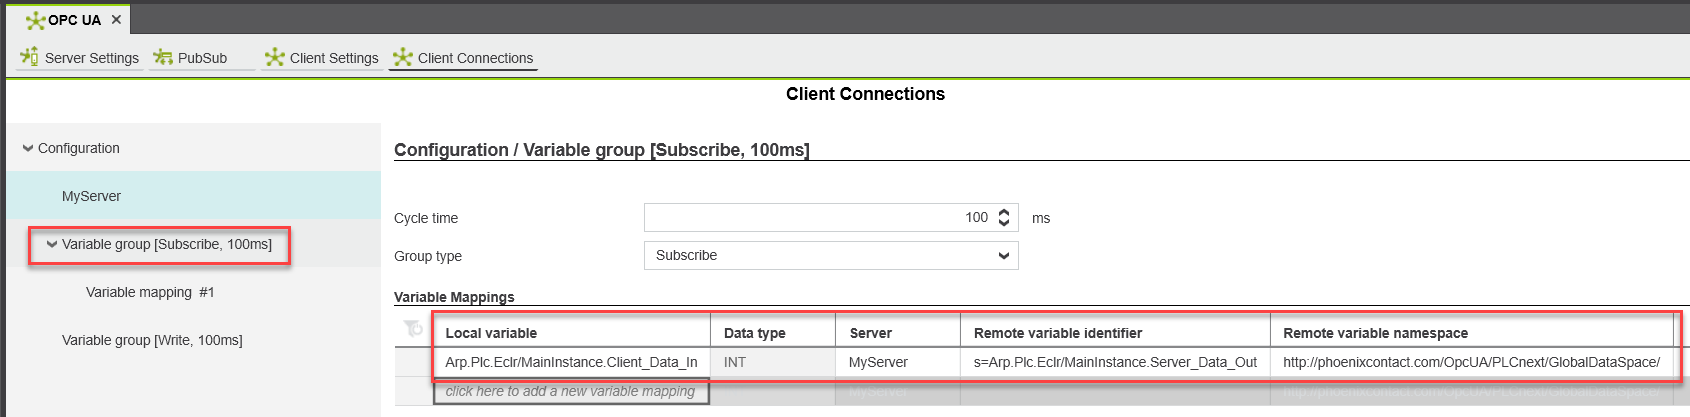
In the "Subscribe" variable group, add one variable mapping, as shown below.
This automatically transfers the value from the remote variable (on the OPC UA Server) to the local variable in the PLCnext Engineer project.
-
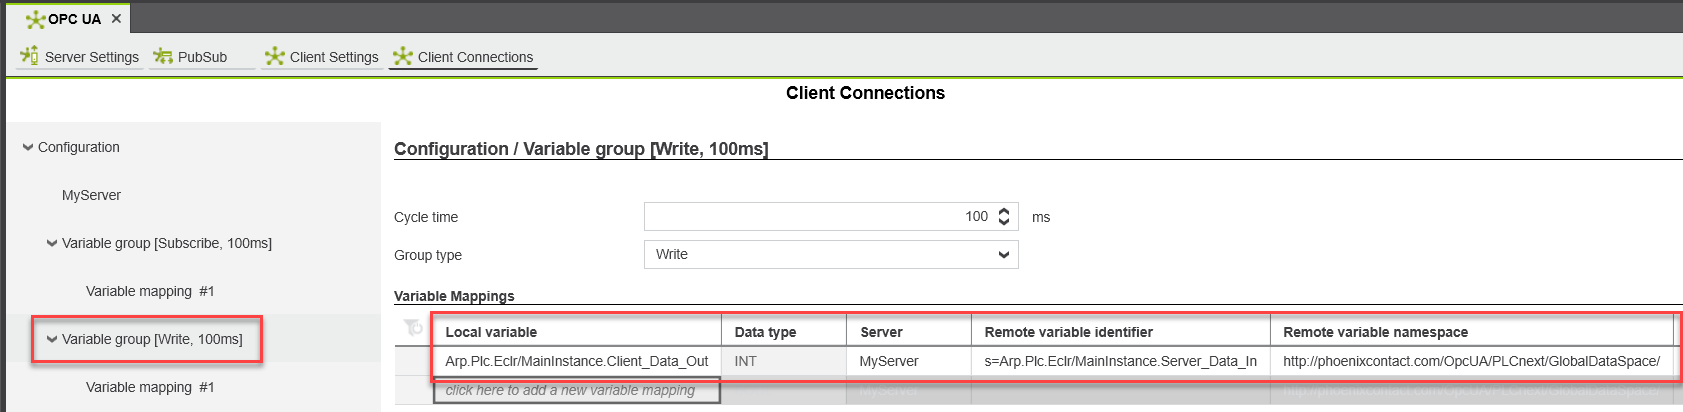
In the "Write" variable group, add one variable mapping, as shown below.
This automatically transfers the value from the local variable in the PLCnext Engineer project to the remote variable (on the OPC UA Server).
-
Write and start the PLCnext Engineer project.
-
In Debug mode, change the value of the variable
Client_Data_out. The value will be written to the variableServer_Data_Inon the OPC UA Server. That value will be incremented by the Server and written to the variableServer_Data_Out. The value of that variable will then be transferred to the variableClient_Data_Inon the Client.
It isn't working?
Please check the Troubleshooting Guide in the PLCnext Info Center (at the bottom of the page).
Frequently Asked Questions
Q: Can the client connect to an OPC UA Server using Certificate/Key authentication?
A: No, not at the moment.
Q: How does the OPC UA Client store the Server password?
A: At the moment the OPC UA Server password is stored as clear text in the client configuration file, but the PLCnext Runtime developers are working on a more secure password storage method.
Q: Can I get quality information (e.g. Status Code, Timestamp) for data read from an OPC UA Server?
A: Not at the moment, sorry.
This article was updated on 24.03.2025 to include information about the Server Browse feature that is now available in PLCnext Engineer.
Appendix: File-based configuration
The OPC UA Client configuration in PLCnext Engineer is stored on the controller in XML format. For applications that do not use PLCnext Engineer, it is possible to configure the OPC UA Client by writing the XML configuration directly on the controller.
The configuration that was prepared in this example is represented in the following XML files:
-
Any required changes to the default OPC UA Client settings are defined in the file
/opt/plcnext/projects/current/Services/OpcUA/Modules/Client/client.module.config:<?xml version="1.0" encoding="utf-8" standalone="yes"?> <OpcUAClientModuleConfigurationDocument schemaVersion="1.0" xmlns:xsi="http://www.w3.org/2001/XMLSchema-instance" xsi:schemaLocation="http://www.phoenixcontact.com/schema/opcuaclientmoduleconfig" xmlns="http://www.phoenixcontact.com/schema/opcuaclientmoduleconfig"> <Application> <CertificateStore> <SelfSignedIdentityStoreName>OPC UA Client self-signed</SelfSignedIdentityStoreName> <GivenIdentityStoreName>OPC UA Client</GivenIdentityStoreName> <TrustStoreName>OPC UA Client</TrustStoreName> </CertificateStore> <SessionSecurity> <ApplicationAuthentication>false</ApplicationAuthentication> <ApplicationUriCheck>true</ApplicationUriCheck> <CertificateHostnameCheck>true</CertificateHostnameCheck> <CertificateTimeCheck>true</CertificateTimeCheck> <CertificateIssuerTimeCheck>true</CertificateIssuerTimeCheck> <PasswordEncryptionCheck>true</PasswordEncryptionCheck> </SessionSecurity> <Timeouts> <SessionTimeout>1200000</SessionTimeout> <ConnectTimeout>5000</ConnectTimeout> <WatchdogTimeout>5000</WatchdogTimeout> <CallTimeout>10000</CallTimeout> </Timeouts> </Application> </OpcUAClientModuleConfigurationDocument> -
OPC UA Client connections are defined in the file
/opt/plcnext/projects/current/Services/OpcUA/Modules/Client/Configs/ clientconnections.xml:<?xml version="1.0" encoding="utf-8"?> <eUAClientConfigurationDocument xmlns:xsi="http://www.w3.org/2001/XMLSchema-instance" xmlns:uax="http://opcfoundation.org/UA/2008/02/Types.xsd" xmlns="http://phoenixcontact.com/OpcUA/PLCnext/UAClientConfig/Types.xsd"> <eUAClientConfiguration> <Name>ClientConnectionsConfiguration</Name> <NamespaceArray> <uax:String>http://phoenixcontact.com/OpcUA/PLCnext/GlobalDataSpace/</uax:String> </NamespaceArray> <ServerConnections> <eUAClientServerConnection> <EncodingMask>3</EncodingMask> <Endpoint> <uax:EndpointUrl>opc.tcp://192.168.1.10:4840</uax:EndpointUrl> <uax:SecurityMode>Sign_2</uax:SecurityMode> <uax:SecurityPolicyUri>http://opcfoundation.org/UA/SecurityPolicy#Basic256Sha256</uax:SecurityPolicyUri> </Endpoint> <UserTokenType>UserName_1</UserTokenType> <UserName>admin</UserName> <Password>xxxxxxxx</Password> </eUAClientServerConnection> </ServerConnections> <VariableGroups> <eUAClientVariableGroup> <GroupType>Write_1</GroupType> <CycleTime>100</CycleTime> <NodeMappings> <eUAClientNodeMapping> <LocalVariable> <uax:Identifier>ns=1;s=Arp.Plc.Eclr/MainInstance.Client_Data_Out</uax:Identifier> </LocalVariable> <RemoteVariableDescriptor> <EncodingMask>2</EncodingMask> <ServerIndex>1</ServerIndex> <NodeId> <uax:Identifier>ns=1;s=Arp.Plc.Eclr/MainInstance.Server_Data_In</uax:Identifier> </NodeId> </RemoteVariableDescriptor> </eUAClientNodeMapping> </NodeMappings> </eUAClientVariableGroup> <eUAClientVariableGroup> <GroupType>Subscribe_0</GroupType> <CycleTime>100</CycleTime> <NodeMappings> <eUAClientNodeMapping> <LocalVariable> <uax:Identifier>ns=1;s=Arp.Plc.Eclr/MainInstance.Client_Data_In</uax:Identifier> </LocalVariable> <RemoteVariableDescriptor> <EncodingMask>2</EncodingMask> <ServerIndex>1</ServerIndex> <NodeId> <uax:Identifier>ns=1;s=Arp.Plc.Eclr/MainInstance.Server_Data_Out</uax:Identifier> </NodeId> </RemoteVariableDescriptor> </eUAClientNodeMapping> </NodeMappings> </eUAClientVariableGroup> </VariableGroups> </eUAClientConfiguration> </eUAClientConfigurationDocument>This file uses the Namespace and Node ID information recorded earlier (using UaExpert) to specify which server variables the client will access.
-
In the above file, change the following to suit your application:
-
The element
uax:EndpointUrlmust include the IP address (or DNS name) of your OPC UA server. -
The
UsernameandPasswordelements must contain the credentials required for the OPC UA server.
IMPORTANT: In this example, the Node ID strings in UaExpert included the text
ns=6. In the XML file above, this has been changed tons=1, because the "namespace" parameter (ns) is an index into the list of namespaces on the local client. In this example, the Namespace name that was copied from UaExpert is the first (and only) namespace in the list of namespaces in ourclientconfig.xmlfile. -
The PLCnext Runtime must be restarted after making changes to the OPC UA Client configuration files.
Important: This post is outdated!
Some things might not work or need to be adapted.
Your PLCnext Team
Leave a Reply
You must be logged in to post a comment.