
This post explains how to connect to a KNX installation with the aid of Node-Red.
Prerequisites
- Node.js is installed (available at the plcnextstore)
- Node-RED is installed (tutorial available in the Makers Blog thanks to Martin Boers)
- OPC UA module is installed (tutorial available in the Makers Blog thanks to Martin Boers)
- KNX installation configured with ETS software
What is KNX
KNX is a manufacturer independent communication protocol designed for building automation. Together with the ETS software, every module can be programmed to work independently from one another listening to specific telegrams on the bus concerning sensors or actuators connected to it.
For more information you can always visit the KNX website.
Installing the necessary software
First, lets install the KNX module for Node-Red by executing the folowing command as “admin” user
npm install -g node-red-contrib-knx-easy
When the installation has finished, launch Node-Red and open the webpage.
If the installation went well, you should see a KNX node on the left under the tab INPUT and one under the tab OUTPUT.
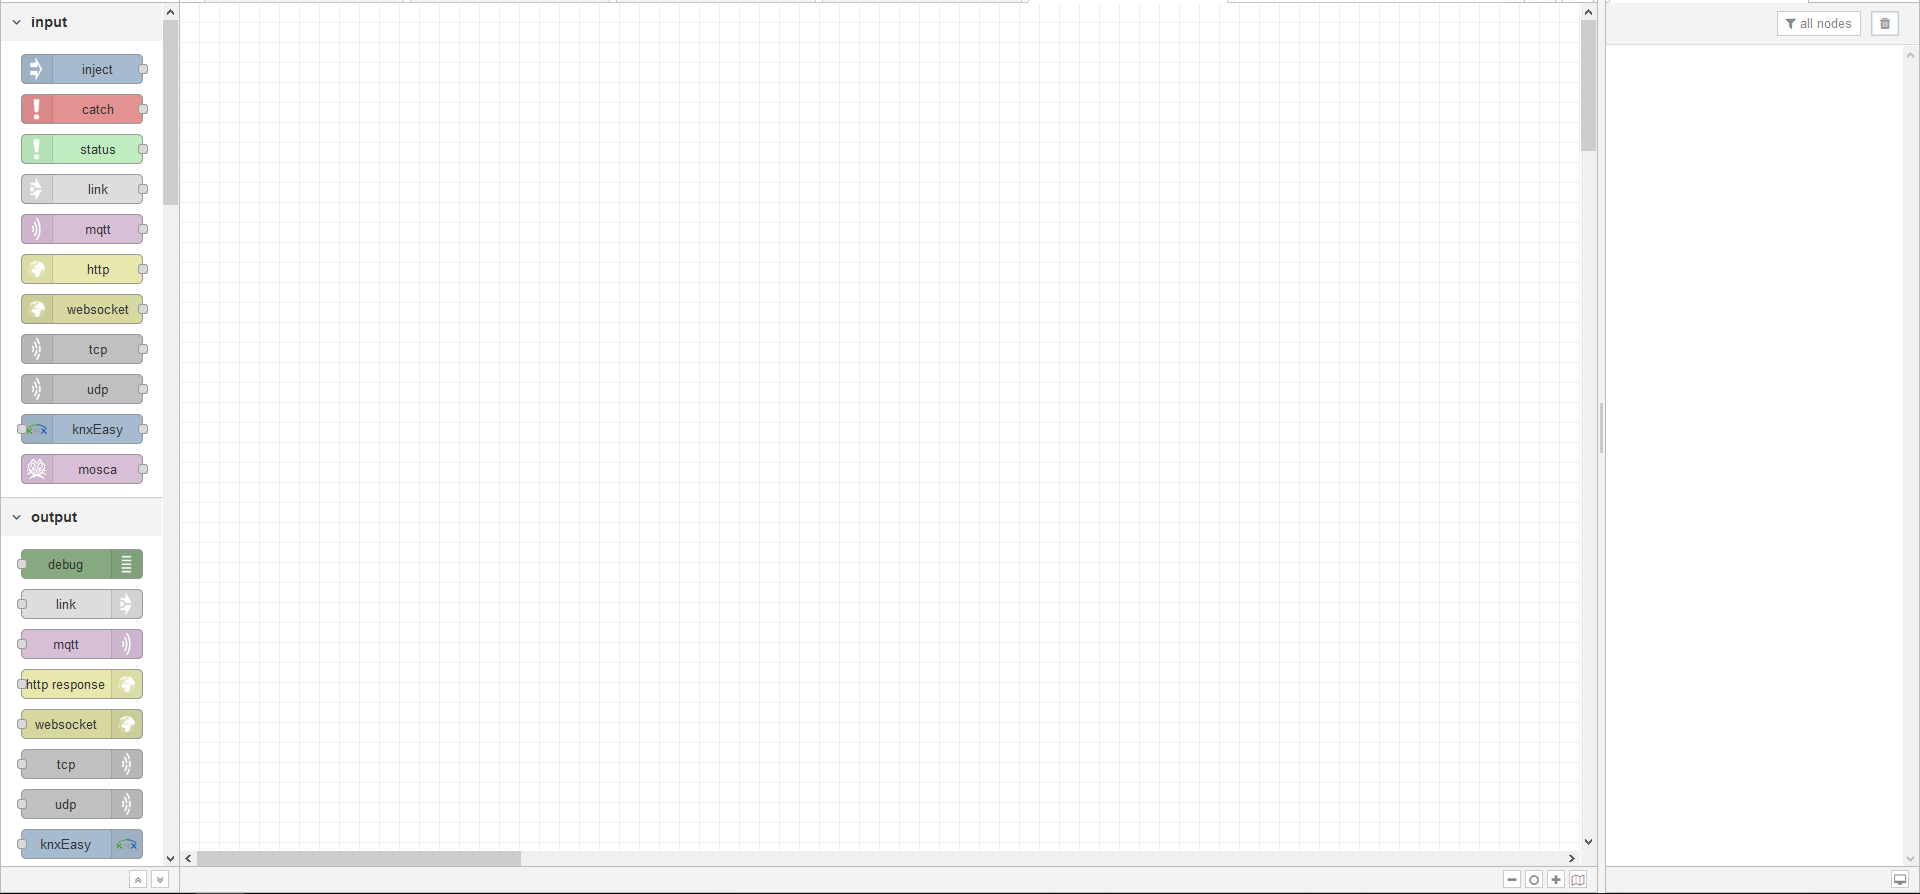
For every Group Address available on the KNX bus that you want to read you will need to add a new KNX node to your project.
Configuration
To start off, drag an input node onto your sheet and double click on it.
First, we need to configure a new gateway by clicking on the pencil as shown below
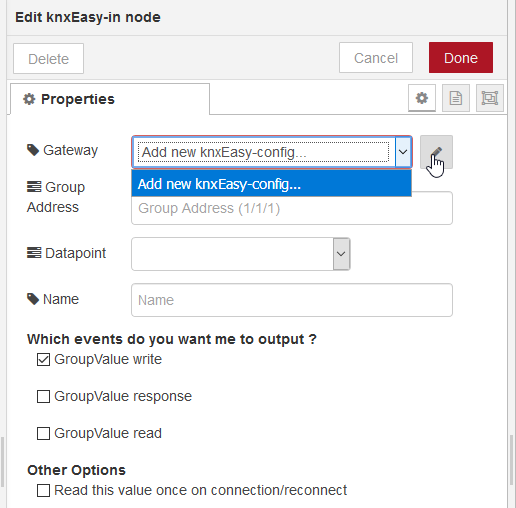
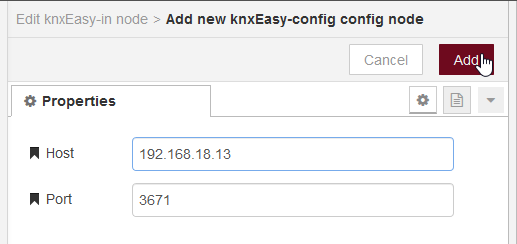
Fill in the correct IP-address and Port of your KNX IP-gateway and click on “Add”
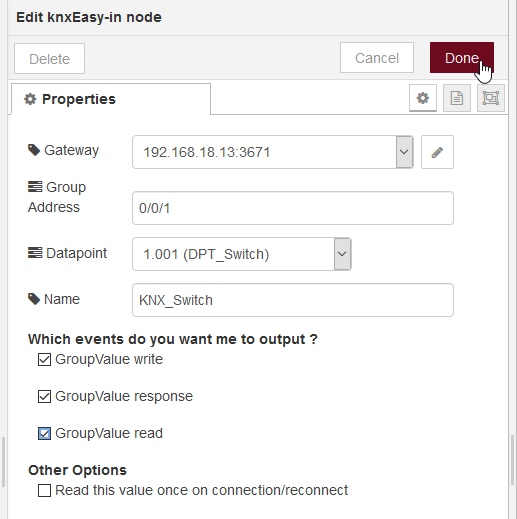
At last, we need to provide all the correct info of the datapoint we want to read. In my case this is:
Group Address: 0/0/1 (configured in ETS)
Datapoint: 1.001 DPT_Switch (My DatapointType in ETS)
Name: Can be chosen as you like
GroupValue write, response, read: I checked them all since I want to know all info regarding that Datapoint
When finished you can click on done.
The only thing that rests now is creating a link between the GDS and our data read from KNX. I chose to transfer everything over OPC UA but you could opt for MQTT or Modbus TCP/IP as well.
When using OPC UA, you will need the OPCUA-IIoT-Node, OPCUA-IIoT-Write and OPCUA-IIoT-Response nodes like shown in the following flow.

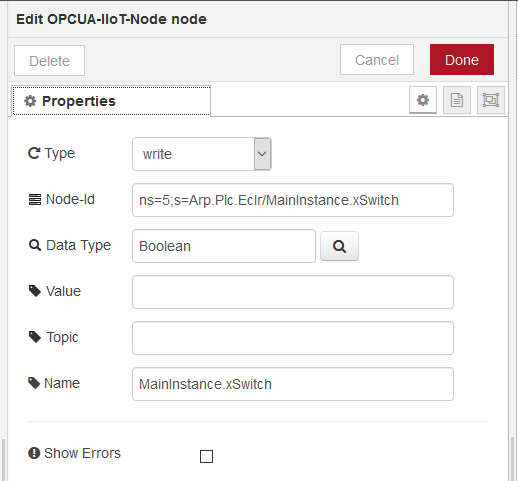
OPCUA-IIoT-Node
This node takes the value from the payload, provided by the KNX input, and configures the object in such a way that the Write node knows to which OPC UA tag the data needs to be written.
Be sure that you set the “Type” to “write”, the “Node-Id” must comply with a existing tag and the Data Type must be correct as well otherwise no data will be written to the OPC UA tag.
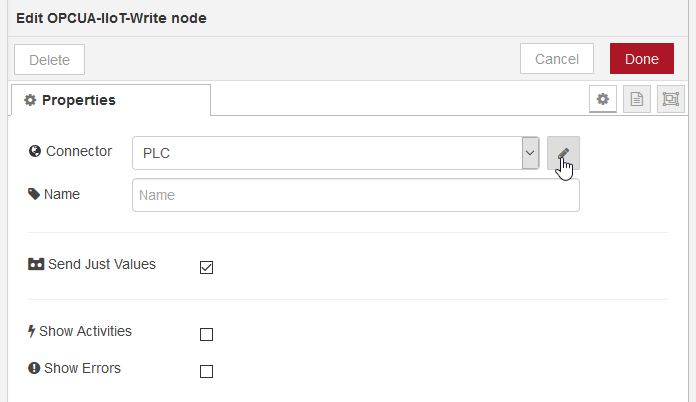
OPCUA-IIoT-Write
This node must be configured with the correct OPCUA-server. This can be done by clicking on the pencil
Fill in the correct link as endpoint in the tab settings (in my case localhost):

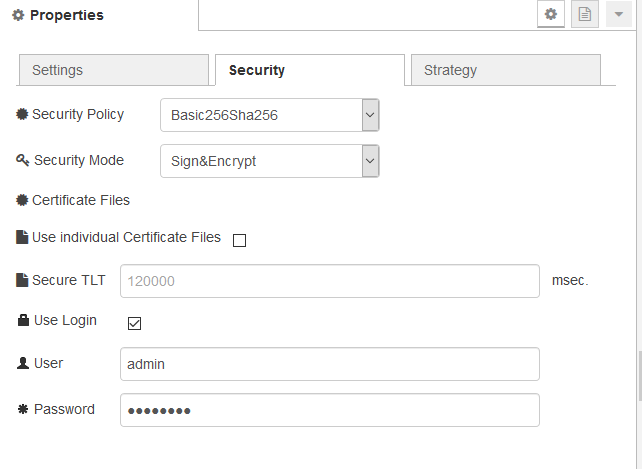
Set the security settings as shown below, change the password into the one of your controller:
When this is done you should receive your data via OPC UA in your PLCNext Engineer project.
If your project contains multiple Switches in KNX you must send the state of your output to all of them. This can be done by using a KNX output node together with an OPCUA-IIoT-Listener node.
Source Code
[{"id":"8611bef.c9e0d4","type":"tab","label":"Flow 2","disabled":false,"info":""},{"id":"a10c5ab5.0766b8","type":"knxEasy-in","z":"8611bef.c9e0d4","server":"8832b49b.6d19a8","topic":"0/0/1","dpt":"1.001","initialread":false,"notifyreadrequest":true,"notifyresponse":true,"notifywrite":true,"name":"KNX_Switch","x":350,"y":300,"wires":[["2f5db65a.72e782"]]},{"id":"62f5d0bb.c720a8","type":"OPCUA-IIoT-Write","z":"8611bef.c9e0d4","connector":"43585330.5f2914","name":"","justValue":true,"showStatusActivities":false,"showErrors":false,"x":750,"y":300,"wires":[["3bd34fe6.8362"]]},{"id":"3bd34fe6.8362","type":"OPCUA-IIoT-Response","z":"8611bef.c9e0d4","name":"","compressStructure":false,"showStatusActivities":false,"showErrors":false,"activateUnsetFilter":false,"activateFilters":false,"negateFilter":false,"filters":[],"x":910,"y":300,"wires":[[]]},{"id":"2f5db65a.72e782","type":"OPCUA-IIoT-Node","z":"8611bef.c9e0d4","injectType":"write","nodeId":"ns=5;s=Arp.Plc.Eclr/MainInstance.xSwitch","datatype":"Boolean","value":"","name":"MainInstance.xSwitch","topic":"","showErrors":false,"x":560,"y":300,"wires":[["62f5d0bb.c720a8"]]},{"id":"8832b49b.6d19a8","type":"knxEasy-config","z":"","host":"192.168.18.13","port":"3671"},{"id":"43585330.5f2914","type":"OPCUA-IIoT-Connector","z":"","discoveryUrl":"","endpoint":"opc.tcp://192.168.18.15:4840","keepSessionAlive":true,"loginEnabled":true,"securityPolicy":"Basic256Sha256","securityMode":"SIGNANDENCRYPT","name":"PLC","showErrors":false,"individualCerts":false,"publicCertificateFile":"","privateKeyFile":"","defaultSecureTokenLifetime":"","endpointMustExist":false,"autoSelectRightEndpoint":false,"strategyMaxRetry":"","strategyInitialDelay":"","strategyMaxDelay":"","strategyRandomisationFactor":"","requestedSessionTimeout":"","connectionStartDelay":"","reconnectDelay":"","maxBadSessionRequests":"10"}]{jcomments on}
Important: This post is outdated!
The APP is no longer available. Some things might not work or need to be adapted.
Your PLCnext Team
Leave a Reply
You must be logged in to post a comment.