Open CV is one of the most used Computer Vision libraries out there. Open CV can be used for face recognition, object tracking, scanning barcodes and more important for this blog, detecting if a light is on or off. In this blog I’ll help you get started with Open CV and Python on PLCnext and present a small code sample on how to preprocess your images for red light detection. This blog is an alternative way of using Open-CV on a PLCnext controller explained in earlier blog posts.
Prerequisites
Today I’m using the AXC F 2152 Controller but it is possible to follow the same procedure on the AXC F 1152 and a very simular procedure on the AXC F 3152 and RFC 4072s. The only prerequisite for today is to have Balena-Engine installed on the controller you’re using. The steps for a succesfull installation of Balena-Engine can be found on the PLCnext Github page. It is advised to use an 8gb SD card. We’ll be using an SSH connection and WinSCP to acces the controller. The use of these tools are out of the scope of this blogpost. You’ll find a good guide on how to use them in this forum or with a quick google search.
Download the OpenCV-Python Image
Start a SSH session to the controller and log in as a root user again after the installation of balena-engine.
Execute the following command and grab a cup of coffee, it will take a while before the image is downloaded onto the controller.
balena-engine pull pxcbe/opencv-python
Validate the installation
In this step we’ll validate the image and get the Open-CV version installed in the image. Execute the next command.
If all goes well, the container will print the Open-CV version and the container will remove itself.
At the time of writing the installed version is: 4.1.0
balena-engine run -it --rm \
       pxcbe/opencv-python \
       python -c "import cv2; print(cv2.__version__)"
Set up the working directory
Open WinSCP and create a folder opencv in the directory /opt/plcnext. Your path should thus be /opt/plcnext/opencv.
Download the contents of this repositry and copy paste them inside directory we just created.
You can change the .jpg with your own picuture and modify the app.py to fit your needs.
Test the script
Now we’ll test the script you’ve downloaded from the GitHub page and run the container interactivly. Execute the next command as root:
balena-engine run -it --rm -v /opt/plcnext/opencv/:/opencv_app pxcbe/opencv-python /bin/bash
You’re now in a shell session inside the container, call the opencv_app directory with
cd opencv_app
And start the script with:
python app.py
You should see some output in the shell and 3 new images in the folder /opt/plcnext/opencv. You might have to refresh your winSCP folder first to be able to see them!
So what have we done?
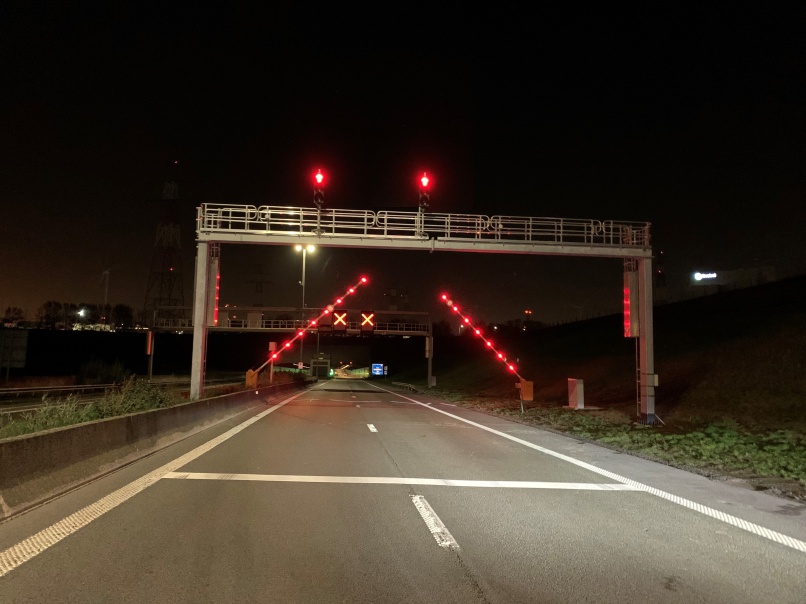
Before we can go and start finding out if our light is on or off, we need to do some preprosessing on the initial image in this case “open_cv.jpg”. The first thing that you’ll uselly do is rescale the image to preserve some computational power. This is done on row 12 (of the app.py) file with the cv2.resize command. The output looks the same as the original but is only 50 % of the initial image.
The next step is to grayscale the image. We grayscale the image with the function found on row 17, the result can be seen on the image below.
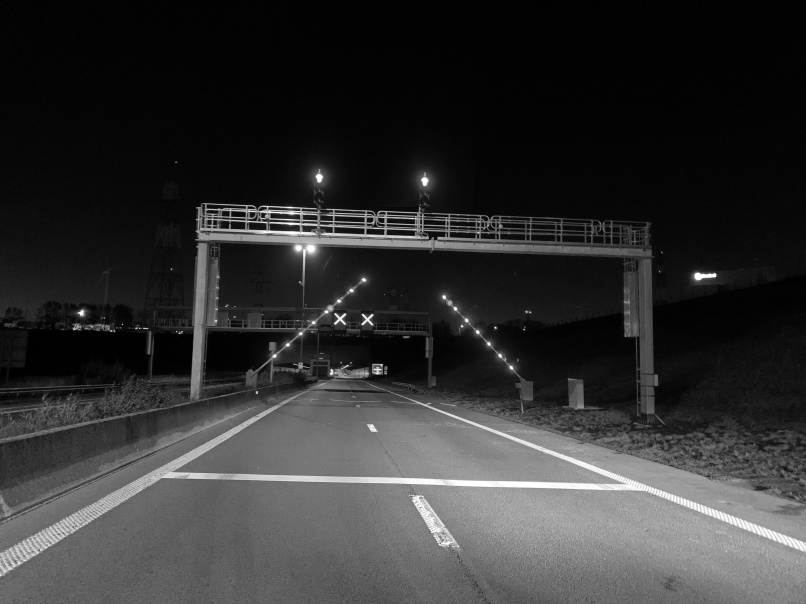
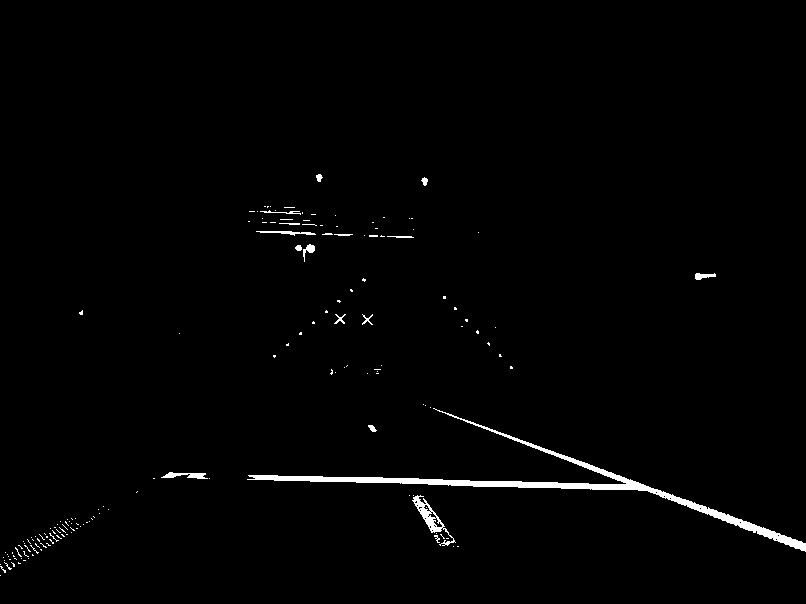
The last step in our prepossessing pipeline is to threshold the image, every pixel under a certain value will be black, everything above the same value will be white. There are some different ways to treshold an image, some will give a way better result. But for today line 21 cv2.threshold will suffice. The result can be found in the following picture. We now have a small image size with only black and white pixels. A simple method for detecting if a light is on from a stationary camera would be do define a Region Of Intrest (ROI) and scan for white pixels. However more complicated algorithms will give you a better result. I linked some other blogs handling this topic under further readings.
Further Readings
https://medium.com/@kenan.r.alkiek/https-medium-com-kenan-r-alkiek-traffic-light-recognition-505d6ab913b1
Still a bit unsure about containers?
You might find these blogs interesting:
Disclaimer
This is one way to work with open-cv on the PLCnext Controller. In this blog you”ll learn on how to cross compile open-cv c++ for a PLCnext target.
However it might seem more cumbersome, it surely has it’s value for production systems. Be sure to do your due diligence before deciding what the best way should be for your project.
The image won’t get regular updates. If you’re interested in expending or maintaining this project please contact axsupport@phoenixcontact.be
I purposefully left out how you could run the container indefinitely as this would differ a lot with your application.
Please find a suitable way yourself or discuss this with people involved in your project.
Credits
The work for the container is heavily based on the work of mohaseeb
Leave a Reply
You must be logged in to post a comment.