

In this Makers Blog article we discuss the possibilities and advantages which a Com Server provides to the PLCnext platform.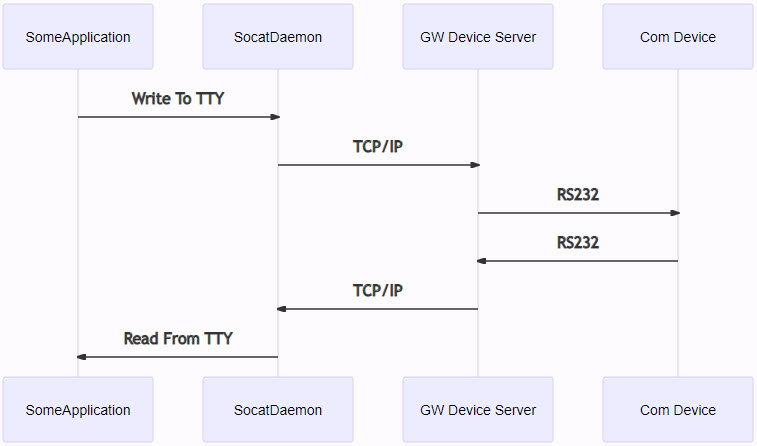
Introduction
The extensions modules that Phoenix Contact offers for its PLCs can for example be serial adapters like:
All extensions modules have on thing in common: they can be accessed cyclically via processdata. This provides the possibility to directly interact with the serial device from our realtime application.
In some cases this is not what we want. Instead, we want to re-use existing (C/C++) libraries and do not need the realtime context. However, we will find that these libraries usually are programmed to have direct access to a COM or TTY interface.
There are two options to create a TTY interface for a PLCnext Control:
- Implement some functions (C++ / C#) that create a TTY interface for the AXL or IL serial adapters from inside the
PLCnext Runtime. - Use of a COM-Server devices such as the GW Device Server
The GW Device Server provides a transparent TCP to Serial interface. With the help of a tool like Socat we can forward the Serial/TCP traffic directly to a pseudo TTY interface. Using GW Device Server also provides the possibility to communicate with the serial device on remote locations via a TLS encrypted channel.
NOTE
In this tutorial, the PLC performs as client and establishes connection to a GW Device Server.
(However, it is also possible to switch the PLC Socat to a listening option and have the GW as client actively connect to the PLC.)
Setup
Setting up the GW Device Server
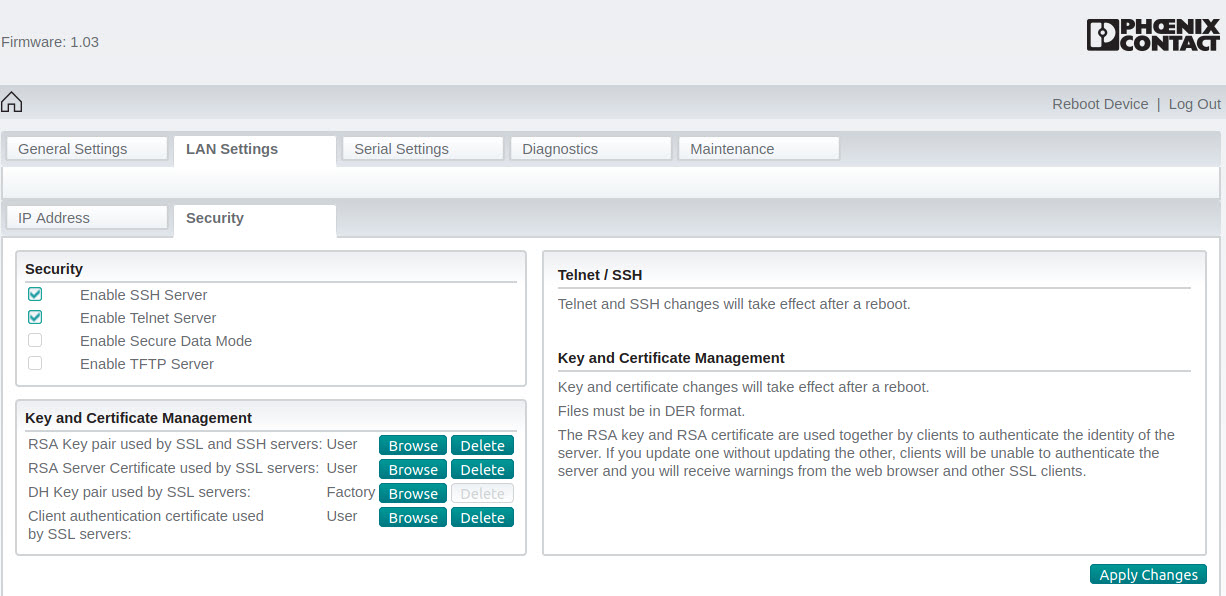
We connect to the GW Device Server via the Web Based Management. The default IP address of the GW Device Server is 192.168.254.254.
We use the following settings:
LAN Settings – Security
- Enable SSH Server
- Enable Telnet Server
- Disable Secure Data Mode
- Disable TFTP Server
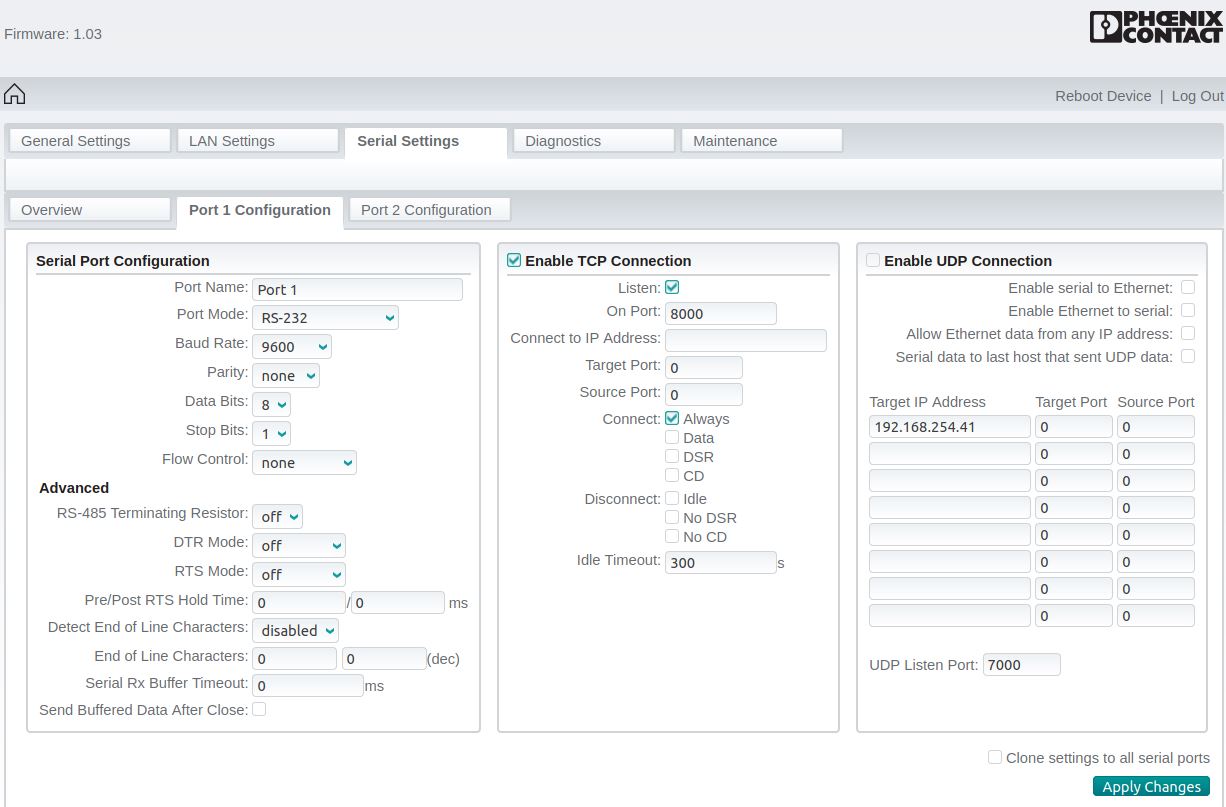
Serial Settings
- Port 1 Configuration (COM1): Enable TCP Connection on Port 8000
- Port 2 Configuration (COM2): Enable TCP Connection on Port 8001
Testing the GW Device Server
To test if we have set up the GW Device Server correctly, first we connect our PLC to the GW Device Server via Ethernet. Then we connect the two DSUB adapters of the GW Device Server with each other.
We can quickly test the setup using the tool Telnet. With this tool, we can send data from the PLC to the GW Device Server at Port8000/COM1 through the serial cable to Port8001/COM2 and finally recieve it back at the PLC.
We use the following commands:
ssh admin@192.168.1.10
sudo passwd root
su root
ip addr add 192.168.254.10 dev eth0
telnet 192.168.254.254 8000
## open another shell session
telnet 192.168.254.254 8001
# Type some messages
Building Socat
To build Socat easily on a Linux OS, we use the following commands:
mkdir tmp
cd tmp
git clone git://repo.or.cz/socat.git
cd socat

## TODO: Modify to your SDK location
source /opt/pxc/release/axcf2152/2020/0/environment-setup-cortexa9t2hf-neon-pxc-linux-gnueabi
. /opt/pxc/release/axcf2152/2020/0/site-config-cortexa9t2hf-neon-pxc-linux-gnueabi

mkdir install
autoconf
./configure $CONFIGURE_FLAGS --prefix=$(pwd)/install --enable-openssl-method
make -j2
make install
Deploying and installing Socat
To deploy the Socat installation, we execute the following script:
cd tmp
mkdir -p deploy
cd deploy
mkdir -p usr
cp -r ../../Daemon/* .
cp -r ../socat/install/* usr/

# Create package
tar -cf ../socat-binaries.tar .
cd ..
scp socat-binaries.tar admin@192.168.188.41:~/
ssh -ttt admin@192.168.188.41
"mkdir -p /opt/plcnext/socat-binaries &&
tar -xf /opt/plcnext/socat-binaries.tar -C /opt/plcnext/socat-binaries"
After deploying, we can now ssh to our PLC. Therefore, we first prepare the PLC by setting up the directories and config files by running the following commands:
deploy$ ssh admin@192.168.1.10

admin@192.168.1.10:~$ su root
root@192.168.1.10$ mkdir -p /etc/default/socat
root@192.168.1.10$ touch /etc/default/socat/socat.conf
root@192.168.1.10$ touch /etc/init.d/SocatDaemon
Now, we modify the socat.conf file to configure the parameters of the serial interface to our needs.
nano /etc/default/socat/socat.confThe content of the file looks like this.
TARGETIP="192.168.254.254"
TARGETPORT="8000"
TTYNAME="/dev/ttyGWDeviceServer"
OPTIONS="pty,link=$TTYNAME tcp-connect:$TARGETIP:$TARGETPORT,forever,interval=15"

BAUD="9600"
PARITY=""
DATABITS="csN 8"
STOPBITS="-cstopb"
FLOWCONTROLL=""
If we need to modify further parameters, we will need to also modify the SocatDaemon file. More information on TTY parameters can be found in the stty manual pages.
Now we create a SocatDaemon file to automatically connect to the GW Device Server using a Socat daemon.
NOTE:
This SocatDaemon file is an example without error/disconnection management etc. please.
nano /etc/init.d/SocatDaemonThe file has the following content.(click to see/hide code)
Now that all config files are in place, we can proceed by setting up the Socat binaries and registering the Socat daemon.
chmod +x /etc/init.d/SocatDaemon
cd /opt/plcnext/socat-binaries
chmod +x usr/bin/*

cp -r usr /

update-rc.d -s -v SocatDaemon 99
/etc/init.d/SocatDaemon start
If everything is set up correctly, we can see the running daemon using a command like ps -e | grep socat. We can also check the Socat logs located at cat /var/log/socat.log.
Accessing the TTY interface from a terminal
Now we can send messages over the TTY interface.
sudo echo "PLC to GW $var" > /dev/GWDeviceServerTo continuously test the pseudo TTY, we can use a command like
while true; do sleep 5 && sudo echo "PLC to GW $var" >/dev/ttyUSB0 && var=$((var+1)); doneIncoming traffic can be displayed by executing cat /dev/GWDeviceServer. Now any application can access the Serial device connected to the GW Device Server as if it is directly connected to the PLC.
Leave a Reply
You must be logged in to post a comment.