
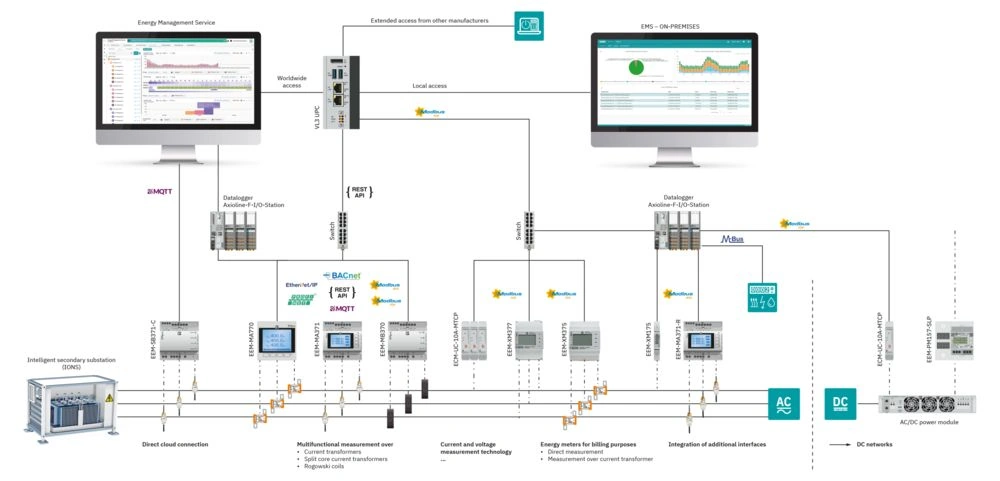
OpenCV (Open Source Computer Vision) is a cross-platform and free-for-use library for use in the emerging field of computer vision, a science on how computers extract information from digital images or videos. It’s about acquiring and processing visual data, and making decisions and performing actions based on the analysis. OpenCV support deep learning frameworks and includes a statistical machine learning library, what makes it applicable for motion tracking, gesture and facial recognition, and object identification.
Because community member David Petter was really interested in using OpenCV in combination with a PLCnext Control, he made an updated tutorial on this topic, using the current versions of FFmpeg, OpenCV, and the AXC firmware.
For this, he used the ‘old’ tutorial he got from community member Vincent Gijsen, who works at Phoenix Contact. All the used scripts and install commands are originally created by Vincent. David only changed small details to make it all work for the current versions of the used libraries and its dependencies.
Thanks a lot to both of them for sharing this tutorial with the community. This is a great example on how to implement open source code with PLCnext Technology!
(…virtually handing over the microphone to David…)
Preconditions and links
Preconditions
So, to get started, I need to make some assumptions. If you don’t have the listed things ready yet, I suggest you start at the ‘getting started’ pages on the community website.
- Operating System (VM): Linux
(tested with Ubuntu 16.04.1 LTS 64-bit) - nano editor in use
- CMake installed
- Eclipse with PLCnext Technology Plug-in already installed
(tested with Neon.3 rel. 4.6.3) - Newest PLCnext Technology SDK installed in this folder:
/opt/pxc/2.2.1 - You can consider a symlink:
/opt/pxc/current
A symlink or “symbolic link” can be used as a reference to a directory. Example: Your files are in /opt/pxc/folder1/folder2/folder3/.
If you were to make a symlink, you can for instance link /opt/file to /opt/pxc/folder1/folder2/folder3/.
This is useful for many things, especially if you need to reference that file in folder3 a lot. Instead of needing to re-type that long file location, you just type /opt/file. I did not use a symlink in this tutorial.
Download links:
- nano – this tutorial is based on the nano editor for Linux; adapt, if you use another editor.
- CMake – we will use it later
- PLCnext Technology SDK – be sure to download the matching SDK for your target controller
- PLCnext Toolchain – this tutorial used the Eclipse plugin, just for convenience
Make sure everything is set up to create, build, and export the library. If all that is working, you can proceed with this tutorial. All other dependencies will be compiled in the course of this tutorial.
Set up the build environment
- Make a file called ‘setupcrosscompiler’. Using the nano editor, run:
nano /opt/pxc/setupcrosscompiler
This file will contain the following lines of code:export ARMPREFIX=/opt/pxc/install
export PKG_CONFIG_PATH=$ARMPREFIX/lib/pkgconfig:$PKG_CONFIG_PATH
Save the file by using CTRL + O and then hit Enter.
Close the file (and the nano editor) with CTRL + X. - Create a folder where our libs and includes will be installed. Just type:
mkdir /opt/pxc/install - Before compiling, make sure to have root permission on the
/opt/pxc/directory, otherwise you’ll get an error saying “…is unable to create an executable file. C compiler test failed.”
Compile FFmpeg
FFmpeg is a dependency we need for OpenCV. We will clone the source files from Github, set some pretty advanced compiler flags, and have it made using CMake.
- First thing is installing Git on our machine. Issue the following command:
apt-get install git
Accept the asked question (if you want to proceed). - Now, we are ready to clone FFmpeg. Go to the ‘pxc’ folder by issuing:
cd /opt/pxc - Now clone FFmpeg by issuing:
git clone https://github.com/FFMPEG/FFMPEG.git ffmpeg
Note: It is recommended to clone (download) the projects from Git under a Linux OS, not Windows.
Downloading (cloning) code from Git under Windows OS you want to run under Linux OS will cause an error: Linux OS just uses line feed (LF) to mark a linebreak in code or text files. Windows uses carriage return (CR) and line feed (LF) for that. Git converts each CRLF to LF on receiving data, but also LF to CRLF on checking out code files to a local filesystem other than Linux. If you necessarily have to clone the projects with the intermediate step on a Windows machine, deactivate the Git function with the option core.autocrlf in the git clone command to avoid trouble with this issue after copying the file to your Linux machine.
- FFmpeg will download to your machine. It can take a while. After finishing, we proceed by typing:
cd ffmpeggit checkout - Now, we need to make a file in which we can set our compiler flags. We will do this in the root directory of our FFmpeg folder (where we are now, if you already accomplished the last step).
Create a file with this command:nano config.sh - The nano editor will open, and we need to paste the following lines into the new file.
Note: If you have a symlink, change the 2.2.1 after ‘export SYSR’ (line 3) to your symlink
export CFLAGS="-mfpu=neon -mfloat-abi=hard -I${ARMPREFIX}/include"
export LDFLAGS="-L${ARMPREFIX}/lib"
export SYSR=/opt/pxc/2.2.1/sysroots/cortexa9t2hf-neon-pxc-linux-gnueabi

export FFMPEG_FLAGS="
--target-os=linux \
--arch=arm \
--enable-shared \
--enable-pic \
--disable-static \
--disable-symver \
--disable-doc \
--disable-ffplay \
--disable-ffprobe \
--disable-avfilter \
--disable-encoders \
--disable-muxers \
--disable-filters \
--disable-devices \
--disable-everything \
--disable-encoder=aac \
--disable-libgme \
--disable-libgsm \
--disable-libiec61883 \
--disable-libilbc \
--disable-libmodplug \
--disable-libmp3lame \
--disable-libopencore-amrwb \
--disable-libopencv \
--disable-libopenh264 \
--disable-libopenjpeg \
--disable-libopus \
--disable-libpulse \
--disable-librtmp \
--disable-libshine \
--disable-libsmbclient \
--disable-libsoxr \
--disable-libspeex \
--disable-libssh \
--disable-libtheora \
--disable-libtwolame \
--disable-libv4l2 \
--disable-libvidstab \
--disable-libvo-amrwbenc \
--disable-libvorbis \
--disable-libvpx \
--disable-libwavpack \
--disable-libwebp \
--disable-libx264 \
--disable-libx265 \
--disable-libxavs \
--disable-libxcb \
--disable-libxcb-shm \
--enable-protocols \
--enable-parsers \
--enable-demuxers \
--enable-decoders \
--enable-muxers \
--enable-bsfs \
--enable-network \
--enable-postproc \
--enable-swscale \
--enable-ffmpeg \
--enable-avfilter \
--enable-avresample \
--enable-pthreads \
--disable-stripping \
--disable-iconv \
--disable-xlib \
--disable-zlib \
--disable-bzlib \
--disable-lzma \
--disable-demuxer=sbg \
--disable-demuxer=dts \
--disable-parser=dca \
--disable-decoder=dca \
--enable-ffmpeg \
--sysroot=${SYSR} \
--prefix=${ARMPREFIX} \
--cross-prefix=arm-pxc-linux-gnueabi-
"
export EXTRA_CFLAGS="-I ${ARMPREFIX}/include"
export LDFLAGS="-L ${ARMPREFIX}/lib"

./configure $FFMPEG_FLAGS --extra-cflags="$CFLAGS $EXTRA_CFLAGS" --extra-ldflags="$LDFLAGS"- Save the file by issuing CTRL + O, and then hitting Enter.
- Then, close the file (and the nano editor) with CTRL + X.
- Now, make the file executable by issuing:
sudo chmod +x config.sh - Before compiling we need to make sure that the correct compiler is accessed. We issue these two
sourcecommands:source /opt/pxc/2.2.1/environment-setup-cortexa9t2hf-neon-pxc-linux-gnueabisource /opt/pxc/setupcrosscompiler
Now we can have our files built:
- Check if there’s a minimum of 2 GB free disk space available on your machine.
- Compile using this command:
./config.sh
And next, type:make -j2
Depending on your core count you can speed up the compiling process by replacing the-j2by your build machines core count e.g.-j8. - After it is done, type:
make install
You can check if the output is correct by accessing the install folder:cd /opt/pxc/install/lib
And here, check if the created files are suited for an ARM target system:readelf -h libavcodec.so
If the output looks like this, all is okay:
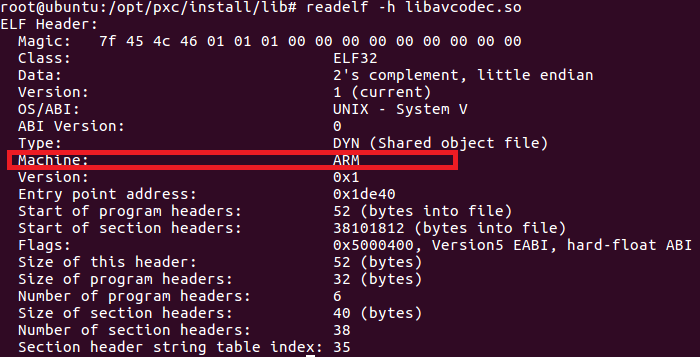
FFMpeg is compiled and we are done with this chapter.
Next is compiling OpenCV for our target system.
Compile OpenCV
- We need to create a folder for OpenCV. Issue the following command:
mkdir /opt/pxc/opencv-arm - Navigate to that folder by entering:
cd /opt/pxc/opencv-arm - Here we are going to clone the OpenCV library files from Git. Use this command:
git clone https://github.com/Itseez/opencv.git opencv - This too will take a while. Wait for the download to finish. Afterwards, issue the commands:
cd opencvgit checkout - Now we need to go back one folder, to the /opencv-arm folder. Use command:
cd ../
In here, we need to make a file named ‘toolchain.cmake’. Issue this command:nano toolchain.cmake - In this file, we need to set some flags, paste these lines into the toolchain.cmake file:
set(ENV{PKG_CONFIG_PATH} $ENV{ARMPREFIX}/lib/pkgconfig)
set(ENV{LD_LIBRARY_PATH} $ENV{ARMPREFIX}/lib)
set(ENV{C_INCLUDE_PATH} $ENV{ARMPREFIX}/include)
set(ENV{CPLUS_INCLUDE_PATH} $ENV{ARMPREFIX}/include)

set(CMAKE_LIBRARY_PATH ${CMAKE_LIBRARY_PATH} $ENV{ARMPREFIX}/lib)
set(MY_FLAGS "-I$ENV{ARMPREFIX}/include -L$ENV{ARMPREFIX}/lib -lswscale -lavformat -lavutil -lswresample -lavcodec")

set(CMAKE_CXX_FLAGS "${CMAKE_CXX_FLAGS} ${MY_FLAGS}")
set(CMAKE_C_FLAGS "${CMAKE_C_FLAGS} ${MY_FLAGS}")

set(CMAKE_INSTALL_PREFIX $ENV{ARMPREFIX})
- To save the file, type CTRL + O, and hit Enter .
Next, use CTRL + X to exit the nano editor.- We now need to create a ‘build’ folder. Issue this command:
mkdir build
Enter this newly created folder by typing:cd build- In here, we are going to make a file that will set some CMmake flags.
Create a new text file by issuing:nano start.sh- In this start.sh file, we need to paste these lines:
cmake -D ENABLE_PRECOMPILED_HEADERS=OFF -D BUILD_opencv_highgui=OFF -D WITH_FFMPEG=ON -D WITH_JPEG=ON -D CMAKE_TOOLCHAIN_FILE=../toolchain.cmake -D CMAKE_BUILD_TYPE=RELEASE ../opencv
Make sure that the entire file consists of just 1 line of code! All of the options need to be just one line.- Save the file by issuing CTRL + O and then hit Enter.
- Exit the nano editor with CTRL + X.
- Now, we need to make this start.sh executable, issue this command:
sudo chmod +x start.sh- Now, we need to make sure that the correct compiler is accessed – as before, we issue these two
sourcecommands:source /opt/pxc/2.2.1/environment-setup-cortexa9t2hf-neon-pxc-linux-gnueabisource /opt/pxc/setupcrosscompiler- Now, we should be able to use our start.sh script. Issue this command:
./start.sh- After a little while, the terminal will say that the configuring is done.
It is particularly important to check if the correct output folder is selected:
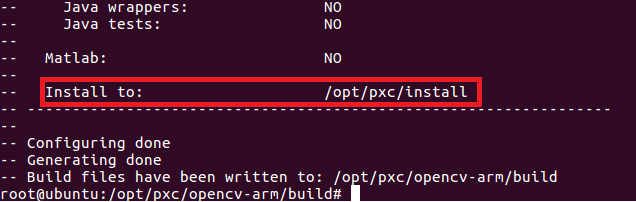
The line ‘Install to:’ needs to be /opt/pxc/install.
Note: If a different folder is listed in the output, start over by deleting the ‘build’ folder, re-creating the build folder, re-creating the start.sh folder and so on… From experience I found out that when the output folder is not correct, the wrong compiler will be used, too. You will end up with x86/x64 files being built.
Now we are ready to use cmake to build the library.
- Check if there’s a minimum of 2 GB of free disk space (as stated before)
- Issue this command:
make -j2 - After it is done we can issue this command:
make install
The built files will be installed in the chosen folder/opt/pxc/install.
We will check to see if the right architecture is used; issue this command:cd /opt/pxc/install/lib
And here, check if the created files are suited for an ARM target system:readelf -h libopencv_core.so
Again, check to see if the ‘Machine:’ line states ARM.
Transfer Libraries to PLCnext Control
In this example, I will copy all the compiled libraries to the PLC. Not because I need them now, but because this is quicker than copying each individual library.
- What I want to do first, is: create a folder on the SD card of the PLC, that we can find quickly, and that is indexed by the PLC.
- From a terminal on our Ubuntu machine, we can command:
ssh admin@<PLCnext_IP>, and use the IP address of your PLC instead of , e.g., <192.168.0.10> - Then, we want to make a folder on the SD card in the PLC, where we will put our libraries. Issue this command:
mkdir /opt/plcnext/lib - We need to make sure that this folder is indexed by the PLC. To do that, we need to login to our shell with the root user. Start a terminal session and issue:
ssh root@<PLCnext_IP>
(using the IP address of your PLC) - You will be prompted for your password.
- Being SSH logged in as root user in the PLC, we need to setup the library folder to be indexed. Issue this command:
nano /etc/ld.so.conf
Here, delete the existing line, and change it to:/opt/plcnext/lib - Save the file by issuing CTRL + O and then hit Enter.
Exit the nano editor with CTRL + X. - The next step is to copy our compiled libraries to the /lib folder we created. We do this by opening a terminal window, and then issue this command:
cd /opt/pxc/install/lib - Now, from the ‘lib’ folder of the machine, issue this command:
sudo scp *.so root@<PLCnext_IP>:/opt/plcnext/lib
(using the IP address of your PLC) - Now you can log off the SSH session on the PLC:
$ logout - The command copies all compiled libraries.
A simple OpenCV program will only need a few, but for future purposes I wanted to copy all of them. Our compiled libraries are quite large files. I might make a ‘stripped’ set of libraries in the future. But for now this works for me. - Wait for all the files to be copied. Next, login to the PLC with SSH as admin and issue these commands:
sudo ldconfigsudo /etc/init.d/plcnext restart - All of the libraries are present on the PLC now, and we can proceed with writing a little test program in Eclipse, export it to PC Worx Engineer, and then upload it.
It is recommended to integrate the OpenCV abd FFmpeg libraries to Eclipse under the same Linux OS distribution they were built with. Otherwise an "invalid format" error might be reported.
Configure Eclipse
Make sure to have installed the PLCnext Technology SDK for Linux, and the Eclipse Plug-in. Otherwise refer to the "Preconditions" at the beginning of this tutorial before proceeding.
Create a new project in Eclipse: Select ‘New C++ project’ and select the ’PLCnext AXC F 2152 program’ from the shared library folder. Insert a project name, click next etc. etc.
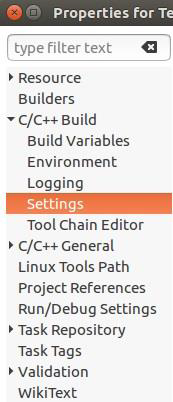
We need to edit the build configuration in order to use OpenCV with the PLCnext Control. To do that, right-click on the main directory of your newly created project (here named “TestWithOpenCV”, and then click ‘properties’ (all the way at the bottom):
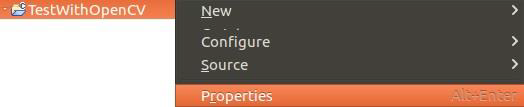
We have the possibility to create a new build configuration, but in this case I just want to edit the ‘release’ configuration.
Navigate to the ‘C/C++ Build’ menu item, and then to the ‘Settings’ tab.
Then navigate to the ‘Cross G++ Compiler’ tab, and from there to the ‘Includes’ tab. There we will Add…” to the ‘Include’ paths (-I):
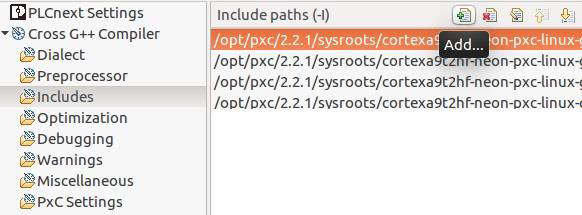
The path is /opt/pxc/install/include.
Just like above, we need to do the exact same thing for the ‘Cross GCC Compiler’.
That is
- navigate to ‘Cross GCC Compiler’, ‘Includes’
- ‘Include paths’ – Add…
- add ‘/opt/pxc/install/include’
Now, we need to add our libraries to the ‘Cross G++ Linker’. In this tutorial we will add just some basic libraries to the configuration.
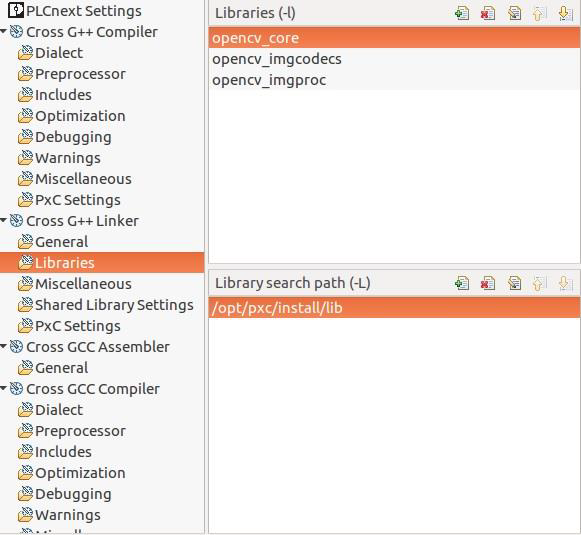
Navigate to the ‘Libraries’ tab of our ‘Cross G++ Linker’, and add these libraries to the Libraries(-I) list:
- opencv_core
- opencv_imgcodecs
- opencv_imgproc
The libraries you need are fully dependent on your needs and wishes. Since this is just an example, not all compiled libraries are added at this point.
Now, we need to add our libraries search path (-L). Add this folder location to the path list:/opt/pxc/install/lib
If all is well, your Cross G++ Linker tab should look like this:
Click ‘Apply and Close’.
Eclipse will need to compile the new settings, this can take a while.
We are now done with setting up Eclipse, and ready to write some code for our OpenCV empowered target.
Write a test program
So, in this last chapter I am going to demonstrate a small test program to show how you can implement the OpenCV library in your own project or test environment.
The program I have made, does not do a whole lot; it only tries to open an image with the OpenCV imread function. If the image does not exist, the program will create a .txt file which states that the image is not found. If the image is found, literally nothing will happen.
Basically, it only demonstrates that the compiling, uploading and including of the OpenCV library did work, since the PLC would indicate a FAIL LED in case the library is not found or the library is not suited for ARM processors.
Do what you want with this example, I actually doubt If you find it useful at all, but since I was writing this tutorial anyway, I thought it wouldn’t hurt to add this, too.
We will continue from where we stopped in the previous chapter: Eclipse has finished setting up the build environment.
Below I have pasted my program code. If you kept the standard names for the library, component, and program, you can simply copy & paste this in your “MyProgram.cpp” and build it.
// Standard includes for a AXC F 2152 control.
#include "MyProgram.hpp"
#include "Arp/System/Commons/Logging.h"
#include "Arp/System/Core/ByteConverter.hpp"

// Basic uses for OpenCV.
#include <opencv2/core/core.hpp>
#include <opencv2/imgproc.hpp>
#include <opencv2/imgcodecs.hpp>

// Used for creating the output file (.txt file).
#include <fstream>

namespace MyLibrary { namespace MyComponent

{
    MyProgram::MyProgram(const String& name) : ProgramBase(name)
{
    //TODO AddPortInfo
}
    void MyProgram::Execute()
{
    using namespace cv;             // CV is the 'main' namespace for OpenCV
    Mat image;                      // Used to store real or complex-valued vectors and lots more
    string filename = "test.jpg";
    string outputfile = "outlog.txt";

    image = imread(filename, 0);    // Loads an image from the file (NULL if not read)

    if( !image.data ) {             // When there is no image, we will read NULL
        std::ofstream outfile (outputfile);
        outfile << "There is no image found in this folder...!" << std::endl;
        outfile.close();
        }
}

}} // end of namespace MyLibrary::MyComponent
From here, you probably know the steps: Simply export the .pcwlx library, and then import it on PC Worx Engineer. After importing it and adding it to one of the ESM tasks, hit F5 to compile and upload it to the PLC. Or watch the regarding Tutorial Video and be back in 4 minutes.
As I stated before, this program doesn’t do much. Since there is no ‘test.jpg’ file in the folder /opt/plcnext, a textfile will be created with the line “There is no image found in this folder…!”.
If you were to upload an image to this folder named “test.jpg”, and delete the outlog.txt before running the program again, nothing should happen. Now OpenCV can access the image, and will do absolutely nothing with it.
(It will however keep opening it with the speed of the Execution & Synchronisation Manager (ESM) interval, so it will probably crash after a while if you have set this interval too fast.)
That’s it!
Have fun trying your own project based on OpenCV or other nice open source software.
Leave a Reply
You must be logged in to post a comment.