

Technical Background
Kafka
Apache Kafka is a framework for data ingestion, storage, processing, and redistribution. Nowadays, it is widely deployed at companies all over the world. Kafka’s official website offers more information about its idea and how to deploy it. One of its key features is the huge number of already existing connectors to other applications and communication protocols like MQTT.
MQTT
MQTT is a lightweight TCP based messaging protocol, often used for IoT communication due to its robustness and small footprint. Details about the OASIS standard MQTT could be found on its website.
Here you can find a Makers Blog article about how to cross-compile mosquitto for PLCnext, an MQTT implementation from Eclipse. Alternatively, the PLCnext Store offers ready MQTT apps.
Requirements
- MQTT client on the PLCnext (see the previous section for implementation hints)
- the controller is connected to a PC/VM
- MQTT broker on the PC/VM (e.g., mosquitto)
- Kafka instance on the PC/VM (see Kafka’s quickstart guide)
Setup
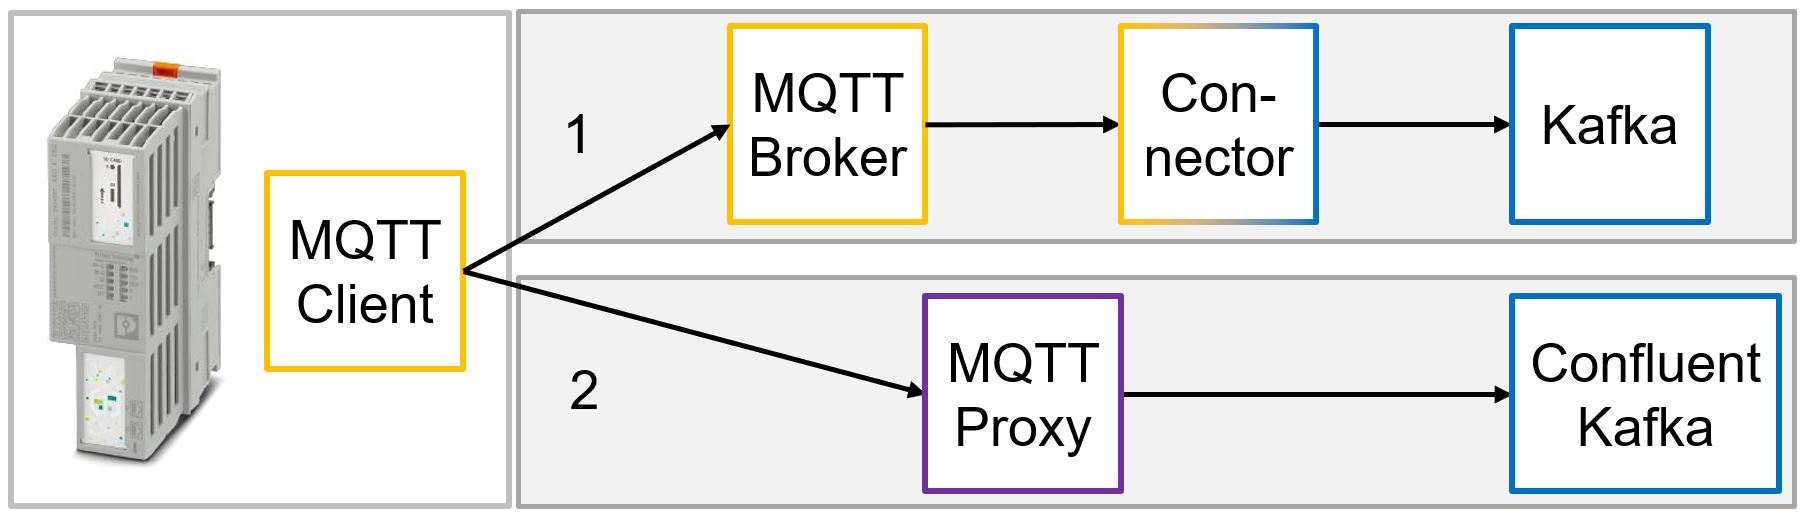
The following picture shows an overview of the setup we are going to implement to ingest data from the PLCnext control to Kafka. While it is possible to use Confluent’s MQTT Proxy for their version of Kafka (2) we will focus on the more generic solution (1). It comprises an MQTT broker where the client connects to and publishes messages and a connector that subscribes to a topic at the broker, processes the messages and forwards them to Kafka.
Creating the Connector
In this tutorial our connector bases on the evokly/kafka-connect-mqtt repository from GitHub, licensed under the MIT License (detailed license information). First, we download and extract the repository. Since the latest repository version is of the end of 2016 we update the build.gradle file, by replacing old dependencies with their new versions:
ext { kafkaVersion = '2.6.0' }
...
dependencies {
    testCompile group: 'junit', name: 'junit', version: '4.13'
    compile "org.apache.kafka:connect-api:$kafkaVersion"
    compile 'org.eclipse.paho:org.eclipse.paho.client.mqttv3:1.2.5'
    compile 'org.bouncycastle:bcprov-jdk15on:1.67'
    compile 'org.bouncycastle:bcpkix-jdk15on:1.67'
    compile 'org.bouncycastle:bcpg-jdk15on:1.67'
    compile 'commons-io:commons-io:2.8.0'
    compile 'org.slf4j:slf4j-api:1.7.30'
    testCompile 'org.slf4j:slf4j-simple:1.7.30'
}
In this example we will send plain String messages to Kafka. Therefore we have to edit the Java class DumbProcessor.java in the folder /kafka-connect-mqtt-master/src/main/java/com/evokly/kafka/connect/mqtt, which is the default message processor:
@Override
public SourceRecord[] getRecords(String kafkaTopic) {

    return new SourceRecord[]{new SourceRecord(null, //sourcePartition
                   null,                //sourceOffset
                   kafkaTopic,          //topic
                   null,                //partition
                   null,                //keySchema
                   mTopic,              //key
                   null,                //valueSchema
                   mMessage.toString(), //value
                   new Long(123L))};    //long timestamp
}
Thereafter, we build a Java Archive File (JAR) that contains the dependencies: ./gradlew clean jar. We copy the output JAR kafka-connect-mqtt-1.1-SNAPSHOT.jar that could be found in the folder /kafka-connect-mqtt-master/build/libs to the libs directory of Kafka.
We also need a copy of the org.eclipse.paho.client.mqttv3-1.2.5.jar archive in the libs directory of Kafka. We can download it here.
Furthermore, we have to create a configuration file for the connector mqtt.properties in Kafka’s config folder. The file has the following content:
name=mqtt
connector.class=com.evokly.kafka.connect.mqtt.MqttSourceConnector
tasks.max=1

# converters for plain String messages without schemas
key.converter = org.apache.kafka.connect.storage.StringConverter
value.converter = org.apache.kafka.connect.storage.StringConverter

key.converter.schemas.enable=false
value.converter.schemas.enable=false

kafka.topic=test_in                     # Kafka destination topic for the MQTT messages
mqtt.client_id=mqtt-kafka-123

mqtt.clean_session=true
mqtt.connection_timeout=30
mqtt.keep_alive_interval=60

mqtt.server_uris=tcp://172.17.0.1:1883  # address of the MQTT broker
mqtt.topic=test/#                       # MQTT topic where the messages should be collected

#if we want to use our own processor class
#message_processor_class=com.evokly.kafka.connect.mqtt.sample.OwnProcessor
Local Test
Now we can test our connector locally. Go to Kafka’s directory and start a ZooKeeper and Broker instance:
# start ZooKeeper
bin/zookeeper-server-start.sh config/zookeeper.properties

# start Kafka:
bin/kafka-server-start.sh config/server.properties

# start an MQTT-Broker (here a mosquitto docker container)
sudo docker run -d --name mosquitto -p 1883:1883 eclipse-mosquitto

# start the MQTT-Kafka connector
bin/connect-standalone.sh config/connect-standalone.properties config/mqtt.properties

# start a Kafka console consumer
bin/kafka-console-consumer.sh --bootstrap-server localhost:9092 --topic test_in --from-beginning --property print.value=true --property print.timestamp=true

# publish an MQTT message
mosquitto_pub -h 172.17.0.1 -p 1883 -t test/1 -m test123
The message shows up in the console consumer.
Leave a Reply
You must be logged in to post a comment.