

Logging values from an industrial application is a main characteristic for many customers, and in some applications the number of variables can be really high, so a native and easy way to configure this datalogging is required.
Below we will dive into the native Datalogging Service Component and see how we can generate a CSV file from this service.
You can find further informations about the Datalogging Service components in these links :
- Configuring the Datalogger and using it form OPC UA Historical Access
- Real-Time Datalogger – PLCnext Info Center
One you have configured the Datalogging sessions, you wil have a *.db file containing all your logged values of the variables. This *.db file is a database file but this format needs a tool like Sqlite3 or a DB Browser if we want to browse the values.
Many customers are already familiar with the *.csv files so we will see how to make an export of this database into a csv file. The Sqlite3 tool present in every PLCnext controller is providing all the required tools to make this export.
When the database is created we can set the name we want for the database, but we cannot set a specific name for the table present in the database containing the values. Fortunately the Sqlite3 tool can help us by showing the tables present in the database, with the command “Sqlite3 <NameOfDatabase> .tables”.
You can find all the specific commands in the help page of Sqlite3 or in this page : Sqlite3.
When we know the name of the table, we can select all the data from this table and export this data into a csv file.
To ease up a bit the process, I will link you two scripts to make an export from a database.
Of course you can adapt the script for your needs !
Unfortunately we can’t upload *.sh files so below you will have the content of the two files.
First, the file for the ISO8601 Timestamp format :
ExportSQL2CSV_ISO.sh
#!/bin/bash

name_of_database="${1:?Missing database}"
name_of_database_no_ext=${name_of_database::-3}

#Get the name of the table
name_of_table=$(sqlite3 $name_of_database .ta)

#Get the DateTime of the first entry to name the output file
DateTime=$(sqlite3 $name_of_database "SELECT strftime('%Y_%m_%d_%H_%M_%S',Timestamp) from $name_of_table limit 1;")

#Create the filename
output_filename=${name_of_database_no_ext}_${DateTime}.csv

#Make the export to the csv file
sqlite3 -header -csv -separator ";" $name_of_database "SELECT * from $name_of_table;"\
> $output_filename
And the second file for the RAW Timestamp format :
ExportSQL2CSV_RAW.sh
#!/bin/bash

name_of_database="${1:?Missing database}"
name_of_database_no_ext=${name_of_database::-3}

#Get the name of the table
name_of_table=$(sqlite3 $name_of_database .ta)

#Get the DateTime of the first entry to name the output file
DateTime=$(sqlite3 $name_of_database "SELECT strftime('%Y_%m_%d_%H_%M_%S',(Timestamp - 4611686018427387904)/10000000 - 62135596800,'unixepoch') from $name_of_table limit 1;")

#Create the filename
output_filename=${name_of_database_no_ext}_${DateTime}.csv

#Make the export to the csv file
sqlite3 -header -csv -separator ";" $name_of_database "SELECT \
strftime('%Y-%m-%d %H:%M:%f',(Timestamp - 4611686018427387904)/10000000 - 62135596800,'unixepoch') AS Time,\
* from $name_of_table;"\
> $output_filename
As these files will be script, don’t forget add the executable flag on the file :
chmod +x ExportSQL2CSV_*.sh
Then we can call the script. Here is the call of the script :
./ExportSQL2CSV_ISO.sh <PathToDatabase>
When the script is done, you will find a CSV file with the name of your database and the DateTime of the first entry of the database like the following :
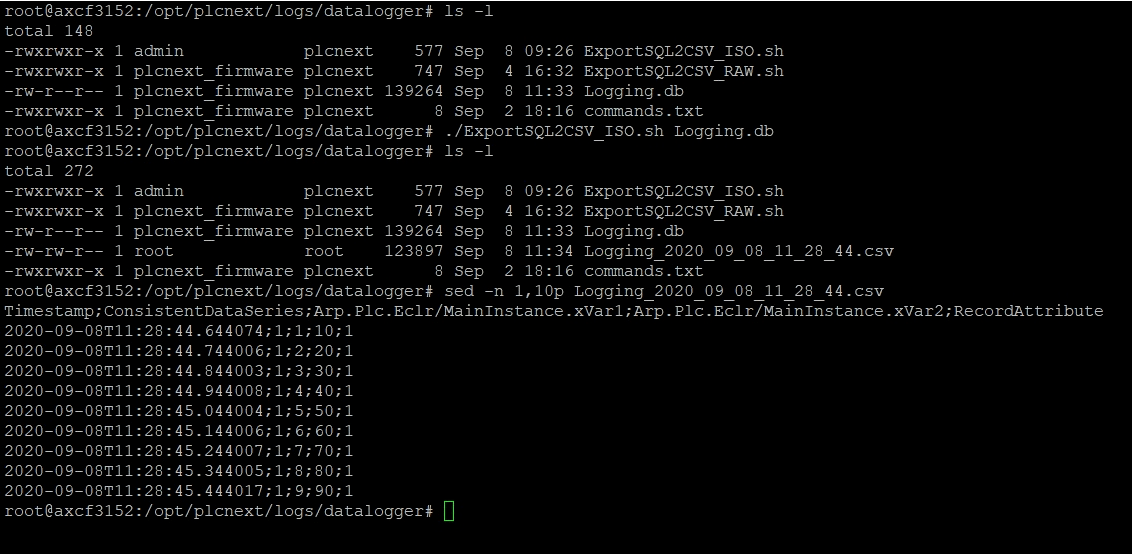
You now have a CSV file with all the data that you recorded using the native DataLogger Service Components.
You can go even further by automating the creation of this file every hour or every day with the tool cron.
If you have any questions or remarks feel free to contact us !
Leave a Reply
You must be logged in to post a comment.