
Hello PLCnext Community,
Cybersecurity is a main topic inside the PLCnext Technology and in general for the Industrial world.
The PLCnext Technology provides a wide range of solutions to make an installation more secure.
Some standards are also existing to make a network, in general, more secure.
One of those standards is the 802.1X from IEEE (Link to Wikipedia).
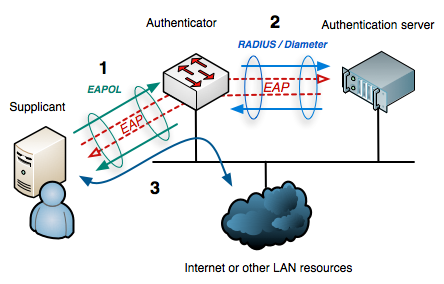
This standard is part of networking protocols and provides an authentication mechanism to devices wishing to connect to a LAN or WLAN.
The end-device (PLCs, PCs, etc …) is the supplicant and request to an authenticator (a Switch, a WLAN Access Point …) the right to use the network. To do so, the authenticator forwards the request to an authentication server (RADIUS server) if the device is allowed or not to use the network. This response is forwared back to the authenticator and blocks or allows the packets from the supplicant.
This authentication mechanism requires some specific installations and/or configurations :
- The supplicant needs to be able to generate those authentication requests
- The authenticator needs to be able to forward thos frames
- A RADIUS server is needed
In our case, the supplicant is the AXC F 2152, the authenticator is an FL SWITCH 4008T-2SFP, and the RADIUS server is hosted on a Windows machine.
So in our situation here are the requirements :
- The AXC F 2152 needs to have installed and configured a tool named “wpa_supplicant”.
The tool is downloadable using the GUIX packet manager. I invite you to follow this link to Install the GNU Guix package manager.
Download the tool as “admin” using guix :
guix install wpa-supplicantAfter the installation, we need to edit a file as root, so we can invoke sudo so the user admin can execute the tool wpa_supplicant.
So first connect as root and then edit the file :nano /etc/sudoersAt then end of the file those two lines are commented :#Defaults targetpw # Ask for the password of the target user
#ALL ALL=(ALL) ALL # WARNING: only use this together with ‘Defaults targetpw’We need to uncomment those two, by removing the “#” in front of the lines. Exit and save the file.
The tool is ready, we will look after on how to create a configuration file to authenticate the device. - In our situation, the authenticator is an FL SWITCH 4008T-2SFP. The 3000 and 4000 series of switchs can be used as an authenticator, because the functionnality is avalaible with the firmware.
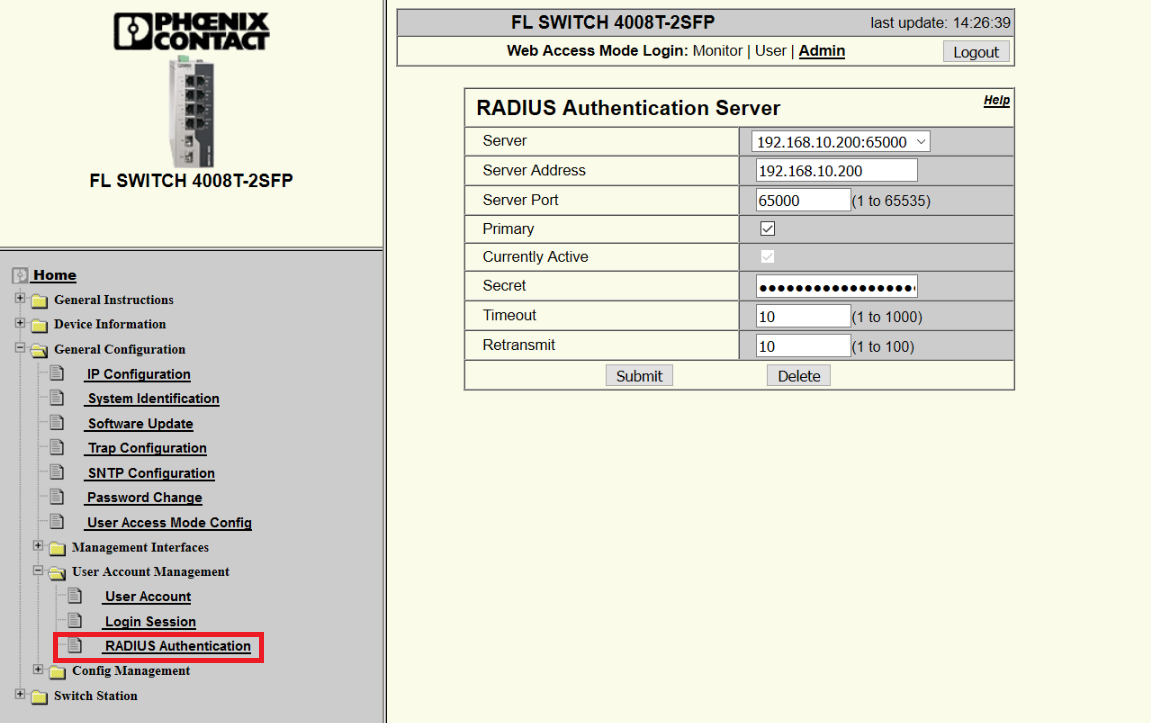
First we need to define the RADIUS server so the switch can forward the 802.1X packets.
To do that, go to the WBM (Web Page Management) of the switch, login using the credentials for the role “admin” and navigate to the menu General Configuration >> User Account Management >> RADIUS Authentication.
Here you need to fill in the informations of the RADIUS server, as the IP address, the port, the Secret (The secret is common between the RADIUS server and the authenticator) the Timeout and the Retransmit time.
Once the server is specified, we need to tell which port is controlled by this authentication method.
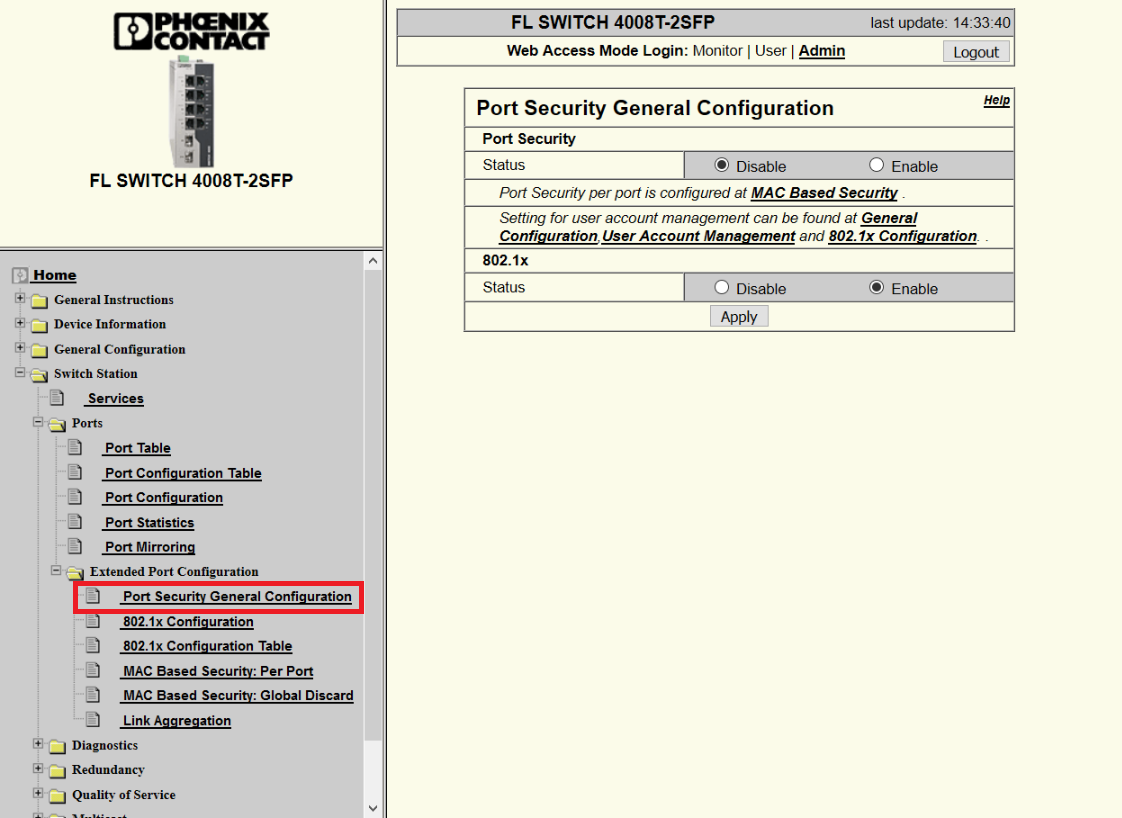
First we need to enable the 802.1X configuration of the switch, menu Switch Station >> Ports >> Extended Port Configuration >> Port Security General Configuration :
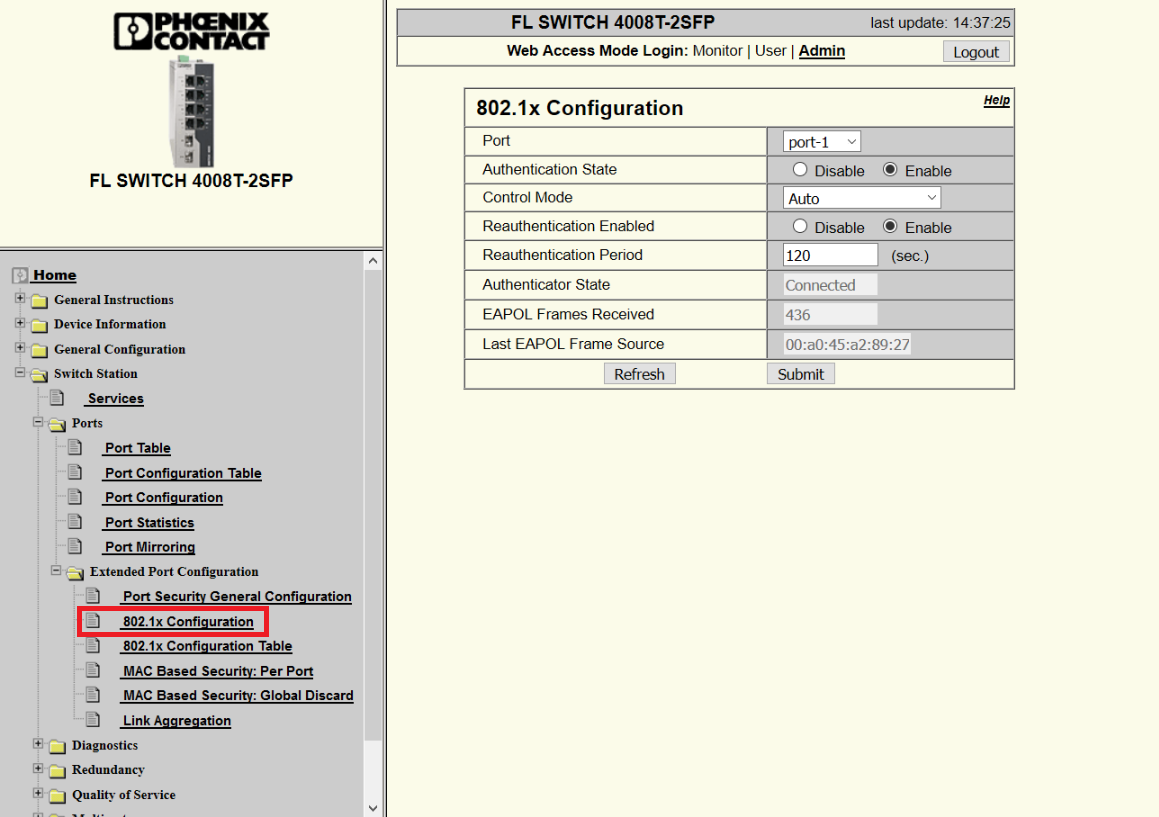
Afterwards, we can go to the page 802.1X Configuration, and tell which port is really using this authentication method:
After that, the switch is ready to forward the 802.1X frames to the RADIUS server. - For the RADIUS server, I used the FreeRADIUS executable for Windows, where you can download it here.
This software provides the functionalities of a RADIUS server, and you need to change some files to make it suitable into your testlab for your installation.
The server comes with 3 important files to edit, at this path, by default (C:\FreeRADIUS.net\etc\raddb) :
– radiusd.conf : Configuration file of the RADIUS server (port, maximum number of requests, network to listen etc …)
– clients.conf : Configuration file of the clients (authenticator)
– users.conf : Configuration file of the users (end-devices)
We will dive more into the details fo the RADIUS server configuration, because we have multiple files.
To edit the files, you can use Notepad++.
First we’re going to edit the file radiusd.conf. Here, we will just change to port on which the server is listening, so we don’t use another port. We saw earlier that, when we configured the server in the WBM, 65000 was specified. So, in the file change the line “port =” so we have this entry “port = 65000”.
The second file to edit is clients.conf. Here we’re going to add the network of the authenticator and define a secret.
In our case, the IP address of the switch is 192.168.10.242/24. He is in a network 192.168.10.0/24. So we’re adding the informations of this network :
client 192.168.10.0/24 {
 secret = testing123
 shortname = private-network-1
}
The string “testing123” needs to be specified in the RADIUS authentication server, as we saw above.
The third file to edit is users.conf. In this file we’re going to add the credentials of the device that we’re going to use.
We’re going to add a username and his password. This will be also present in the configuration of the device.
Add this line in the file :
testuser User-Password == "testpw"
Once we configured the server, we’re going to create the configuration file for the AXC F 2152.
A configuration is represented in a block. For a basic authentication here is my block, for my situation :
network={
 key_mgmt=IEEE8021X
 eap=TTLS MD5
 identity="testuser"
 anonymous_identity="testuser"
 password="testpw"
 phase1="auth=MD5"
 phase2="auth=PAP password=testpw"
 eapol_flags=0
}
You need to have only this network block to make it easier for the AXC F 2152 to know which configuration to try.
The file, having this entry, needs to be placed somewhere on the AXC F 2152 directories.
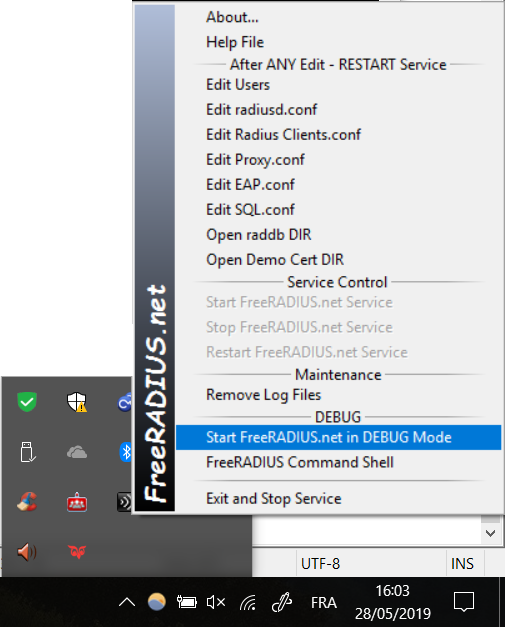
Once every configuration file is modified, we can launch the RADIUS server, so he can listen on incomming authentication requests.
Right click on the FreeRADIUS Server icon, then “Start FreeRADIUS.net in DEBUG Mode”.
Afterwards, log in on the AXC F 2152 as admin and run the wpa_supplicant tool with your configuration file :
sudo wpa_supplicant -Dwired -ieth0 -c <path to your configuration file>
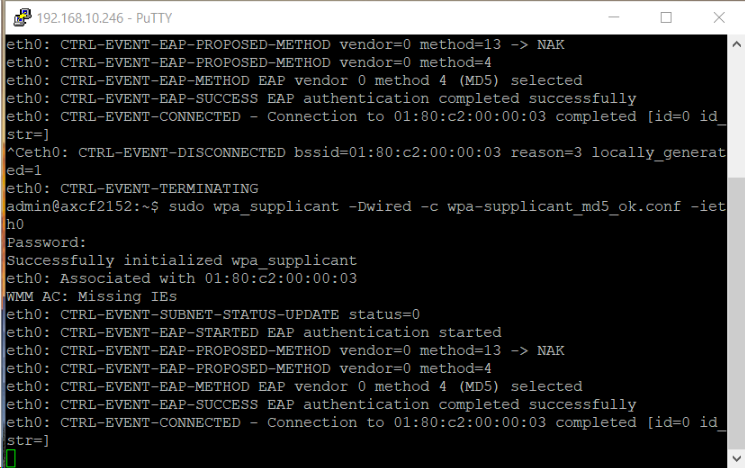
The AXC F 2152 will then try to authenticate himself with the RADIUS server. If the configurations are matching the device is allowed to use the port of the switch.
Further options are available when authenticating using 802.1X, as using certificates, encrypting the outer tunnel etc … this article was more about how to install and make a basic configuration to use the tool wpa_supplicant for 802.1X authentications.
If you need more informations, or if this blog is not clear enough, feel free to contact me.
Leave a Reply
You must be logged in to post a comment.