
To try out open source packages like Docker that require kernel parameters which are not enabled in the kernel of the standard firmware, it might be necessary to build and install an altered kernel on a PLCnext Control.
This How-To will guide you through this process. You need to get the kernel sources for the specific device and firmware version.
This package is not provided in the download-section for the device but can be ordered for a handling fee (check the procedure in the User Manual to the device).
(Click “Read more…” below the image.)
NOTICE
Risk of material damage
Making changes to the kernel may damage the device.
- Use altered kernel only for testing under laboratory conditions.
- Phoenix Contact grants absolutely no warranty of any kind and no support for devices running on altered kernels.
- The device cannot be updated any more without loosing the altered kernel. A firmware update will always replace the altered kernel with an unaltered kernel.
Preconditions
- This How-To was created for AXC F 2152 FW 2019.0, you may have to adapt paths and version numbers accordingly for more recent firmware versions.
- The host system used here was Ubuntu 18.04; an internet connection is necessary to download additional packages to the Ubuntu installation.
- Install the SDK with the cross-compile toolchain of the device, e.g. in /opt/pxc/2019.0, on the host PC.
- Get the Linux sources for the device (check the procedure in the User Manual to the device); in this example the zip file containing the sources is named “sources.tar.gz”.
- Activate the cross-compile toolchain:
. /opt/pxc/2019.0/site-config-cortexa9t2hf-neon-pxc-linux-gnueabi
Note: there is a space between the dot and the path!
- Create a working directory e.g. in your home folder; in this example the working directory is located in the home folder of the user and is named “workspace”.
Build the altered kernel
- Unzip sources:
cd ~/workspacetar -xzvf sources.tar.gz
- Unzip kernel sources:
tar -xzvf yocto/jenkins/workspace/rp_Yocto_AXCF2152_release_19.0.0/build/tmp/deploy/sources/arm-pxc-linux-gnueabi/linux-rt-4.14.63+gitAUTOINC+da6bee3cef-r0
- Adapt path to sources:
cd ~/workspace/kernel-source/build.linux-rt-4.14.63+gitAUTOINC+da6bee3cef-r0.ar_configured
- Edit makefile (e.g. vim):
MAKEARGS := -C ..
- Clean up:
cd ~/workspace/kernel-sourcemake mrproper
- Build kernel:
sudo apt-get install u-boot-toolscd ~/workspace/kernel-source/build.linux-rt-4.14.63+gitAUTOINC+da6bee3cef-r0.ar_configured
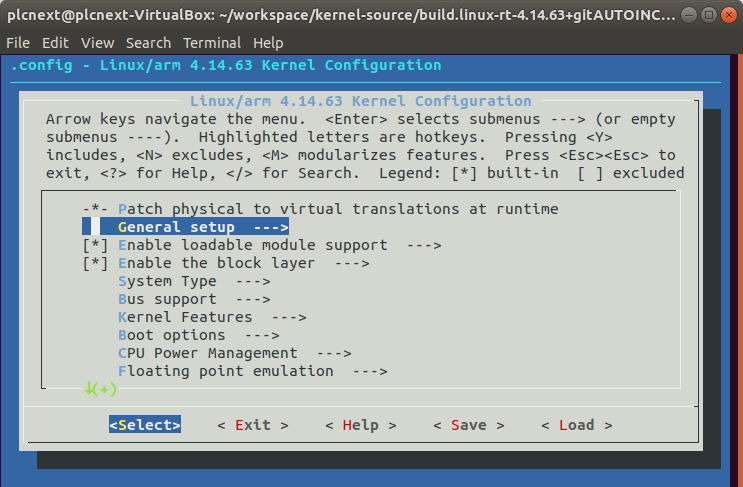
- Edit kernel configuration:
sudo apt-get install libncurses5-dev libncursesw5-devmake menuconfig- You can give the kernel a new name, alter <Local version>, change “pxc” to “modified” or something else, but in this case the loadable kernel modules on the device (/lib/modules/4.14.63-rt40-pxc) will no longer be found and loaded!
make uImage LOADADDR=0x00008000
The new kernel is now located here:
~/workspace/kernel-source/build.linux-rt-4.14.63+gitAUTOINC+da6bee3cef-r0.ar_configured/arch/arm/boot/uImage
Install the altered kernel
- Check the active partition:
cat /proc/cmdline
On my device this results in:
root=/dev/mmcblk0p3 rauc.slot=B ro rootwait rootrw=/dev/mmcblk1p1 init=/init mem=504M memmap=8M$0x1f80000 console=ttyS0,115200 uio_pdrv_genirq.of_id=generic-uio
- The partition is mounted read-only. Remount the active partition as read/write:
sudo mount -o remount,rw /dev/mmcblk0p3 /media/rfs/ro
- Copy the new kernel to “/media/rfs/ro/boot”
- Rename the file, e.g.: “uImage-4.14.63-modified”
- Set the symbolic link to the new kernel:
cd /media/rfs/rorm uImageln -s uImage-4.14.63-modified uImage
- Reboot
- Check if the new kernel is running:
cat /var/log/dmesg
Booting Linux on physical CPU 0x0
[0.000000] Linux version 4.14.63-rt40-modified (plcnext@plcnext-VirtualBox) (gcc version 7.3.0 (GCC)) #3 SMP PREEMPT RT Thu Feb 21 13:52:23 CET 2019
Troubleshooting
The original kernel is still booting
- The new kernel may have failed to boot and as a result the controller has switched to the backup-partition with a working kernel
- The System has two separate root-filesystem, after each firmware-update the active partition will be switched.
- You can check the active partition via the boot command line:
cat /proc/cmdlineresults inroot=/dev/mmcblk0p2 rauc.slot=A ro rootwait rootrw=/dev/mmcblk1p1 init=/init mem=504M memmap=8M$0x1f80000 console=ttyS0,115200or
root=/dev/mmcblk0p3 rauc.slot=B ro rootwait rootrw=/dev/mmcblk1p1 init=/init mem=504M memmap=8M$0x1f80000 console=ttyS0,115200 - Manually mount the other partition with the non-working kernel (/dev/mmcblk0p2 or /dev/mmcblk0p3) and replace the kernel again.
- Tell the system to use the other partition again, so you can retry:
sudo rauc status mark-active other
- You may have replace the kernel directly in /boot
- This will not work because the kernel will then be stored in the overlay filesystem which is not active during boot time.
- You have to replace the kernel in /media/rfs/ro/boot like shown above.
The device does not boot at all
Do a factory reset type 2, for the procedure check the User Manual for the controller:
A golden image firmware will replace the installed firmware.
Note:
- All settings on the device will be lost.
- You may have to update the firmware again to the version you had before.
Leave a Reply
You must be logged in to post a comment.