

This is a little quickstart on how to use PLCnext Technology with IO-Link devices.
When implementing IO-Link (IEC 61131-9) for the first time there are some “have to know” things.
I hope this quickstart helps everyone to get on the right track.
Preparation
Equipment used
- AXC F 2152 Starterkit
- AXL E IO-Link master (2701513)
Knowledge required
- Configuring Profinet devices in PLCnext Engineer
- How does synchronous and asynchronous data transfer work
Documentation used
- Datasheet of the IO-Link master
- Datasheet of the IO-Link device
Step 1: connect the hardware
For the connecting to network, the power supply, and the sensor I used a standard cabling.
In the datasheet of the IO-Link master you find that for the power supply:
- brown and black are 24v
- blue and green are GND
In the datasheet of the Sick sensor you find this:
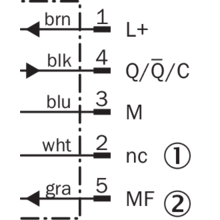
Which means it is a 3-wire sensor and it will work on A-type and B-type ports.
Step 2: configure the standard Profinet
- Load the AXL E library (not the GSDML)
- Insert the IO-Link Master
- Find it online and pair it to the controller

Download these settings to the controller, the BF-C led goes off, as well as the BF led on the AXL E IO-Link master. Please notice that the IO-Link led on the IO-Link master is still off in this moment.
Step 3: configure the IO-Link device hardware
- Double-click the IO-Link master: here you can insert an IO-Link type. In the SICK datasheet we find:

So we should insert an IO-Link device with 2byte input in our hardware configuration: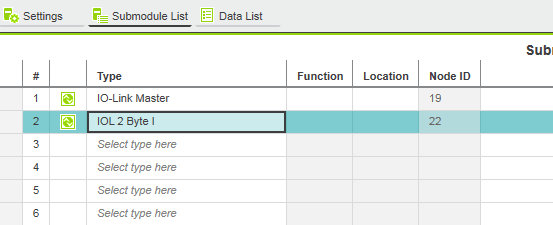
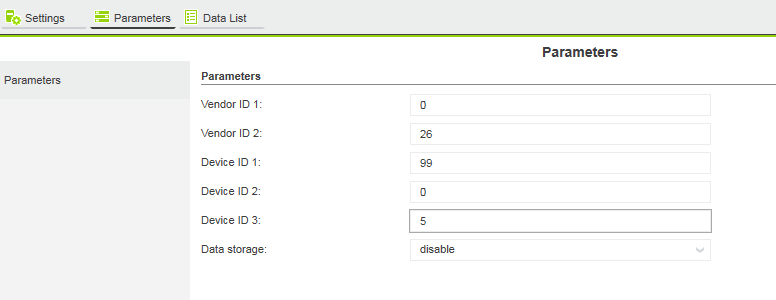
- Double-clicking this device in the project tree gives us the possibility to fill in the Vendor ID and the Device ID. The device specific parameters are found in the device documentation.
I peeked in the IODD file of the sensor:
Please notice these are decimal numbers!
- For the Vendor ID this is ok but for the Device ID we need a special trick.
- First we convert it into Hex code:
6488069->99 00 05 - These are 3 bytes which have to be individually converted back to decimal notation:
99->6400->0005->05
- Fill these decimal numbers in into the hardware configuration for the device:
- First we convert it into Hex code:
After downloading the parameters, the IO-Link communication should run.
Watching at the diagnose on the web interface, we’ll see this:
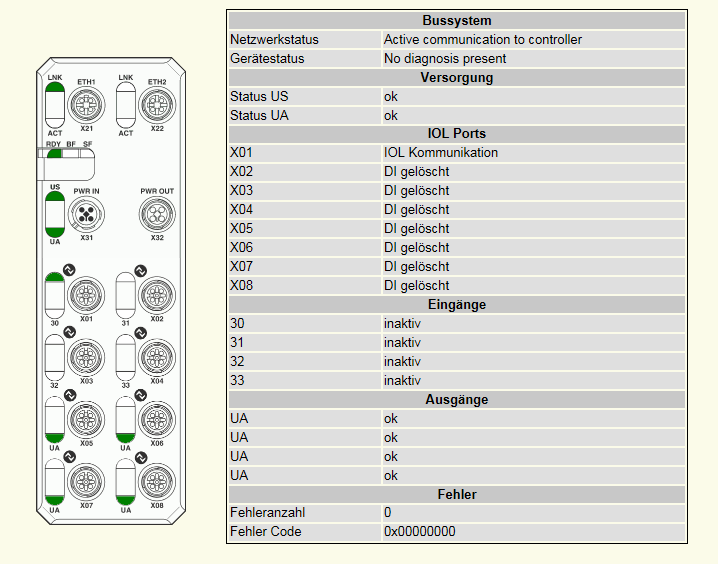
Please notice the green led at port 1, this could also be seen at the IO-Link master itself.
Step 4: receive synchronous process data
Add a uint or word variable to the project and connect this to the GDS data of the IO-Link port:
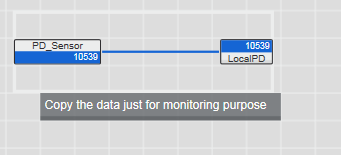
This is the synchronous process data.
Step 5: receive asynchronous process data
Add the IO-Link library to PLCnext Engineer.
I used the “PLCNE_IOL_Basic_PLCnext_2_20180928.msi” which I downloaded from the AXC F 2152 download page on the Phoenix Contact website. (In between, all function modules moved to the PLCnext Store, and the one used here was updated to work with the PLCnext Engineer 2019.0 LTS.)
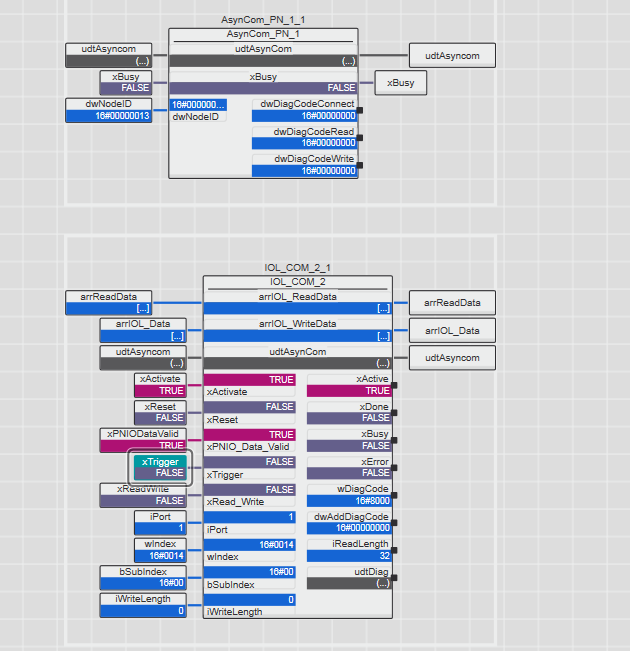
In the example we find that we need 2 blocks of Asyncom_PN to set up the Profinet communication channel and IOLCom to send asynchronous IO-Link data over this channel.
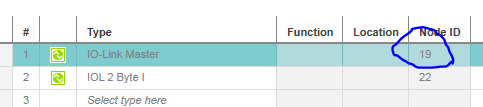
All we need for Asyncom is the NodeID of the IO-Link master which is in our case 19 ( = 13h):
At the IOL we set the bit PNIOdataValid when the AR is valid.xActivate will communicate with the Asyncom block.
The xActive should become true and the Diagcode should be 8000.
Fill in the port .. (at the IO-Link master 1 = port X01).wIndex and bSubindex are numbers for the object you want to read.
I will be reading object 10h with subindex 0 because the SICK documentation does not supply me with sub indexes.
Reading this will – after some time – give an answer of ireadlength 16, in the data array we will find (53,49,43,4B,20, 41,47, 00, 00,00, 00 etc) which is according to the ASCII table “SICK AG”, and at object 14h I get the answer “Ultrasonic sensor”:
That’s it: IO-Link on PLCnext Technology.
Any questions or comments?
Leave a Reply
You must be logged in to post a comment.