
I would like to describe two different ways to remote debug a .Net Core 3.0 application with VS Code on a PLCnext target. In this post I’m using Debian 9 on my development machine and an AXC F 2152 with version: PLCnext Linux 2020.0.
- Start and debug your remote application (Press “F5” and debug)
- Attaching to remote processes
Before we could start to remote debug at our target, we have to prepare two different things. The first one is to set up the remote debugger and the second one is to enable an SSH key based authentication to the controller. The tutorial is based of two posts in the Makers Blog.
- Debugging .NET Core 3 applications on PLCnext (by Andreas Orzelski)
- Automate your development workflow with Visual Studio Code (by Björn Sauer)
Install the debugger on the target
First we create the .vs-debugger directory in our home directory and create a subdirectory called vs2019.
At the controller:
mkdir -p ~/.vs-debugger/vs2019Download the GetVsDbg.sh script and the VS debugger (vsdbg). Copy both files to the controller.
scp GetVsDbg.sh  admin@<IP of the controller>:/opt/plcnext/.vs-debugger
scp vsdbg-linux-arm.zip   admin@<IP of the controller>:/opt/plcnext/.vs-debugger
Unzip the vsdbg-linux-arm.zip to the vs2019 directory and afterwards remove vsdbg-linux-arm.zip.
At the controller:
cd ~/.vs-debugger
unzip vsdbg-linux-arm.zip -d ~/.vs-debugger/vs2019
rm vsdbg-linux-arm.zip
We navigate in vs2019 and make vsdbg executable. vsdbg itself is a .NET Core application, for which the environment variables need to be turned off. Now we could test the debugger.
cd  ~/.vs-debugger/vs2019
chmod +x vsdbg
export DOTNET_SYSTEM_GLOBALIZATION_INVARIANT=true
export COMPlus_LTTng=0
./vsdbg
For more information, see Install the .NET Core runtime 3.0.0 on the AXC F 2152
Then vsdbg should start without exceptions or errors. But if we execute vsdbg the environment variable must be set each time. The solution for this problem is creating a script. We rename vsdbg to vsdbg2 and create a script to set the environment variables and to start the debugger by executing vsdbg2.
mv vsdbg vsdbg2
touch vsdbg
echo "export DOTNET_SYSTEM_GLOBALIZATION_INVARIANT=true" >> vsdbg
echo "export COMPlus_LTTng=0" >> vsdbg
echo "~/.vs-debugger/vs2019/vsdbg2" >> vsdbg
chmod +x vsdbg
We test the debugger again. The result should be the same as in the first test. Finally, we have to create a success.txt to show GetVsDbg.sh that the debugger was downloaded successfully.
./vsdbg
cd  ~/.vs-debugger/vs2019
touch success.txt
echo "16.3.10904.1" >> success.txt
We navigate to .vs-debugger and start GetVsDbg.sh.
cd  ~/.vs-debugger
sh GetVsDbg.sh -v vs2019 -l ~/.vs-debgger/vs2019 -d vscode
The output should look like:
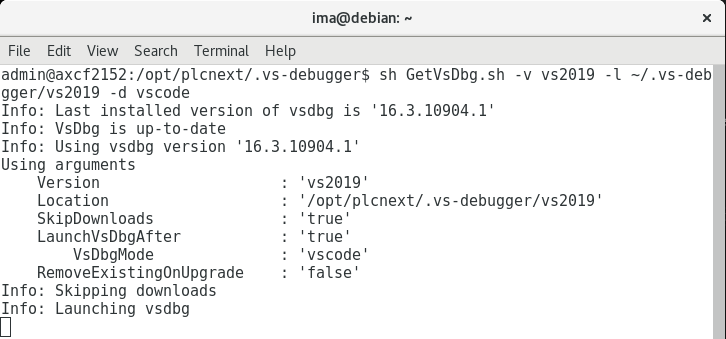
Now the debugger is ready to go.
Requirement to attach processes
If you like to attach the debugger to process on the controller, the IDE must be able to list all active processes on the controller.
VS Code (or VS 2019) issues the ps command to show the available tasks:
ps -axww -o pid=A,ruser=B,args=CPLCnext only has busybox for the ps command which doesn’t include the needed switches of ps. Fortunately it is possible to use the Debian ps on the PLCnext. Please download the packages and copy ps, libprocps.so.3, libprocps.so.3.0.0 to the controller:
cd ~/Downloads
wget http://ftp.de.debian.org/debian/pool/main/p/procps/procps_3.3.9-9+deb8u1_armhf.deb
ar -x procps_3.3.9-9+deb8u1_armhf.deb
tar -xf data.tar.xz ./bin/ps
scp  /bin/ps admin@<IP of the controller>:/opt/plcnext/Downloads

wget http://ftp.de.debian.org/debian/pool/main/p/procps/libprocps3_3.3.9-9+deb8u1_armhf.deb
ar -x libprocps3_3.3.9-9+deb8u1_armhf.deb
tar -xf  data.tar.xz ./lib/arm-linux-gnueabihf
scp  lib/arm-linux-gnueabihf/libprocps.so.3  admin@<IP of the controller>:/opt/plcnext/Downloads
scp  lib/arm-linux-gnueabihf/libprocps.so.3.0.0 admin@<IP of the controller>:/opt/plcnext/Downloads
We rename the ps command in bin to ps-old.
On the controller:
cd ~
cd ../../bin
su
mv ps ps-old
exit
Copy the Debian ps into bin. Then copy libprocps.so.3 and libprocps.so.3.0.0 into lib.
cd ~
cd Downloads
su
mv ps /bin
mv libprocps.so.3 /lib
mv libprocps.so.3.0.0 /lib
Finally, we make ps executable.
cd ~
cd ../../bin
chmod +x ps
exit
Now the debugging environment is finished. The next step is to set up a key based SSH authentication.
SSH key based authentication
To automate the download of the shared object library and restart of the PLCnext runtime we need to set up key based authentication for the ssh server on the controller. This is needed because we don’t want to type in our password on each action. Edit the ssh server configuration /etc/ssh/sshd_config on the target controller and modify the AuthorizedKeysFile and PermitRootLogin options.
Remember to deactivate the
PermitRootLoginoption on production systems. It is not recommended leaving this option activated in production systems.
PermitRootLogin yes

# The default is to check both .ssh/authorized_keys and .ssh/authorized_keys2
# but this is overridden so installations will only check .ssh/authorized_keys
AuthorizedKeysFile .ssh/authorized_keys /home/%u/.ssh/authorized_keys
The PermitRootLogin allows connecting to the ssh server with the root user. The AuthorizedKeysFile option specifies files to look for authorized keys. We need to add the /home/%u/.ssh/authorized_key file here. The %u parameter will expand to the user name that tries to log in to the ssh server.
So why is the additional file needed? This is because the home directory of the admin user is set to /opt/plcnext and this directory is the working directory of the PLCnext runtime. The ssh server needs restricted file permissions to the directory in which the .ssh folder is located. The directory must not be writeable by the group. So if we would use the home directory of the admin user, the group plcnext would not have write permissions to the PLCnext runtime working directory anymore. This is why we add the explicit location to the AuthorizedKeysFile option. So we can place the file authorized_keys in a directory in /home/admin/.ssh even if the actual home directory of the user is set to another location.
Create a ssh key for your user on the build machine if not already done. Do not specify a password for your key otherwise we have to set up a key agent to provide the encrypted keys and this is not part of this example.
ssh-keygen -t ed25519The option ed25519 uses an elliptic curve cryptography based algorithm for the key.
Copy the key to the target controller for the root user. This requires that a password for the root user was set with sudo passwd root on the controller.
ssh-copy-id -i ~/.ssh/id_ed25519.pub root@192.168.1.10This will add the public key into the authorized_keys file in the home directory of the root user /home/.root/ssh/authorized_keys. The ssh-copy-id tool can not be used to copy the key for the admin user because the tool would add the key to the home directory of the user. For the admin user the home directory is set to /opt/plcnext so we need to manually copy the public key. Login with the admin user to the target controller and run the following commands.
su -
mkdir -p /home/admin/.ssh
chown -R admin:plcnext /home/admin
exit
chmod 755 /home/admin
chmod 700 /home/admin/.ssh
touch /home/admin/.ssh/authorized_keys
chmod 600 /home/admin/.ssh/authorized_keys
Now from your build machine run:
cat ~/.ssh/id_ed25519.pub | ssh admin@192.168.1.10 "cat >> /home/admin/.ssh/authorized_keys"This will append the public key to the authorize_keys file on the target controller.
Finally, restart the ssh server on the controller.
su -
/etc/init.d/sshd restart
exit
exit
We should now be able to login to the controller with our ssh key and without password. Try to connect again to the controller.
ssh admin@192.168.1.10
admin@axcf2152:~$
It should directly connect without prompting for a password.
Remote debug a .NET Core application with Visual Studio Code
Now the environment is ready to debug an application remotely. There are different ways to do so. I would like to show two of them:
- Start and debug your remote application (Press “F5” and debug)
- Attaching to a remote process
Create a sample application
But first, lets create a Hello World application in VS Code as a basis. It should be possible to debug the code at the local machine. We add a for loop and some console commands to have some user interactivity.
The Hello World code could like look like the example below, but it doesn’t actually matter.
using System;

namespace HelloWorld
{
   public class Program
    {
        static void Main(string[] args)
        {
            Console.WriteLine("Hello World!");

            for (int i = 0; i < 10; i++)
            {
                Console.WriteLine("Hello PLCnext");
            }
            Console.WriteLine("Enter any key to continue");
            Console.ReadLine();
            Console.WriteLine("Enter any key to exit");
            Console.ReadLine();
        }
    }
}
At last, we have to add the PublishSingleFile and the RuntimeIdentifier tags to the HelloWorld.cspoj file. The final .csproj file looks like:
<Project Sdk="Microsoft.NET.Sdk">

  <PropertyGroup>
    <OutputType>Exe</OutputType>
    <TargetFramework>netcoreapp3.0</TargetFramework>
      <PublishSingleFile>true</PublishSingleFile>
      <RuntimeIdentifier>linux-x64</RuntimeIdentifier>
  </PropertyGroup>

</Project>
Note: If you need help to create an application. Please check: Getting started with C# and .Net Core 3.0 on PLCnext
Start and debug your remote application (Press “F5” and debug)
The first way to debug a C# application is more common for developers. Scott Hanselmann called it the inner loop. He describes is that way: “write code, run code, change”. This section shows a method to do so with a PLCnext target and a .Net Core 3.0 application published as single file app.
This section is mainly based on an article by Scott Hanselmann: Remote debugging with VS Code on Windows to a Raspberry Pi using .NET Core on ARM
In the Hello World project root, we start creating a new script to publish and to copy our application to the target. Lets name it publish.sh and add the publish and copy command.
touch publish.sh
echo "dotnet publish -c Release -r linux-arm -o ../publish HelloWorld.csproj" >> publish.sh
echo "scp  ../publish/HelloWorld.pdb   admin@192.168.224.41:/opt/plcnext/apps" >> publish.sh
echo "scp  ../publish/HelloWorld   admin@192.168.224.41:/opt/plcnext/apps" >> publish.sh
chmod +x publish.sh
This script simplifies the processes of publishing and copying the code to the target in one line. Please test the script with:
dotnet build
./publish.sh
The program should be build, published and copied to our target. We have to find the two files in ~/apps. on our target device.
The next step is to include this mechanism into a task. Tasks could be used to integrate external tools in VS Code.
For more information, see Integrate with External Tools via Tasks
We open the task.json in our project and add the following code to the task array:
  {
            "label": "remotePublish",
            "type": "shell",
            "dependsOn": "build",
            "command": "./publish.sh",
            "presentation": {
                "reveal": "always",
                "panel": "new"
            },
            "problemMatcher":[]
        },
The remotePublish task executes the build task and the publish.sh script, like we did in the last test.
The final step is to create a new debugger configuration. In launch.json, we copy the .NET Core Launch (console) object and paste it below the origin object. We rename it in .Net Core Launch remote (console) and have a good start to configure a new use case.
 {
            "name": ".NET Core Launch (console)",
            "type": "coreclr",
            "request": "launch",
            "preLaunchTask": "build",
            "program": "${workspaceFolder}/bin/Debug/netcoreapp3.0/HelloWorld.dll",
            "args": [],
            "cwd": "${workspaceFolder}",
            "console": "externalTerminal",
            "stopAtEntry": false
        },
        {
            "name": ".NET Core Launch remote (console)",
            "type": "coreclr",
            "request": "launch",
            "preLaunchTask": "build",
            "program": "${workspaceFolder}/bin/Debug/netcoreapp3.0/HelloWorld.dll",
            "args": [],
            "cwd": "${workspaceFolder}",
            "console": "externalTerminal",
            "stopAtEntry": false
        },
We change the preLaunchTask to remotePublish to use our new defined task. Now the code will be build, published and copied before we start the debugging session.
"preLaunchTask": "remotePublish"Also, we have to configure the ssh connection to our target. We add the pipeTransport object including the debugger path.
     "pipeTransport": {
                "pipeProgram": "ssh",
                "pipeArgs": [
                    "-T",
                    "admin@192.168.224.41"
                ],
                "debuggerPath": "~/.vs-debugger/vs2019/vsdbg",
                "pipeCwd": "${workspaceRoot}",
                "quoteArgs": true,
            },
The SymbolOptions define the places where the debugger could find symbols. The "searchPaths": ["~/apps"] is a path on the remote device.
  "symbolOptions": {
                "searchPaths": ["~/apps"],
                "searchMicrosoftSymbolServer": false
            }
On the other hand we have to set the parameter justMyCode : false to allow the debugger to look outside of our project for PDBs.
Note: If you are close to a wtf moment while you modifying the
launch.jsonor thetask.jsonmake sure you are working in the right configuration.
The program defines an application to start up. Using a ssh tunnel moves the cwd to the remote device. We step in ~/apps and start the published application.
     "program": "HelloWorld",
            "args": [],
            "cwd": "~/apps",
For more information, see Remote Debugging On Linux Arm and
Configuring launch.json for C# debugging
The final configuration:
    {
            "name": ".NET Core Launch remote (console)",
            "type": "coreclr",
            "request": "launch",
            "preLaunchTask": "remotePublish",
            "program": "HelloWorld",
            "args": [],
            "cwd": "~/apps",
            "console": "internalConsole",
            "stopAtEntry": false,
            "justMyCode": false,
            "sourceFileMap": {
                "~/apps": "${workspaceRoot}"
            },
            "requireExactSource": false,
            "pipeTransport": {
                "pipeProgram": "ssh",
                "pipeArgs": [
                    "-T",
                    "admin@192.168.224.41"
                ],
                "debuggerPath": "~/.vs-debugger/vs2019/vsdbg",
                "pipeCwd": "${workspaceRoot}",
                "quoteArgs": true,
            },
            "symbolOptions": {
                "searchPaths": ["~/apps"],
                "searchMicrosoftSymbolServer": false
            }
        }
Now we could select the Debugger profile: .NET Core Launch remote (console), hit F5 and debug our application as common.

Attaching to remote process
As, before we start to extend the configuration of the debugger in Hello World. We add a new option to the debugger by editing the launch.json.
For more information, see Configuring launch.json for C# debugging
We add a new element into the launch.json to configure a debugger option.
    {
            "name": ".NET Core SSH Attach",
            "type": "coreclr",
            "request": "attach",
            "processId": "${command:pickRemoteProcess}",
            "pipeTransport": {
                "pipeProgram": "ssh",
                "pipeArgs": [
                    "-T",
                    "admin@192.168.224.41"
                ],
                "debuggerPath": "~/.vs-debugger/vs2019/vsdbg",
                "pipeCwd": "${workspaceRoot}",
                "quoteArgs": true
            },
            "justMyCode": false,
            "symbolOptions": {
                "searchPaths": ["~/apps"],
                "searchMicrosoftSymbolServer": false
            },
            "requireExactSource": false,
        }
The final launch.json should look like:
{
     "version": "0.2.0",
    "configurations": [
        {
            "name": ".NET Core Launch (console)",
            "type": "coreclr",
            "request": "launch",
            "preLaunchTask": "build",
            "program": "${workspaceFolder}/bin/Debug/netcoreapp3.0/HelloWorld.dll",
            "args": [],
            "cwd": "${workspaceFolder}",
            "console": "externalTerminal",
            "stopAtEntry": false
        },
        {
            "name": ".NET Core Launch remote (console)",
            "type": "coreclr",
            "request": "launch",
            "preLaunchTask": "remotePublish",
            "program": "HelloWorld",
            "args": [],
            "cwd": "~/apps",
            "console": "internalConsole",
            "stopAtEntry": false,
            "justMyCode": false,
            "sourceFileMap": {
                "~/apps": "${workspaceRoot}"
            },
            "requireExactSource": false,
            "pipeTransport": {
                "pipeProgram": "ssh",
                "pipeArgs": [
                    "-T",
                    "admin@192.168.224.41"
                ],
                "debuggerPath": "~/.vs-debugger/vs2019/vsdbg",
                "pipeCwd": "${workspaceRoot}",
                "quoteArgs": true,
            },
            "symbolOptions": {
                "searchPaths": ["~/apps"],
                "searchMicrosoftSymbolServer": false
            }
        },
        {
            "name": ".NET Core Attach",
            "type": "coreclr",
            "request": "attach",
            "processId": "${command:pickProcess}"
        },
        {
            "name": ".NET Core SSH Attach",
            "type": "coreclr",
            "request": "attach",
            "processId": "${command:pickRemoteProcess}",
            "pipeTransport": {
                "pipeProgram": "ssh",
                "pipeArgs": [
                    "-T",
                    "admin@192.168.224.41"
                ],
                "debuggerPath": "~/.vs-debugger/vs2019/vsdbg",
                "pipeCwd": "${workspaceRoot}",
                "quoteArgs": true
            },
            "justMyCode": false,
            "symbolOptions": {
                "searchPaths": ["~/apps"],
                "searchMicrosoftSymbolServer": false
            },
            "requireExactSource": false,
        }
    ]
}
Now, the debugger provides a new option named .NET Core Attach".
If we start a new debugging session the process picker will appear and provide the remote list of active processes. But first things first: we compile our code. Then we publish the code and copy the binary to the controller. Finally, we execute the application on the PLCnext target.
dotnet build HelloWorld.csproj
dotnet publish -c Release -r linux-arm -o ../publish HelloWorld.csproj
cd ../publish/
scp HelloWorld   admin@192.168.224.41:/opt/plcnext/apps
scp HelloWorld.pdb   admin@192.168.224.41:/opt/plcnext/apps
ssh admin@192.168.224.41
admin@axcf2152:/opt/plcnext$ .//apps/HelloWorld
Now we can set a breakpoint in line 17 and start a new debugging session. We pick the process and enter a key into our running application. The result should look like:

Important: This post is outdated!
Some things might not work or need to be adapted. Root user isn’t available on newer devices.
Your PLCnext Team
Leave a Reply
You must be logged in to post a comment.