
Hello PLCnext Community,
you probably already have seen awesome things within the last publication, like Node-RED, the package manager and PROFICLOUD.
All right, but all these cool IoT applications have a common need, that is right, they need to be connected to the Internet in order to function. Well, our colleague Josh Krug put together this great documentation on how to configure the AXC F 2152 for an Internet connection.
! Important ! Phoenix Contact cannot be held accountable for any vulnerabilities which your PLC may be exposed while connected to the Internet. The proper precaution and protection for that shall be implemented by the user and is not covered within this document. For more information on Cyber Security please visit https://phoenixcontact.com/mguard
If you have any question and concerns on this document please contact us at the PLCnext community or UsTechnicalService@phoenixcon.com
Enjoy your Internet connection.
Objectives
This document covers the following procedures:
- Determine Internet settings for the device
- Set up the root user on the controller
- Modify network settings on the controller and PC to use the Internet
- Verify that an Internet connection has been established with the controller
Requirements
The following hardware and software was used in the development of this procedure
Hardware
- PC
- AXC F 2152
- Internet Connection w/ Cabling
Software
- PuTTY
- ColaSoft MAC Scanner
Procedure overview
Following is an overview of the steps that were performed in this procedure:
- Part 1: Internet Details
- Part 2: Connecting to the controller and modifying network settings
- Part 3: Verifying Internet communication
Procedure
Part 1: Internet Details
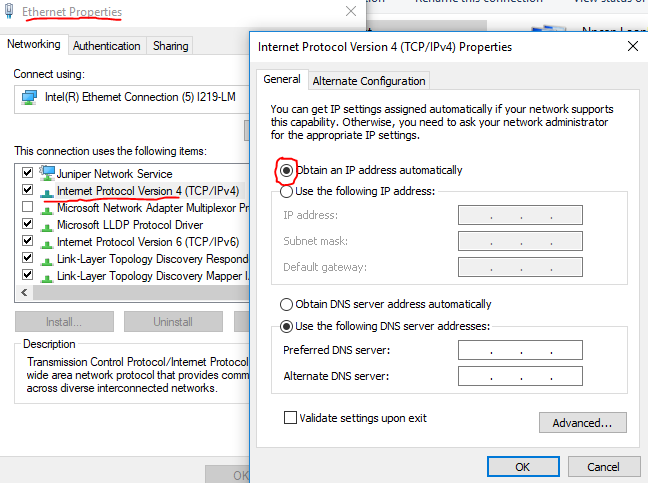
1. Using the PC, connect to the Internet and receive an IP address automatically. Be sure to select the adapter that is connected to the internet
2. At the command prompt, type “ipconfig” and view the settings for the Ethernet adapter:
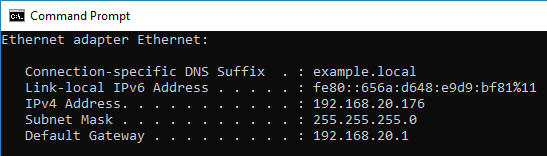
3. Take a note of the following from the command prompt:
a. IPv4 Address: 192.168.20.176
– The controller will be set to 192.168.20.X (an IP that has not been used yet)
– A corporate/business network will require IT support to allow the device on the network
b. Subnet Mask: 255.255.255.0
– The same subnet mask will be used for the controller
c. Default Gateway: 192.168.20.1
– The same gateway will be used for the controller
4. To use websites domain names, a DNS server must be included; we can use 8.8.8.8 by default
a. If using a corporate/business network, IT support may be needed to determine the proper address.
Part 2: Connecting to controller and modifying network settings
1. First, a known available IP address must be acquired. If one is known use that IP. Otherwise, the MAC Scanner can be used to look for available addresses:
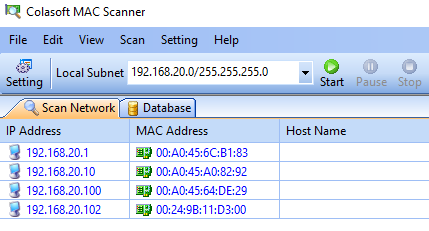
Select the proper Local Subnet connection and start scanning the network.
Once you see a valid IP stop the scan immediately.
NOTE: Any address that does not appear in the table is available (i.e. 192.168.20.9 would be a valid address)
NOTE: **Scanning the complete network is not recommended, and if it is needed it should be stopped as soon as possible.
2. Disconnect the PC from the Internet and connect to the controller using the same Ethernet port.
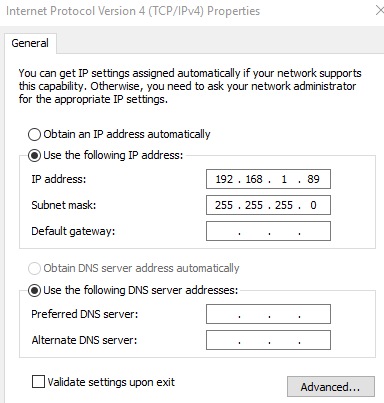
3. Assign a static IP to the PC that is within same network as the controller
a. By default the controller’s settings are
– IP address: 192.168.1.10
– Subnetmask: 255.255.255.0
– Make sure the PC’s IP is NOT the same as the controller’s
4. Open Putty, type in the current IP of the controller and select “Open”
a. If a security warning is issued, select “yes”
5. Once connected log in as “admin” and use the default password on the controller.
6. Set up root privileges
a. Type: “sudo passwd root”
– Enter default password
– Change password of root
7. Login as root
a. Type “su” and enter the newly created password
8. Set up IP settings for controller
a. Type “nano /etc/network/interfaces”
b. Edit the file to the available IP address found in Part 2 Step 1 and additional network details from Part 1 Step 3
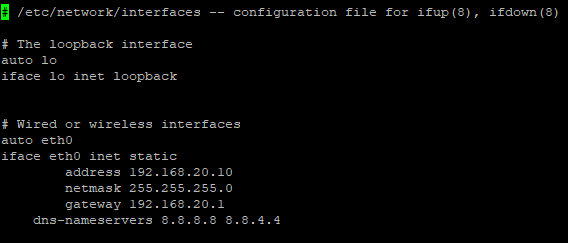
c. Exit and save file
d. Type “reboot”
– You will no longer have access to the controller and will need to change the adapter back to the way it was configured in Part 1 Step 1.
– NOTE: You will receive the following message in PuTTY if the network has been changed or lost.
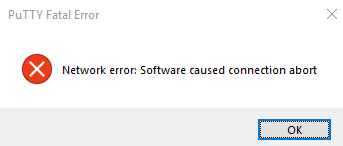
– In case of new network settings, restart PuTTY and enter new IP address
– If no network settings have been changed check power, connections, and restart session.
9. Close Putty
Verifying Internet Communication
1. Connect Internet to the controller and the PC
2. Change PC to be on the same network as the internet (Part 1 Step 1)
3. Using Putty type the new controller’s IP address (i.e. 192.168.20.10) and open the terminal
4. In the terminal first test the internet connection
a. Type “ping 8.8.8.8”
b. This should be the result (Press “CTRL + c” once verified)

5. Now verify that domain names (DNS settings) can be resolved
a. Type “ping www.google.com”
b. This should be the result (Press “CTRL + c” once verified):

6. Enjoy your Internet connection! : )
Important: This post is outdated!
IP settings has changed, please use the WBM or other official ways to setup your controller IP.
Your PLCnext Team
Leave a Reply
You must be logged in to post a comment.