

This little demo project shows how to easily use a PLCnext controller as a smart home device in the open-source home automation software Home Assistant via the REST API and Modbus TCP. With the PLCnext controller you can use the Axioline components in your automation to add easily more powerful Outputs then the GPIO Pins of the Raspberry Pi, temperature sensors like Pt100 and bus systems like DALI. All you need is a working Home Assistant installationand a PLCnext controller with a small but runnable PLCnext project.
Prerequisites
- Home Assistant Core 2021.1.5
- Balena
- PLCnext Engineer 2020.6
- AXC F 2152FW 2020.0 LTS
- Raspberry Pi 2 Image (The startup can take one hour.)
Libraries:
- Modbus_TCP (Build 8) for PLCnext Engineer
Home Assistant Services:
Functionality Description
To give a brief overview of the possibilities of using a PLCnext Controller as a smart home device, there is a PLCnext project that can hard reset other devices by controlling their supply voltage with relays. The resets are triggered by commands which are send to a Telegram Bot, before an email is send with the information that a restart was initiated. This example will be shown with two different ways to connect the PLCnext controller to the Home Assistant environment.
Architecture
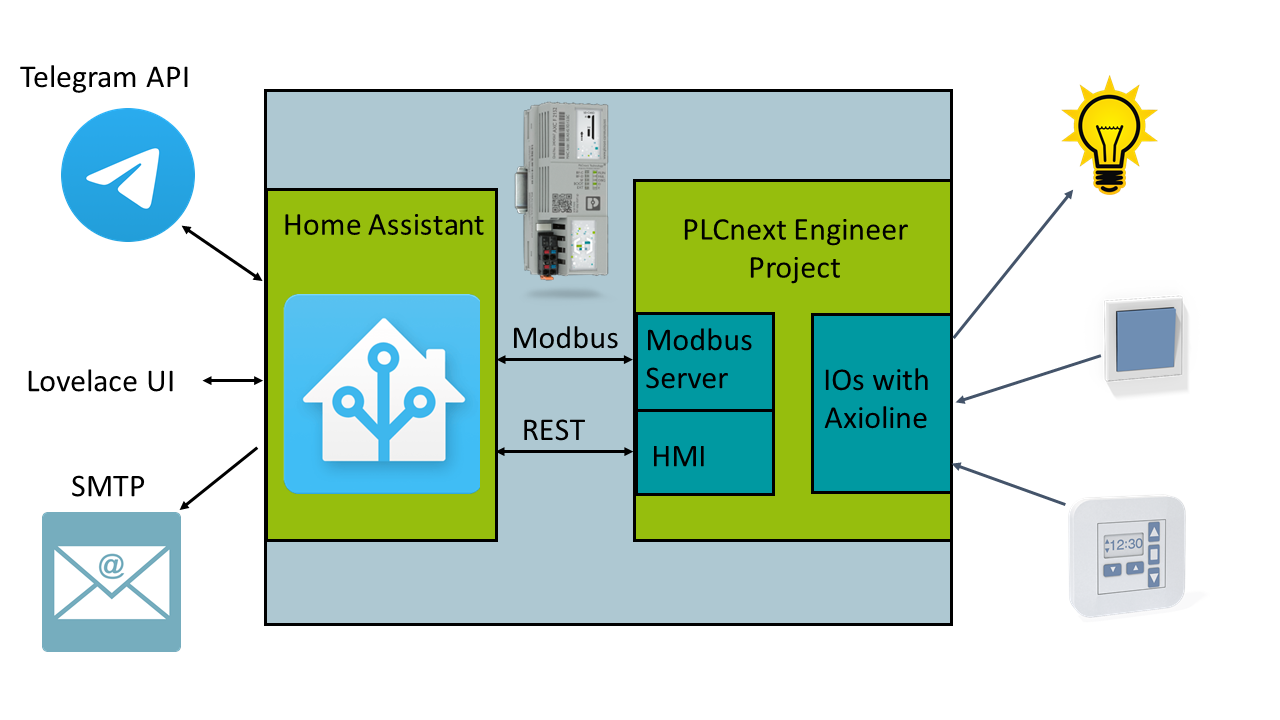
Connection via Modbus TCP
Starting with the Modbus TCP connection, a Modbus server is added to the PLCnext project by using the Modbus TCPl ibrary. The configuration is the same as in the library example. Choosing the right Modbus register depends on the kind of data and how they are meant to be used. In this case the variables are mapped to the coil register.
Please pay attention to the fact, that the Modbus server does not support more than one connection at the time. So if a connection is not ended correctly, which unfortunately happens sometimes while testing the connection, the server will get into an error state and has to be restarted manually. To avoid this, it is recommended to program an automatic restart of the Modbus server in the PLCnext project.
For the Modbus client there are two main possibilities in Home Assistant and it is on you to choose your favorite. The first one is to use the Node-RED add-on and one of the Modbus libraries which are available there. The more intuitive one is to configure an entity in the configuration.yaml of your Home Assistant environment (more informations). As shown below the standard switch service is used, which is a common way to work with boolean variables, because it has implemented turn_on/turn_off functionalities to set or reset the variables.
modbus:
    type: tcp           # using Modbus TCP
    host: YOUR_SERVER_IP    # fill the server ip address
    port: 502
    name: hub1          # could be changed
switch:
  - platform: modbus
    coils:
      - name: restartMB     # could be changed
        hub: hub1
        slave: 1
        coil: 13            # the register position of the variable
If you choose the Node-RED possibility, be aware of the fact that it typically starts different connections for reading and writing with Modbus TCP, so that the Modbus server goes in an error state as mentioned above. To avoid this, you can use Modbus UDP or two Modbus servers in your PLCnext project, one for reading and one for writing.
Connection via REST API
The second possibility for the connection is the PLCnext REST data interface. This interface is related to the PLCnext HMI, so it is necessary to have at least one HMI page in your PLCnext project, even if it is empty, in order to make the REST API available. Furthermore, the variables have to be signed with the HMI flag. For more detailed information please have a look at the PLCnext Info Center.
In this case the Node-RED add-on is used to generate HTTP requests on the Home Assistant side. The installation of the add-on is done by following this and this instructions. Make sure that you have done both steps before you go on.
If the HMI-user authentication in the PLCnext project is activated, the authentication in Node-RED could look like this:

The flow runs the authentication and stores the access token to use it in the later requests. For the exact structure of the HTTP requests please also check the documentation in the PLCnext Info Center.
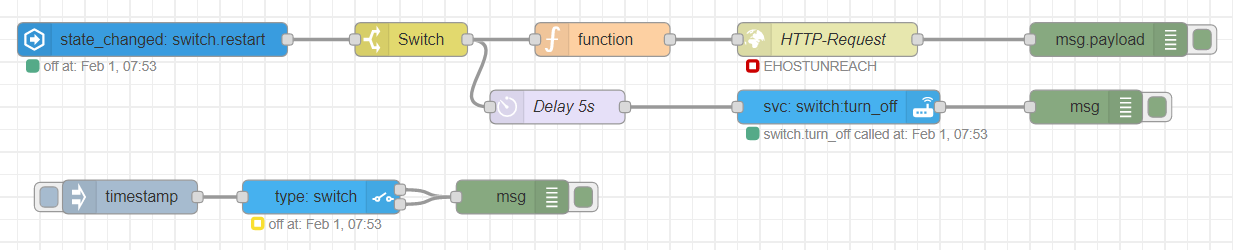
To get access to the data of your Home Assistant environment in Node-RED, there are several nodes coming with the Node-RED add-on. The short flow at the bottom of the following figure creates a new entity in Home Assistant and in the flow above this entity is checked for changes. If the entity is set to true, a variable in the PLCnext controller is also set to true and triggers a reset. Because the restart variable in the PLCnext project is automatically set to false after the reset, the entity in Home Assistant is set to false after a delay of 5 seconds too.
Telegram Bot
To communicate with Home Assistant the Telegram Bot API is used. For using this a new bot must be registered by following this instruction.
telegram_bot:
  - platform: polling
    api_key: YOUR_API_TOKEN
    allowed_chat_ids:
      - YOUR_CHAT_ID_1
      - YOUR_CHAT_ID_2
The easiest way to find your chat id is to write your bot a message and then start http request:
A useful example for the Telegram Bot might be, that it informs you every morning about the todays weather conditions, so that you have an indication what you should wear this day. In this project he gets another task, to hard reset a PLC (push the button in the Modbus registers) by a command in Telegram. The command “/MBrestartPLC” is sent to the bot and starts an automation script in Home Assistant, which finally changes the Modbus coil register value and “/RESTrestartPLC” does the same by using the REST API.
SMTP
In Home Assistant the Simple Mail Transfer Protocol (SMTP) can be used to send emails with a selection of the data available in your home automation. The service can be implemented by adding the following code to the configuration.yaml:
notify:
  - name: SMTP_MESSENGER # could be changed
    platform: smtp
    server: SMTP_SERVER # e.g. smtp.gmail.com
    port: 587
    timeout: 15
    sender: YOUR_EMAIL_ADRESS
    encryption: starttls
    username: YOUR_USERNAME
    password: YOUR_PASSWORD
    recipient:
      - EMAIL_ADRESS_OF_THE_RECIPIENT
    sender_name: My Home Assistant # could be changed
Click here to get further information about the SMTP service in Home Assistant.
Automations
If all services and libraries are implemented and prepared, they have to be combined. This is done by the automations which are programmed in the automations.yaml of the Home Assistant environment. The structure of an automation is very simple as it is shown in the table below. The alias is just the name for the automation in Home Assistant. The trigger is the condition that has to be true to execute the automation, like a certain telegram command as used in this case, and the action is the task, like in this case setting a variable to true and sending an email.
| Modbus TCP | REST API |
- id: '1' alias: 'Trigger a reset of a controller via modbus' trigger: platform: event event_type: telegram_command event_data: command: '/MBrestartPLC' action: - service: switch.turn_on entity_id: switch.restartMB - service: notify.SMTP_MESSENGER data: title: 'PLC message' message: 'PLC restart initiated via modbus!' | - id: '2' alias: 'Trigger a reset of a controller via rest api' trigger: platform: event event_type: telegram_command event_data: command: '/RESTrestartPLC' action: - service: switch.turn_on entity_id: switch.restartREST - service: notify.SMTP_MESSENGER data: title: 'PLC message' message: 'PLC restart initiated via rest!' |
Conclusion
This little demo project proves, that it is quite simple to integrate a PLCnext controller in a home automation. The availability of all PLC data in Home Assistant paves the way for applications that are much more powerful than this example. Think about more complex PLC programs that can be controlled and monitored in dependance of the weather or other data available in Home Assistant.
Important: This post is outdated!
Docker/Balena isn’t supported anymore and root user isn’t available on newer devices. Please use Podman, it is a rootless pre installed alternative
Your PLCnext Team
Leave a Reply
You must be logged in to post a comment.