
This article describes how to debug custom C++ components and programs on a PLCnext Control device using Microsoft Visual Studio.The example in this article uses:
- AXC F 2152 with firmware version 2022.0.3.
- Microsoft Visual Studio 2019.
- PLCnext Toolchain version 2022.0 for Windows, with the Visual Studio extension.
- Software Development Kit for AXC F 2152 version 2022.0.3 for Windows.
Procedure
On the PLC:
- Allow the root user to login via ssh. This is required for remote debugging.
In Visual Studio:
- Create a PLCnext PLM project (e.g. PLCnextPLMProject1) with one component (e.g. MyComponent) and one program (e.g. MyProgram), for the target device.
- Make sure the “Solution Configuration” is set to Debug.
- Build the project.
In PLCnext Engineer:
- Add the user library and create an instance of the C++ program in an ESM task.
- Disable the ESM task watchdog by setting the Watchdog value to zero.
- Send the project to the PLC.
In Visual Studio, perform the following one-off configuration:
- Select Tools > Options > Cross Platform > Connection Manager and click the Add button.
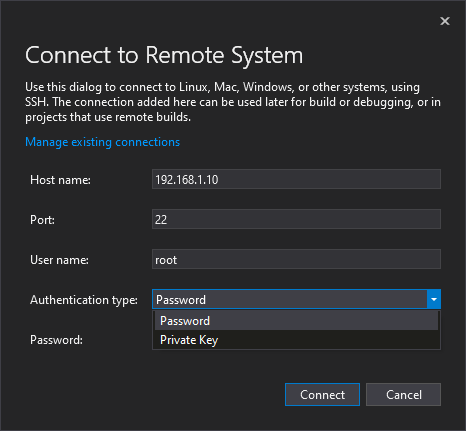
In the dialog box, enter the following details:
Host name: The IP Address of the PLCnext Control device.
Port: Unless you’re using a special SSH configuration, the port should be the default 22.
User name: root
Authentication type: If you have not set up Private Key access for the root user, then select Password and enter the password for the root user on the PLCnext Control device.Now you are ready to debug your C++ program. In Visual Studio:
- Select Debug > Attach to Process…
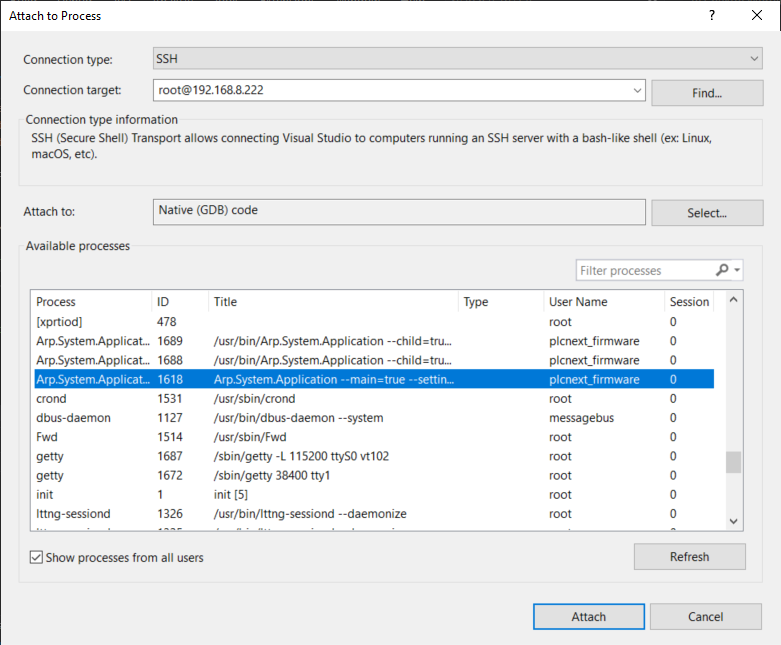
Select the Connection target that you configured earlier, and the other options as shown in the screen shot.
In the Available processes frame:
- For firmware versions prior to 2026.0 LTS: Select the Arp.System.Application process that contains –main=true in the title.
- For firmware versions 2026.0 LTS and later: Select the Arp.System.Application process that contains –child=true and –name=PrivilegedProcess in the title.
Click the Attach button, and you will enter debug mode.
You can now debug in the usual way – set breakpoints, add variables to the Watch window etc.
To stop debugging, don’t click the “Stop” button – that will stop the PLCnext Runtime process. Instead, select Detach all from the Debug menu.
Leave a Reply
You must be logged in to post a comment.