
Written by: Damian Bombeeck
Summary
In this tutorial I will show you how to download, build and install a third-party open-source library, in my case libcurl, on your PLCnext AXC F 2152 controller. I’ll go through the different steps and explain why these steps are needed, furthermore I’ll include all bash commands, pieces of code and side-notes concerning the installation. The tutorial is mainly focussed on CMake and won’t include languages as C#, JSON or Java.
NOTE: This is not a tutorial on how to use the libcurl library and how to set up a HTTPS request on the controller, this tutorial will only cover the installation of the library on the controller itself.
Introduction
When one wants to use lets say a cloud service and wants to keep the communication completely client-sided, not using protocols like MQTT or AMQP, HTTP(S) requests become quite interesting to work with. I assume the reader knows how these requests work, what they are good for and how to use them.
To make HTTP(S) requests a URL transfer library is needed, this library facilitates the functions needed to create a full request consisting of a URL request line, headers for authorization and a body with information (often in json format). I chose to use the libcurl library which is an free easy-to-use client-sided transfer library. It can handle protocols like FTP, HTTP, HTTPS, LDAP, SMTP and many more. The AXC F 2152 controller comes with an older version of libcurl already installed, but I want to install the latest version, and that’s exactly what I’m going to show you in this tutorial.
NOTE: When using third-party software, it is the responsibility of the user to ensure that all license conditions are complied with.
Prerequisites
The following hardware and software was used during the writing of this tutorial
Hardware:
- AXC F 2152 PLCnext controller
- Laptop with Linux installed (see software)
Software:
- Ubuntu 18.04.3 development environment with the following installed:
- Git 2.17.1
- CMake 3.15.5
- sshpass 1.06
- virtualbox-guest-dkms
- PLCnext SDK for linux 64 bit 2019.0.4 LTS (software development kit)
Procedure Overview
Following is an overview of the steps that I will explain in this tutorial:
- Step 1: Prepare your development environment
- Step 2: Download the source code
- Step 3: Make a shell script
- Step 4: Build the library
- Step 5: Duplicate and rename .so files
- Step 6: Remove default installation
- Step 7: Install the latest library
- Step 8: Verify your installation
NOTE: All shell commands preformed on the Linux of my PC are denoted with
Linux-PC$and all commands preformed on the Linux of my AXC F 2152 controller are denoted withLinux-Controller$.
Procedure
Step 1: Prepare your development environment
First we have to prepare our environment on which we will download the source code and build the library. I chose to use a Linux system, Ubuntu 18.04.3 in particular. The reason I chose Linux is the ease of use when working with it, but before we can continue using this environment we first need to install the PLCnext SDK and some necessary packages.
Download the PLCnext SDK for Linux 64bit, watch out for the version you are downloading. After you have downloaded the SDK, install it using the shell script, enter the following command in your terminal:
Linux-PC$ sudo ./pxc-glibc-x86_64-axcf2152-image-sdk-cortexa9t2hf-neon-toolchain-2019.0.sh -d /usr/programs/pxc/sdk/AXCF2152/2019.04
The -d option specifies the directory where you want to have the SDK installed. I chose to install my SDK in /usr/programs/pxc/sdk/AXCF2152/2019.04. I recommend you to make a directory similar to this to install your SDK in. I will get back to it when we build the shell script in step 3.
NOTE: If you can’t execute the shell script, Right-click on the file and open the properties. Navigate to the Permissions window and make sure the “Execute” box at the bottom is checked.
Next, type the commands listed below in your Linux terminal to install the required packages.
We first need to update the repositories to be able to retrieve the latest package versions.
Linux-PC$ sudo apt-get update
To download the library from GitHub we need the git package.
Linux-PC$ sudo apt-get install git
To be able to use all options of CMake we need to get the latest version.
Linux-PC$ sudo snap install cmake --classic
We need the sshpass package to make sure we can communicate with the controller through ssh.
Linux-PC$ sudo apt-get install sshpass
OPTIONAL: To make sure Linux is optimized as a guest OS (running on a virtual box) I installed this package.
Linux-PC$ sudo apt-get install virtualbox-guest-dkms
Step 2: Download the library
Now that the environment is all set up, we can continue to download the source code for the library from GitHub.
We do this with the git clone command.
Linux-PC$ git clone https://github.com/curl/curl /home/damian/Desktop/libcurl
the /home/damian/Desktop/libcurl in the command is used to create and specify a directory to which I want to download the source code, in my case this directory is called libcurl and is located on my desktop. The source code will be downloaded to the curl directory within this directory.
NOTE: From now on I will denote the path to my desktop with
[your_desktop_path]. Everytime you see this, you have to implement the path to your own desktop.
Step 3: Make a buildscript
The AXC F 2152 controller has a Linux system on it with an ARM achitecture, the development environment we use to build the library on has an AMD achitecture. If we use the default Linux compiler the library will be built for an AMD architecture, but we need an ARM architecture. This means we have to cross-compile the source code so that the library is recognized by Linux on the controller. To achieve this, we are going to use the PLCnext SDK which includes it’s own compiler. This compiler automatically builds projects for an ARM achitecture suited for the controller, all we need to do is make a shell script to use this SDK and it’s toolchain.
First navigate to your your libcurl folder and create a shell script file named buildscript.sh.
Linux-PC$ cd [your_desktop_path]/libcurl
Linux-PC$ sudo nano buildscript.sh
This wil create an empty shell script that opens up immediately in the text editor.
Type the following script into this file:
#!/bin/bash

DIR="$( cd "$( dirname "${BASH_SOURCE[0]}" )" >/dev/null 2>&1 && pwd )"

export SDKROOT="/usr/programs/pxc/sdk/AXCF2152/2019.04"

cmake \
-D CMAKE_BUILD_TYPE=Release \
-D BUILD_SHARED_LIBS=ON \
-D CMAKE_TOOLCHAIN_FILE="${SDKROOT}/toolchain.cmake" \
-D ARP_TOOLCHAIN_ROOT=${SDKROOT} \
-D CURL_STATIC_CRT=OFF \
-S "${DIR}/curl" \
-B "${DIR}/curl_build"

cmake --build "${DIR}/curl_build"
In this script we first specify that we want to use the bash shell using #!/bin/bash. After that we specify the DIR variable and set it to the directory where the bash shell is opened.
Because we need to use the PLCnext SDK, we have to link our SDKROOT to our PLCnext SDK. We do this by using export SDKROOT="[your_install_dir]", where [your_install_dir] is the path to your SDK and depends on where you installed it. As I mentioned before, I installed it in /usr/programs/pxc/sdk/AXCF2152/2019.04. Next we specify all the options we want to give to CMake for building using the -D, -S and -B prefixes. The option -S specifies the source directory, in our case the curl directory, -B specifies the build directory, in our case curl_build which will be created when the script is executed. -D specifies certain generic CMake options.
To make sure that the script can be executed, we have to look into the properties of the file. Right-click on the file and open the properties. Navigate to the Permissions window and make sure the “Execute” box is checked.
To verify that the script is now an executable, open a terminal within the libcurl directory and type in the command ls. This should display the contents of the directory and should show the buildscript highlighted in green.
You should now have a directory named libcurl and within this the buildscript file and the curl directory containing the source code.
Step 4: Build the library
The downloaded source code is now ready to be built using the shell script. Navigate to your libcurl directory and execute the buildscript.
Linux-PC$ cd [your_desktop_path]/libcurl
Linux-PC$ ./buildscript.sh
This will generate all the library files from the source code into the curl_build directory and makes the .so and executable file we’re interested in.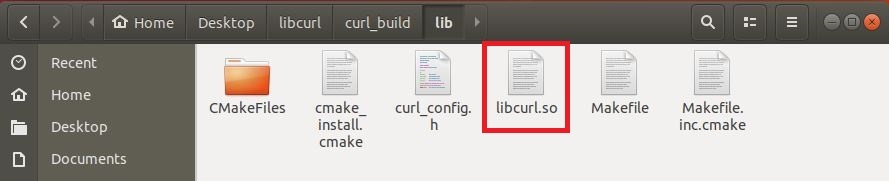

To check if the created library libcurl.so has the right architecture we first navigate to the .so file located in libcurl/curl_build/lib and then retrieve the header data of the file.
Linux-PC$ cd [your_desktop_path]/libcurl/curl_build/lib
Linux-PC$ readelf -h libcurl.so
This wil display a lot of data about the file, the one we need to look at is the Machine data.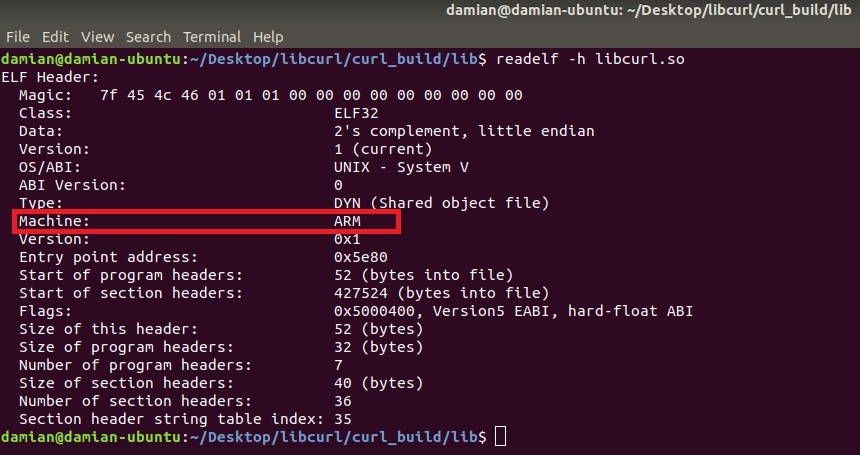
As you can see, the library is successfully built for an ARM architecture!
We are ready to go on to step 5 if all these files are present and have the right architecture.
Step 5: Duplicate and rename .so files
The AXC F 2152 already comes with an older version of libcurl installed. These installation files, along with other installed library files, can be found in the /usr/lib and /usr/bin directories on the Linux system of the controller. The /usr/bin directory contains the curl executable file, the /usr/lib directory contains the .so files of which there are two.
The reason there are two .so files is the use of symbolic linking and version control. There is one .so file named libcurl.so.4, one file named libcurl.so.4.5.0 and they are linked to eachother. This way, the controller only needs to know the main version (version 4) of libcurl and will automatically use the latest libcurl library linked to it (version 4.5.0). Because the controller uses these names, it’s mandatory that we use them too, else the controller won’t find the libraries.
NOTE: The 4 and 4.5.0 additives are important and must not be named differently!
First copy the default .so file to your desktop with the cp command.
Linux-PC$ cp libcurl.so [your_desktop_path]
Rename the .so file in [your_desktop_path]/libcurl/curl_build/lib to libcurl.so.4 and the copied .so file on your desktop to libcurl.so.4.5.0, then move the renamed .so file on your desktop back to your lib directory.
Linux-PC$ mv [your_desktop_path]/libcurl.so.4.5.0 [your_desktop_path]/libcurl/curl_build/lib
You should now have two .so files named accordingly.
Step 6: Remove default installation
We can begin to remove the old files from the controller when all the necessary files are prepared.
NOTE: For this step it is important that you are able to log in to Linux on the controller. You should know the IP address of the controller, the login credentials and the password for superuser mode.
If you have not configured the superuser mode yet, you can configure it by entering the command sudo passwd root after you’ve connected and logged in through ssh. This command is used to make a password for superuser mode and lets you create one after entering the login password. For more information, use this tutorial.
Linux-Controller$ sudo passwd root
Start by opening a terminal on your PC and type in the ssh command to open a connection with the controller.
Linux-PC$ ssh admin@[ip_of_your_controller]
The [ip_of_your_controller] is the IP address of your controller, in my case the command would be ssh admin@192.168.6.49. Change this to the address your controller uses, the default IP address is 192.168.1.10.
Log in to your controller and go into superuser mode by entering the su command after that.
Navigate to /usr/lib and delete the old library files with the rm command.
Linux-Controller$ cd /usr/lib
Linux-Controller$ rm libcurl.so*
The * suffix is a wildcard which means it will remove every file that at least corresponds with this name.
Check if the files are deleted, this command should return nothing if all went well.
Linux-Controller$ ls | grep curl
Do the same for the executable file in the /usr/bin directory.
Linux-Controller$ cd /usr/bin
Linux-Controller$ rm curl
Again check with the ls | grep curl command to see if the executable is deleted.
Step 7: Install the latest library
The next step is to copy all the prepared files to the controller. We can’t copy the files directly into their designated directories because of protection, we first have to copy them to a different directory where we are allowed to copy to. I chose to use the /usr/local/lib directory because it’s empty.
While in the [your_desktop_path]/libcurl/curl_build/lib directory, open a terminal and use the scp command (secure copy) to copy the library files to the /usr/local/lib directory.
Linux-PC$ scp libcurl.so* admin@[ip_of_your_controller]:/usr/local/lib

Both library files should have now been copied to your controller.
Navigate to the src directory [your_desktop_path]/libcurl/curl_build/src and copy the executable to the controller too.
Linux-PC$ scp curl admin@[ip_of_your_controller]:/usr/local/lib

Now that all the files are copied to the controller, we can connect to the controller again with the ssh admin@[ip_of_your_controller] command. After you have logged in and are in superuser mode, navigate to the folder you copied all the files to.
Linux-Controller$ cd /usr/local/lib
Check if all the files are present with the ls command, this should now display the three files you’ve copied.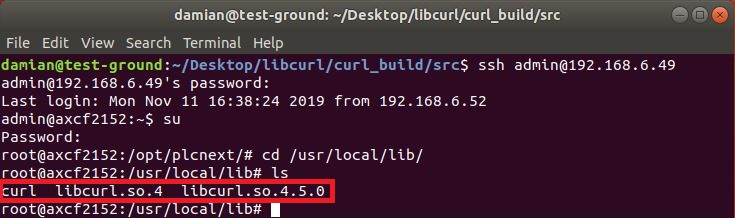
While in this directory, move the curl executable to /usr/bin and the .so files to /usr/lib.
Linux-Controller$  mv curl /usr/bin
Linux-Controller$  mv libcurl.so* /usr/lib
The /usr/local/lib directory should now be empty again, this can be checked with the ls command which should return nothing.
Navigate to the /usr/lib directory and check if the .so files are present using the ls | grep curl command. This should return the two .so files you have just moved. Do the same check for the curl executable in /usr/bin.
When the files are in their designated directories, we can make a symbolic link between the .so files. While in the /usr/lib directory, enter the ln -sf command.
Linux-Controller$ ln -sf libcurl.so.4.5.0 libcurl.so
This creates a soft symbolic link through a third .so file which is linked to the libcurl.so.4.5.0 file containing the full version. To check if the linking was succesful, type in the command ls | grep curl again. This should now return three files: libcurl.so, libcurl.so.4 and libcurl.so.4.5.0.
Lastly, check and update the created symbolic links by entering the ldconfig command and reboot the controller to finalize the installation.
Linux-Controller$ ldconfig
Linux-Controller$ reboot
Step 8: Verify your installation
If you have succesfully followed the tutorial, you should now have the latest version of libcurl installed on your controller. To check this, use the --version command.
Linux-Controller$ curl --version
This will return all the information regarding the installed library like the release date, protocols and features , and should also state the version of the library. Mine says curl 7.67.0-DEV (Linux) which means my controller uses the latest library I just installed.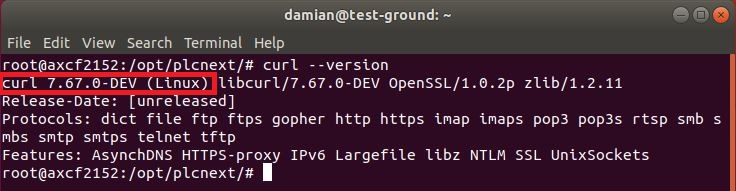
Leave a Reply
You must be logged in to post a comment.