

This script has been developed to copy AXC F 2152’s filesystem from an external SD card to the internal SD card on a clean* AXC F 2152.
*A clean AXC F 2152 means there is no code on the controller. All code can be cleared from the controller with a Type 1 Reset.
IMPORTANT: If you have anything scheduled in cron under the root user, it will not be copied. You need to schedule scripts as admin in order for them to move to the other controller. If you need root rights for script, run this command: usermod -aG sudo admin
Pre-requisites:
To deploy this project, you MUST have a Phoenix Contact SD card (Part# 1043501 or 1061701), and your project must not exceed 400MB.
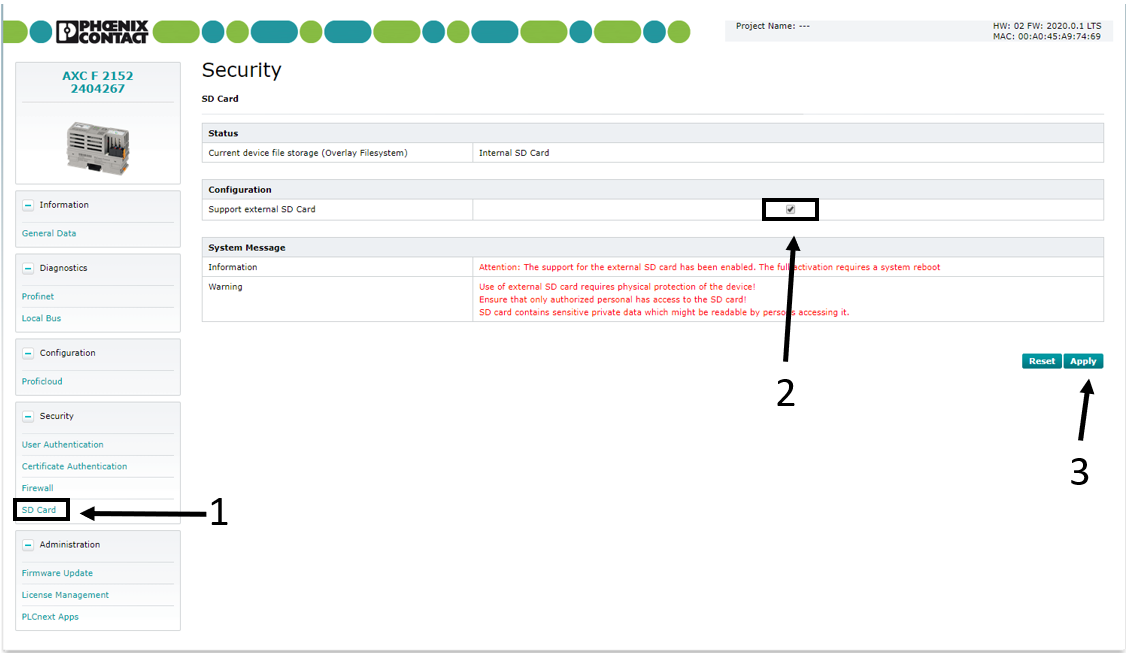
SD card configuration
- Go to the web based management (can be accessed by typing the IP address of the controller in a browser), and under Security and SD card ensure the Support external SD Card is selected. If it is not selected, select it and hit apply and reboot the controller
- Once selected and rebooted (or if it was already selected), remove power from the AXC F 2152 (or remove it again if it was not selected). Once the AXC F 2152 is powered off, insert the SD card and turn on the AXC F 2152.
- Once online, deploy your entire project onto the controller (PLCnext Engineer and programs running in Linux if applicable).
- Once the entire project is deployed and functional with the external SD, download the zip file from http://www.github.com/plcnextusa/SDcardDeploy and extract it. A pdf of this guide is also located here for reference. (see Appendix 1 for more information, located on the PDF)
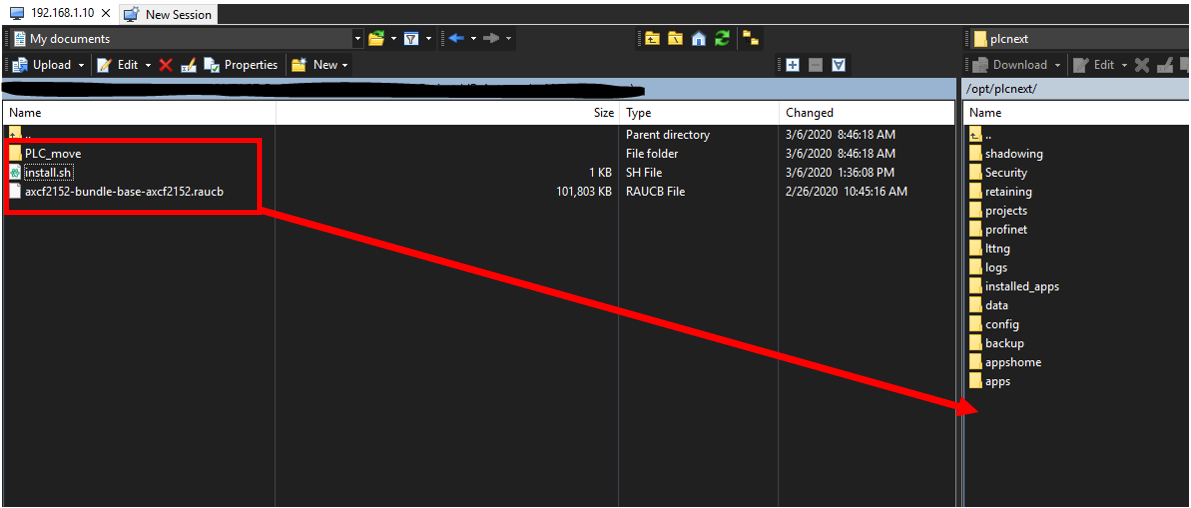
- Open up WinSCP and connect to the controller.
- Once connected, copy the PLC_move folder, the install.sh to the /opt/plcnext/ directory.
- Also copy over the .raucb file for the firmware of your project. This is needed to make sure the firmware of the new AXC F 2152 matches the project being deployed on the device. (see Appendix 2 for more information, located on the PDF) NOTE: If the .raucb file is not also copied onto the controller this will cause the transfer to fail if firmware does not match!

- Once all of the necessary files are on the controller, open a session in PuTTY and connect to the controller.
- Log into the root user, ensure you are in the /opt/plcnext/ directory. (see Appendix 3 for more information, located on the PDF)
- Run the below commands:
chmod 777 install.sh./install.sh - Now the AXC F 2152 will begin the copying process. The AXC F 2152 will reboot, and once the RUN LED is solid green the process is complete DO NOT disconnect from the AXC F 2152 until the controller reboots, and DO NOT remove the SD card until the AXC F 2152 is running after the reboot.
- Once this process is complete, power down the AXC F 2152 and remove the SD card.
Project deployment on a AXC F 2152:
- Now when you want to deploy your project on a brand new AXC F 2152, insert the SD card and power on the device. If the AXC F 2152 has been used previously, see Appendix 4 located on the PDF. The copying process can take up to 5 minutes and the AXC F 2152 will reboot once if FW is the same, and twice if the FW is different.NOTE: The AXC F 2152 must not have an existing project on it and the external SD support checkbox must be checked! (checked by default, see step 1 of SD Configuration for more details)
- The new AXC F 2152 will reboot on its own, and the project will automatically be deployed
- Once the AXC F 2152 is running after a reboot, power off the controller and remove the SD card.
- Once the SD card is removed, the AXC F 2152 can be powered back on and the project will be fully deployed.
Removing the automatic deploy from the SD card:
If you no longer need the deployment or have a new project revision, you will need to clear the SD card.
Read the entire process before executing
- To do so, ensure that the external SD card is supported. See step 1 of SD Configuration for more details
- Once the checkbox is checked and settings are applied, reboot the controller.
- Check the web based management to ensure that an external SD card is supported.
- Once that has been verified, power off the AXC F 2152.
- Insert the SD card, hold down the reset button, and turn on the AXC F 2152.
- Once the RUN and FAIL LED’s are solid, release the reset button. All LEDs will show yellow.
- Once the AXC F 2152 comes back online, the SD card is now cleared, and can be used for a new deployment.
Important: This post is outdated!
Some things might not work or need to be adapted. Root user isn’t available on newer devices.
Your PLCnext Team
Leave a Reply
You must be logged in to post a comment.