This demo project shows how to create a custom keypad for use with the eHMI in PLCnext Engineer. This was developed as a work-around for the BWP 2000 series HMI touch screens, but will work with the WP 4000 series touch screens as well.
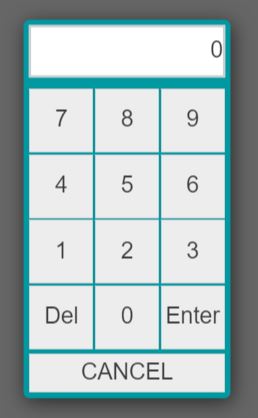
The BWP 2000 series touch screens only have a full on-screen keyboard; there is no keypad option. The on-screen keyboard can be moved from the bottom of the screen to the top of the screen so that it does not cover the input field, but in many scenarios it is desirable to have a numeric keypad.
The WP 4000 series touch screens have a full on-screen keyboard and a numeric keypad. However, PLCnext Engineer is not able to use the built-in numeric keypad. Even more challenging is the fact the full on-screen keyboard cannot be moved and often will cover the input field.
History
2019.0 LTS
This project was originally created in PLCnext Engineer 2019.0 LTS with the help of Tim Wicker of Phoenix Contact USA. This was created for a specific customer application that only had a single numeric input field.
2021.0 LTS
The sample project was updated to PLCnext Engineer 2021.0 LTS as this allows the use of parameters, tags, and simple expressions in the eHMI. It is now possible to use a single instance of the custom keypad with many numeric input fields.
Update March 2021:
The sample project has been rewritten by Wilco Meewis of eL-Tec Elektrotechnologie in the Netherlands. This version uses char codes as input to resolve the previous limitation of negative numbers and supports all numeric data types. Wilco also improved the popup Keypad to automatically use the variable’s current value. I added a button to clear the value, if desired.
Implementation
- Download the sample project here.
- Import the “Keypad” eHMI Page and the NumericKeypad Function Block into your project.
- Add an instance of the “NumericKeypad” Function Block to a Program. This Program should be scheduled in a Task with an Interval that is twice as fast as the eHMI Data poll interval.
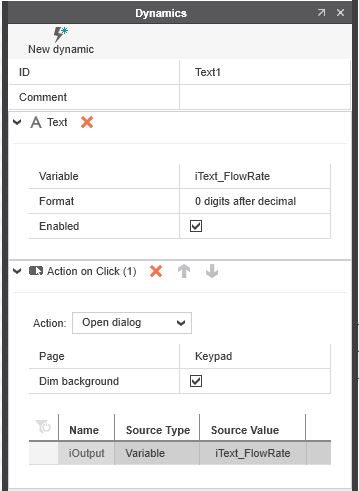
- Use a “Text” object, not a “Text Input” object, in your HMI where a numeric value entry field is needed.
- Add an “Action on Click” dynamic to this “Text” object.
- Set the “Action” to “Open dialog”.
- For “Page” select “Keypad”.
- Optionally, check the box to “Dim background”.
- Select your desired variable as the Source Value for the Parameter “iOutput”.
Repeat steps 4 and 5 to add as many input fields as needed for your application.
Limitations
All known limitations have been resolved. There may be additional limitations or challenges that have not been identified. User assumes all liability and responsibility when using this demonstration project.
Leave a Reply
You must be logged in to post a comment.