
Hello all,
In this blog post we will be exploring simple and complex datatypes in C++ and PLCnext Engineer. It wil contain two distinct parts, a simple and complex exercise.
This tutorial assumes you have some experience with C++ and PLCnext Engineer.
First you wil need the right tools for the job, a C++ editor, the PLCnext Engineer software and a Phoenix Contact PLC to run this on. These are the materials i have used:
- AXC F 2152 on firmware version 2021.0.3
- PLCnext Engineer version 2021.0.2
- Visual studio 2019 community version 16.9.4
I have personaly chose Visual Studio as my C++ editor, But eclipse can also be used. The links to the Tutorials can be found here:
As for PLCnext Engineer, this can be found on our website.
For this first example we will be making a small application that checks if the right number is sent from the PLC. First make a new C++ project. Then we head to the header file, the name should look something like this [NameOfTheProject].hpp, there are also files with the name [nameOfTheProject]component.hpp we will not be using those. Once you are in the header file there will be a wall of code before you but do not worry it will be simple. First off, we will be defining the ports, one IN and one OUT. They can be defined like this, bear in mind this is only for simple data types:
//#port
//#attributes(input)
//#name(InputTest)
int64 InputTest = 0;
//#port
//#attributes(Output)
//#name(outputTest)
int64 OutputTest = 0;
Then we move over to the next file where we will do the actual coding. This should be named [NameOfTheProject].cpp and should not contain much. We will be changing that soon enough. Let us add some code to check for numbers either by using If’s or a switch case, that is up to you. I have used if structures in this one:
void PLMProjectReadInputProgram::Execute()void PLMProjectReadInputProgram::Execute(){
if (InputTest == 1) {
OutputTest = 15;}
if (InputTest == 2) {
OutputTest = 150;}
if (InputTest == 3) {
OutputTest = 1500;}
if (InputTest == 4) {
OutputTest = 15000;}
}
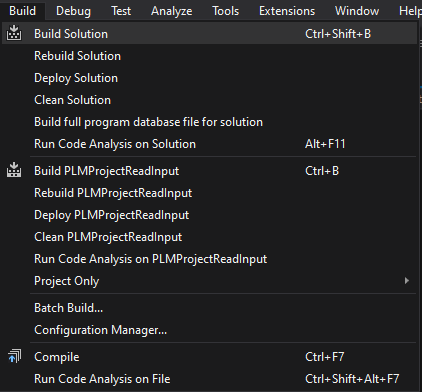
Before we head over to the PLCnext engineer we need to make this C++ project into a library for the PLC to understand. This is done by just clicking build at the top of the screen. This should run for a bit and will tell you when the library is complete. If this step is unclear, I highly advise you to check the tutorials listed above.

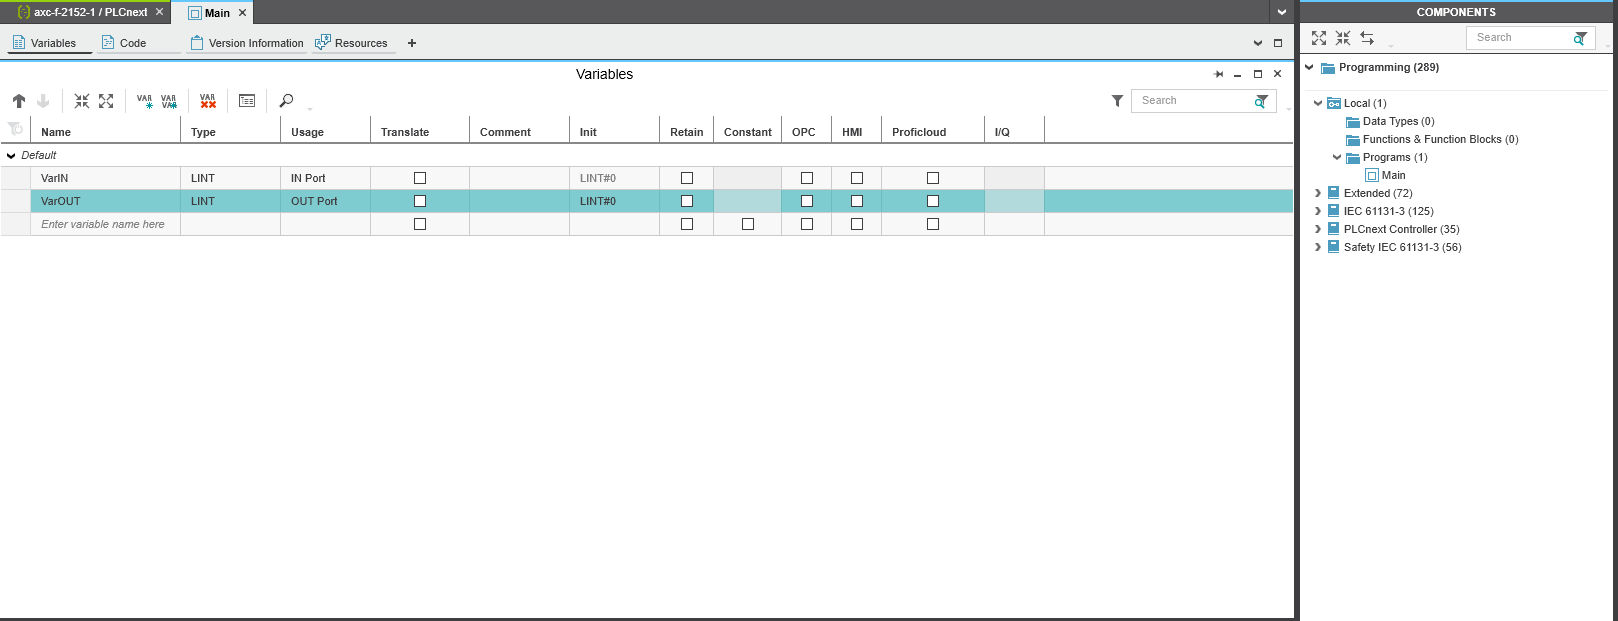
Navigate to the main program in the components tab under programming in the folder ‘Local’ then select variables inside the main screen to see the variables in the PLC. Here we can choose a name and a datatype and the usage. Datatypes in PLCnext engineer need to be the same as in the C++ program a link to the different types and their equals can be found here. Usage will define if the Variables are local or can be used to send and recieve data from outside programs or variables.
After doing this we will start to connect the variables after we have added the new library. This can be done like this:
The library you made can be found inside the bin folder of your project, copy this to the libraries folder for PLCnext engineer. The location looks something like this:
C:\Users\Public\Documents\PLCnext Engineer\Libraries
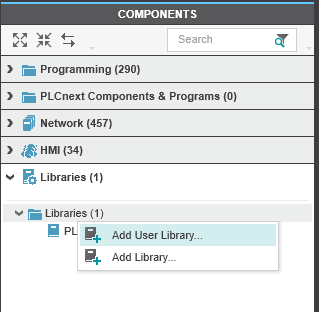
After that we head back to PLCnext engineer to add the library to our program. We wil navigate to the components tab, opening the libraries box and right clicking libraries. Then click ‘add user library’ this will take you to the libraries folder we went to earlier. Chose the library you want to use and continue.
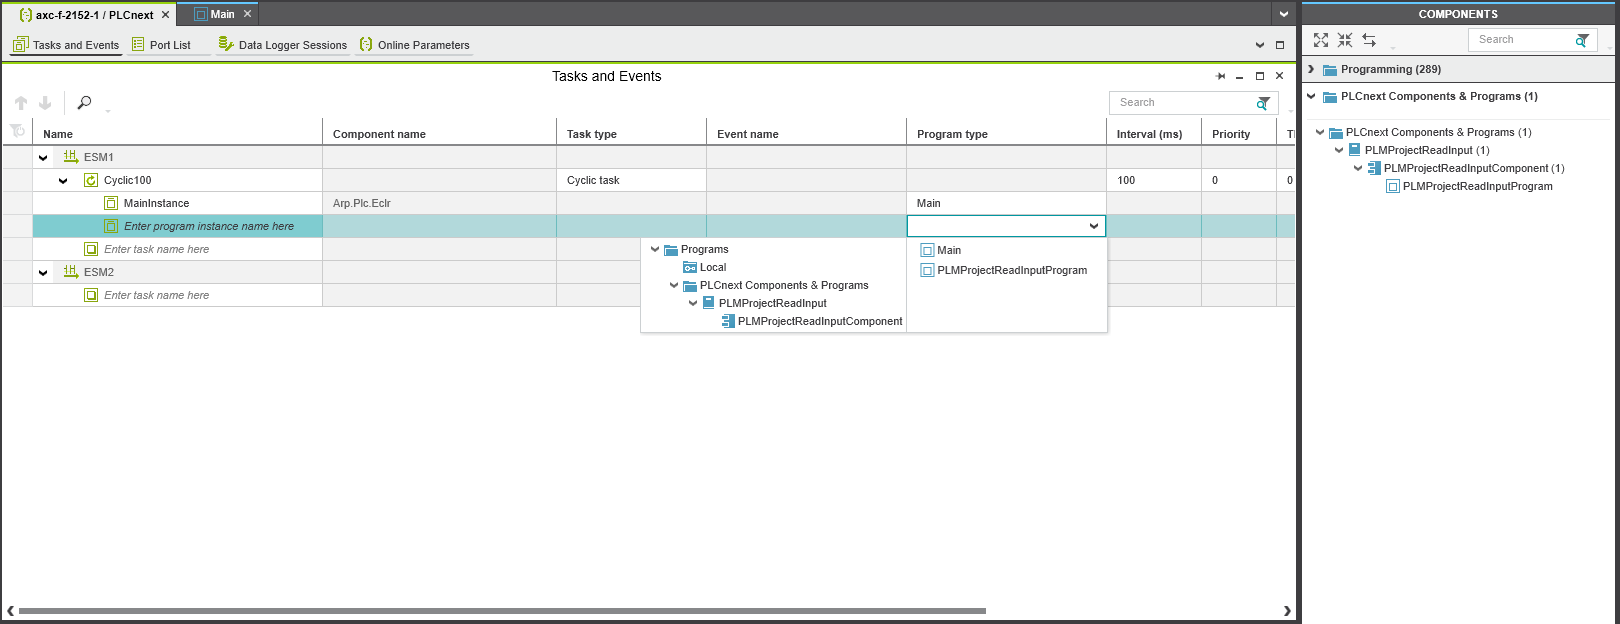
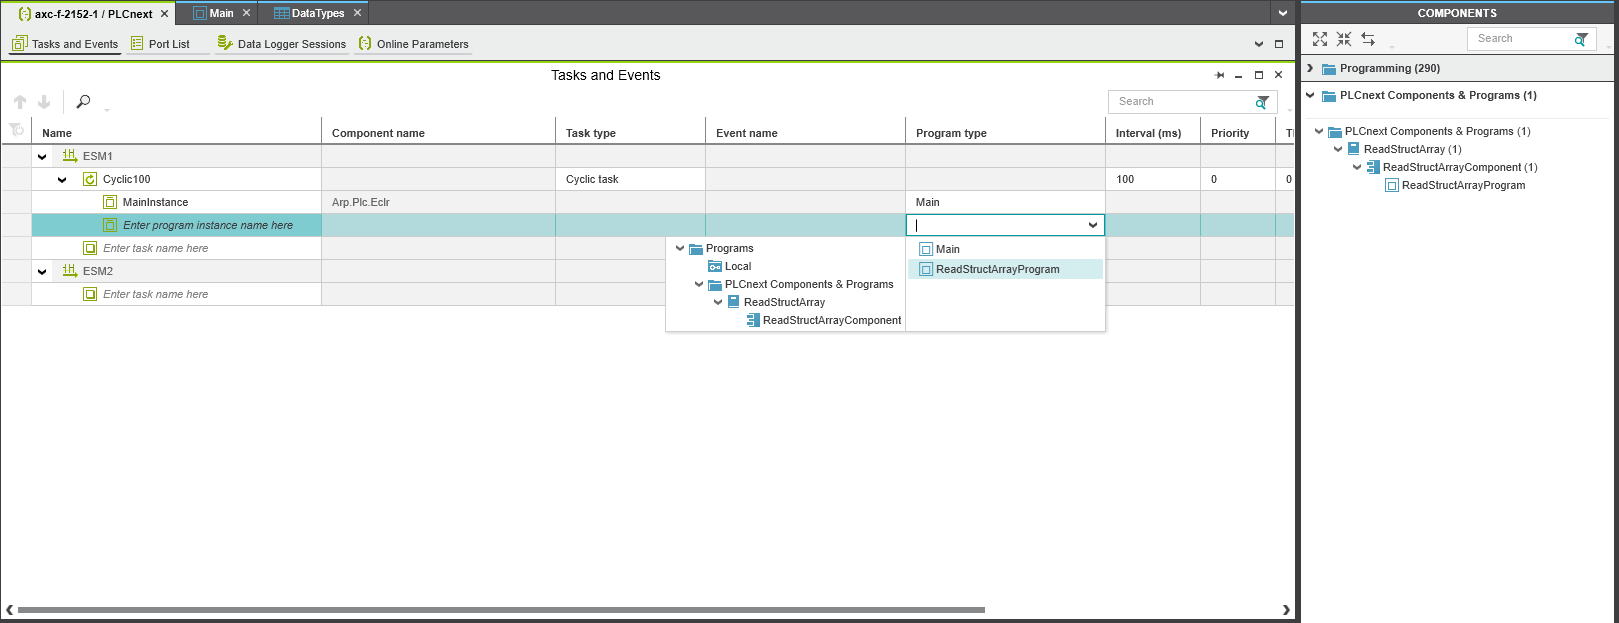
Once this is done, we will need to add the program to the tasks which is done as follows. On the left side of the screen inside the plant area double klick on PLCnext. It should open in the middle. Then go to the ‘tasks and events’ tab and add a new program after the MainInstance. This can be done two ways, by either selecting the program type or dragging it from the components area under ‘PLCnext Components & Programs’.
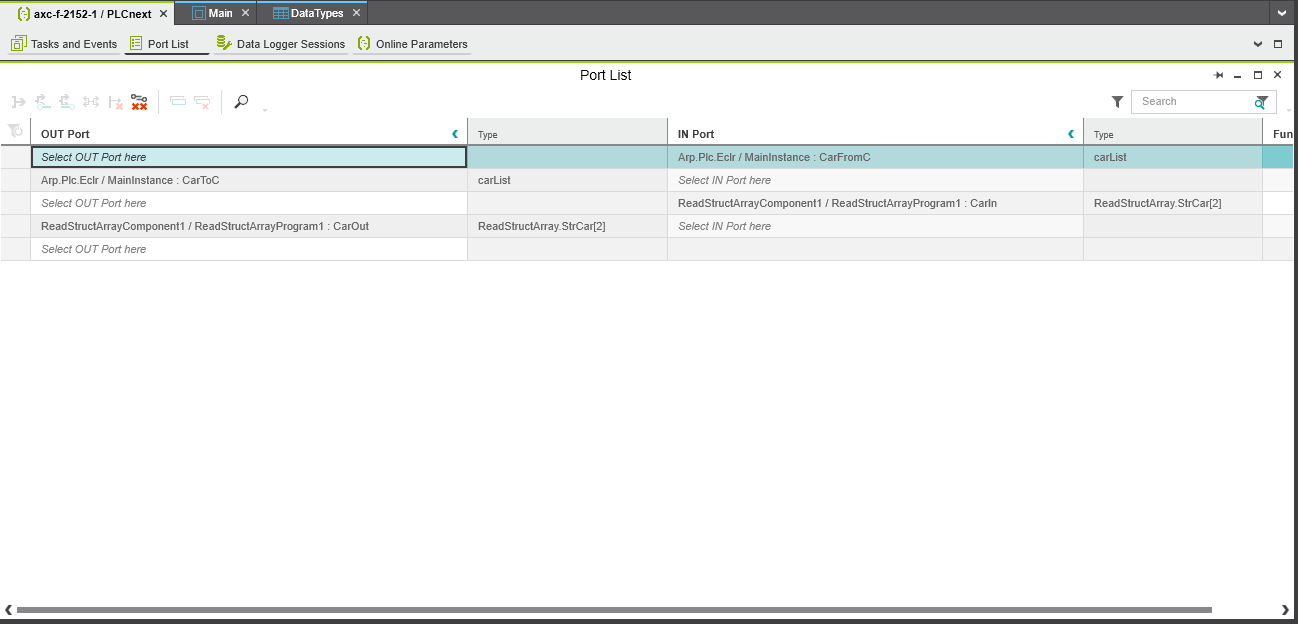
Then the variables should show up in the ‘Port list’ tab found next to the ‘tasks and events’ tab. Open this to be greeted by all your variables from C++ and PLCnext. It should look something like this:

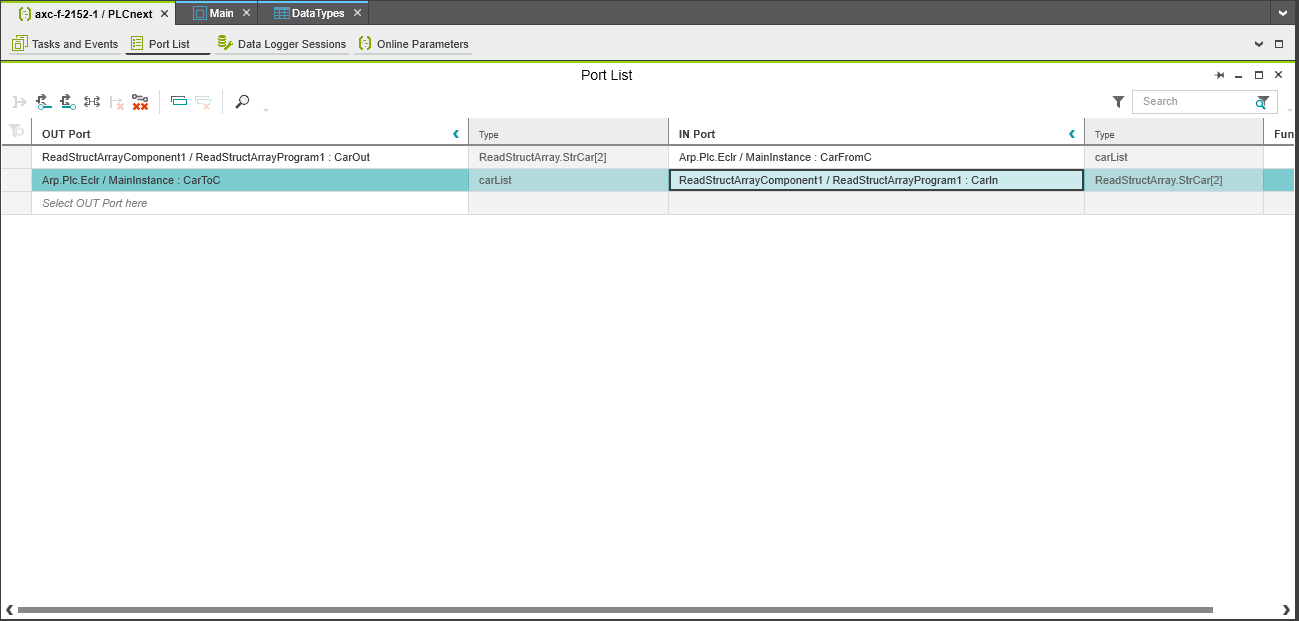
If you did everything correctly you should be able to connect the OUT ports from your PLC to the IN port of the C++ program, the other way around is also possible, and should look something like this. If this doesn’t work try checking your datatypes.

For adding a dummy value to our variable let us navigate to the main program in the components tab then select code inside the main screen to see the code and add some of our own. We will just be setting the variable going out to a numeric value, in this case 1.
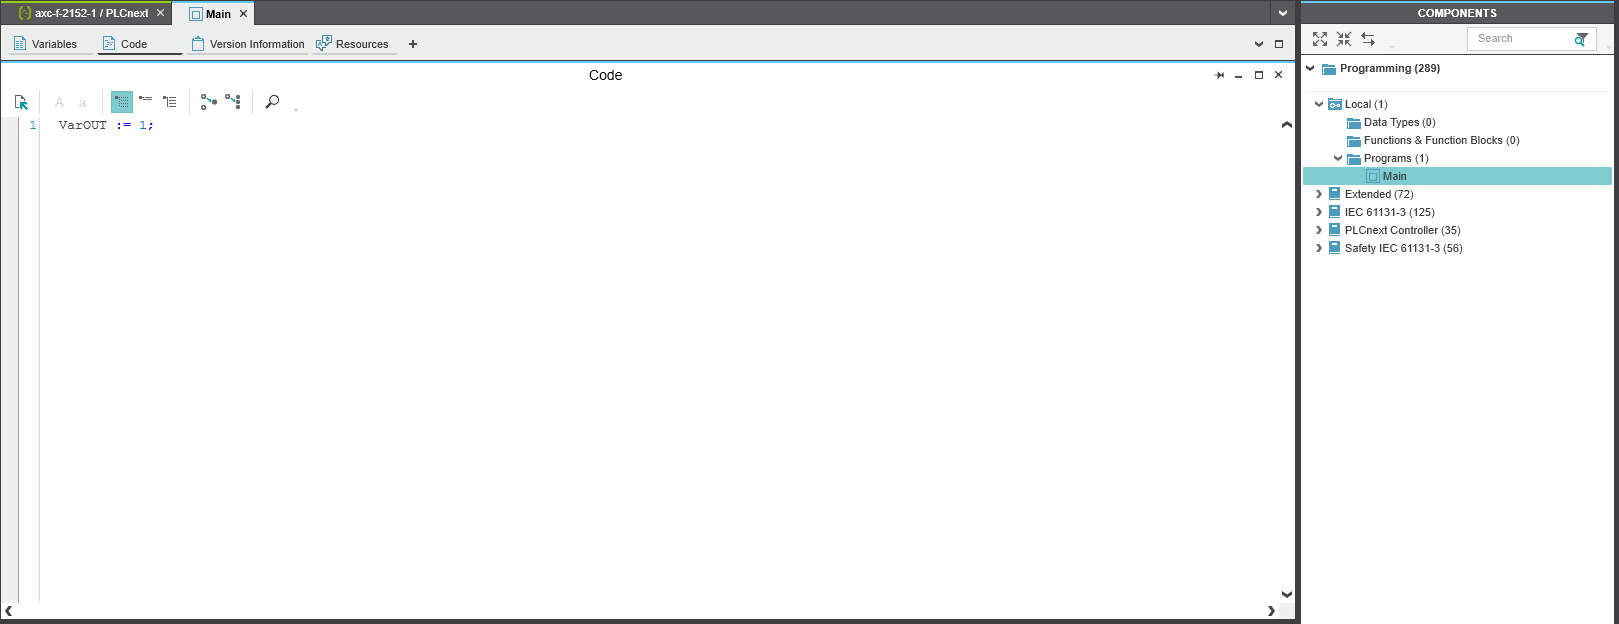
Now let us deploy the project to the plc and we should get 15 as a response from the C++ code. You can see the variables in the ‘Ports List’ from before.
For this example, we will be making a small application that will send an array of structs to and from the PLC. First make a new C++ project. Then we head to the header file, the name should look something like this [NameOfTheProject].hpp, there are also files with the name [nameOfTheProject]component.hpp we will not be using those. Once you are in the header file there will be a wall of code before you but do not worry it will be simple. First off, we will need to make a struct for this example we will be making a struct for a car. This is done as follows:
public: // typedefs
struct StrCar{
StaticString<80> sbrand;
int16 iHorsepower;
int16 iYear;
boolean xInsured;
};
!IMPORTANT! The names and types in C++ and PLCnext engineer need to be the same! Datatypes can be found here.
Then we will be defining the ports, one IN and one OUT because they will be lists of data make them as such. Also important is to make it a list of ‘cars’. This is done like this:
//#port
//#attributes(Input)
//#name(CarIn)
StrCar CarToC[2];
//#port
//#attributes(Output)
//#name(CarOut)
StrCar CarFromC[2];
Then we move over to the next file where we will do the actual coding. This should be named [NameOfTheProject].cpp and should not contain much. We will be changing that soon enough. Here we will be changing the values from car one and car two.
//Set the first member of the car list equal to the car from the PLC
CarFromC[0].sbrand = CarToC[1].sbrand;
CarFromC[0].iHorsepower = CarToC[1].iHorsepower;
CarFromC[0].iYear = CarToC[1].iYear;
CarFromC[0].xInsured = CarToC[1].xInsured;
//Add dummy values to the second member
CarFromC[1].sbrand = CarToC[0].sbrand;
CarFromC[1].iHorsepower = CarToC[0].iHorsepower;
CarFromC[1].iYear = CarToC[0].iYear;
CarFromC[1].xInsured = CarToC[0].xInsured;
Before we head over to the PLCnext engineer we need to make this C++ project into a library for the PLC to understand. This is done by just clicking build at the top of the screen. This should run for a bit and will tell you when the library is complete. If this step is unclear, I highly advise you to check the tutorials listed above.
Now before we can get to making variables in PLCnext engineer we will need to create a datatype of our own, in this case a struct car and a list of cars. For this we will need a datatypes file and can be found and created here:
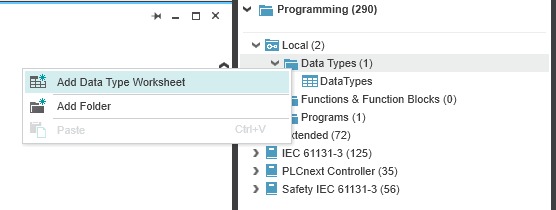
Open this file if it hasn’t already, then we can start to make our own struct like follows:
TYPE
StrCar:
STRUCT
sBrand: STRING;
iHorsepower: INT;
iYear: int;
xInsured: BOOL;
END_STRUCT
END_TYPE
!IMPORTANT! The names and types in C++ and PLCnext engineer need to be the same! Datatypes can be found here.
After making the struct we need to make an array of this type and is done like this and in the same file we are in currently:
TYPE
carList: ARRAY[0..1] OF StrCar;
END_TYPE
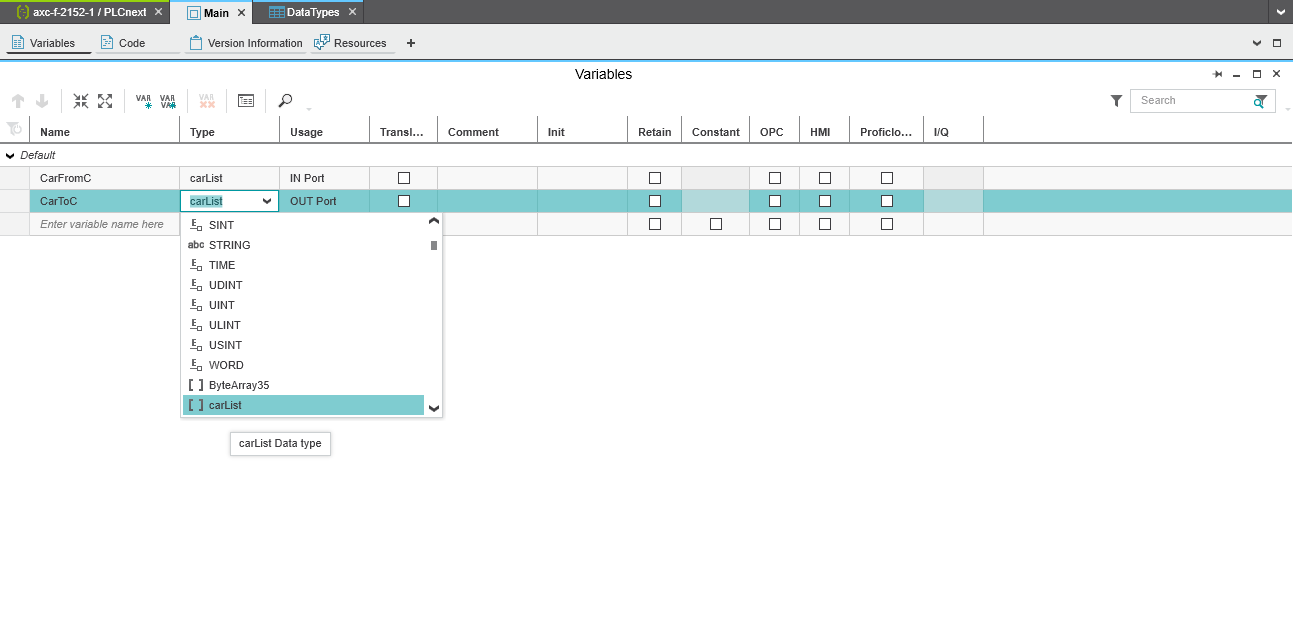
To create a variable with the ‘carList’ type navigate to the main program in the components tab under ‘programming’ then inside the folder ‘Programs’ then select variables inside the main screen to see the variables in the PLC. Here we can choose a name and a datatype and the usage. As datatype select our custom made one:
After doing this we will start to connect the variables after we have added the new library. This can be done like this:
The library you made can be found inside the bin folder of your project, copy this to the libraries folder for PLCnext engineer. The location looks something like this:
C:\Users\Public\Documents\PLCnext Engineer\Libraries
After that we head back to PLCnext engineer to add the library to our program. We wil navigate to the components tab, opening the libraries box and right clicking libraries. Then click ‘add user library’ this will take you to the libraries folder we went to earlier. Chose the library you want to use and continue.

Once this is done, we will need to add the program to the tasks which is done as follows. On the left side of the screen inside the plant area double klick on PLCnext. It should open in the middle. Then go to the ‘tasks and events’ tab and add a new program after the MainInstance. This can be done two ways, by either selecting the program type or dragging it from the components area under ‘PLCnext Components & Programs’.
Then the variables should show up in the ‘Port list’ tab found next to the ‘tasks and events’ tab. Open this to be greeted by all your variables from C++ and PLCnext. It should look something like this.
If you did everything correctly you should be able to connect the OUT ports from your PLC to the IN port of the C++ program, the other way around is also possible, and should look something like this. If this doesn’t work check the datatypes and names of your variables.
For adding a dummy value to our variable let us navigate to the main program in the components tab then select code inside the main screen to see the code and add some of our own. We will just be setting the variable going out to some car specifics. These can be chosen at random but will need to match the datatypes. (depending on what you chose, use strings where you used strings etc.)
CarToC[0].sBrand := ‘Audi’;
CarToC[0].iHorsepower := 200;
CarToC[0].iYear := 2020;
CarToC[0].xInsured := TRUE;
CarToC[1].sBrand := ‘Mazda’;
CarToC[1].iHorsepower := 120;
CarToC[1].iYear := 2001;
CarToC[1].xInsured := FALSE;
Once we deploy this example the list going out should be swapped in the incoming list. You can see the variables in the ‘Ports List’ from before.
Leave a Reply
You must be logged in to post a comment.