


This little guide describes how a VPN tunnel can be created in an easy manner between a server and a client (AXC F 2152) via OpenVPN® by using certificates.
Keep in mind that there are several ways of how to configure a VPN tunnel, this examples shows only one possible way of many.
Use this guide at your own risk. I tried to make it reasonably safe, but you should always assure yourself if it’s safe, if their are vulnerabilities known, and if protocols might be compromised.
- This document is based on the firmware 1.0.0.250 of the AXC F 2152.
Author: Vincent Gijsen (Phoenix Contact Netherland)
Assumptions
In this guide, I assume you have basic knowledge of
- Navigationg a linux system
- Networking concepts
- I used a Linux-system to play ‘server’
- Basic grasp of the PKI concept of certificate
Requirements
We need the following tools
- A OpenVPN® Server configured. I used a linux-laptop, but windows might also work
- Certificates, I used XCA (https://sourceforge.net/projects/xca/) to generate them
- OpenSSL® installed on the Linux-workstation, to generate Dilffie-Hellmann files.
- The time on the server and client needs to be synchronized. Configure NTPD on the target for proper time settings, if not, connections will not be established
Generate the Certificates
In this tutorial, the first step is to generate some certificates we used to authorize our connections.
XCA
As XCA is installed, we will utilize this tool to generate our certificates.
We need three certificates in total:
- The CA or Certificate Authority certificates
- The server Certificate (we use this in the Mikrotik VPN server)
- The client certificate (we use this in the AXC 2152 )
after we are done, the certificates in the tool will look like:
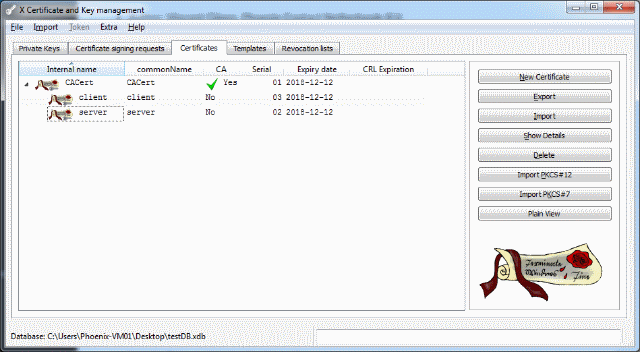
Figure 1: Certificate management
Use the export buttons to export the keys and certificates
The certificates
We first create a new certificate database in XCA to store our certificates, and generate the CA certificate:
The CA certificate
On the source tab select default CA, and on the subject tab:
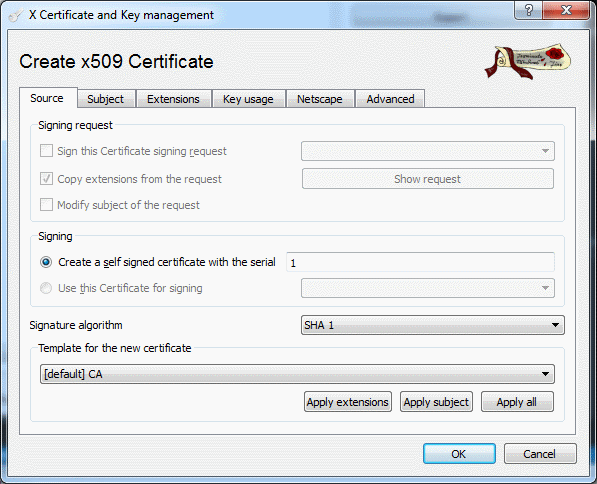
Figure 2: Source configuration / default CA
Go now to the subject tab, fill out the forms like in the screenshot and press the generate a new key.
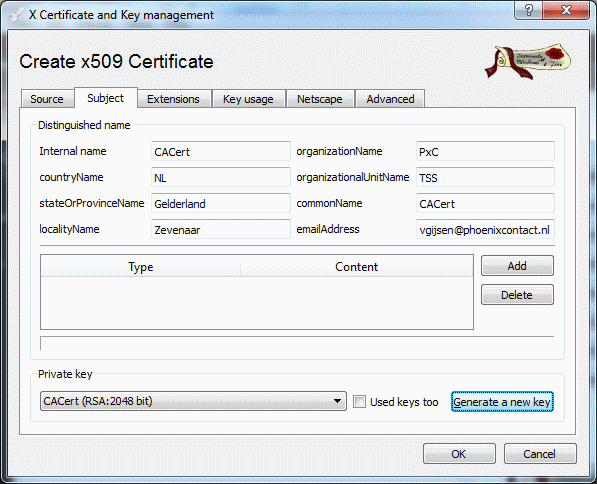
Figure 3: Subject configuration / default CA
Set the constrains inside the extensions tab to Certification Authority and adjust the time range of validity.
Tip:
- Setting the time frame to short will invalid any certificates with this certificate as parenT
- Ensure that the time-frame is to your liking, one year might not be enough.
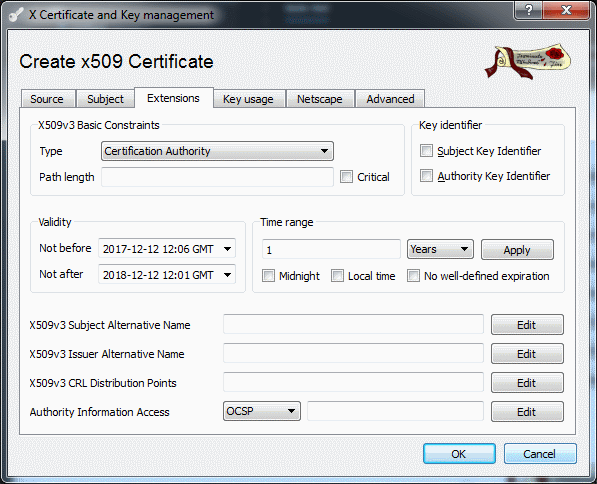
Figure 4: Extension configuration / default CA
The Key usage tab will also need some settings:

Figure 5: Key usage configuration / default CA
Select:
- Digital Signature
- Key Encipherment
- Data Encipherment
- Certificate Sign
- CRL Sign
The Other certificates
With our CA certificate in place, we can start generating our Server and Client certificate.
These are signed by the CA certificate.
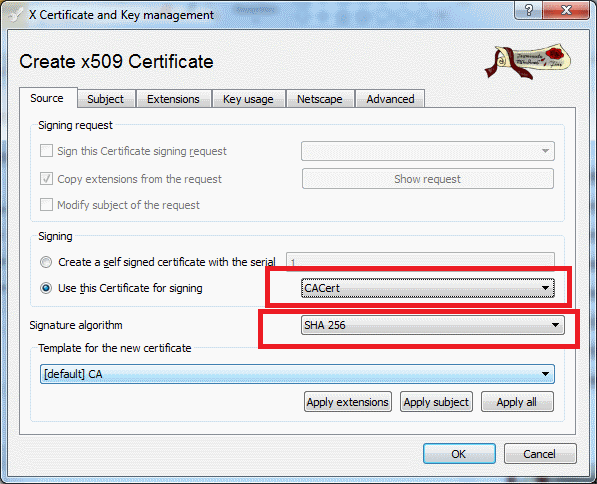
Figure 6: Source configuration / derived certificates
Ensure:
- SHA-256 is selected, as it’s a safe bet.
- Our CA certificate is chosen as certificate
In the subject section, generate a new key, and fill out the fields appropriately
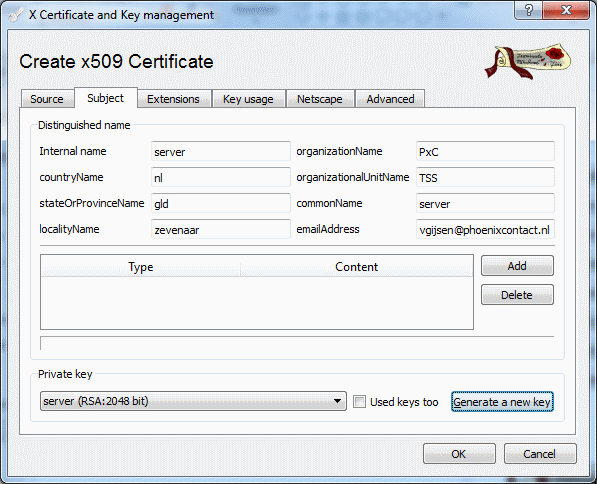
Figure 7: Subject configuration / derived certificates
Take note of the value “commonName” (server in our example) you give this certificate.
This value will be checked by our client configuration, to protect against Man-In-The-Middle-Attacks
In the Key-usage , it is important to select End Entity:
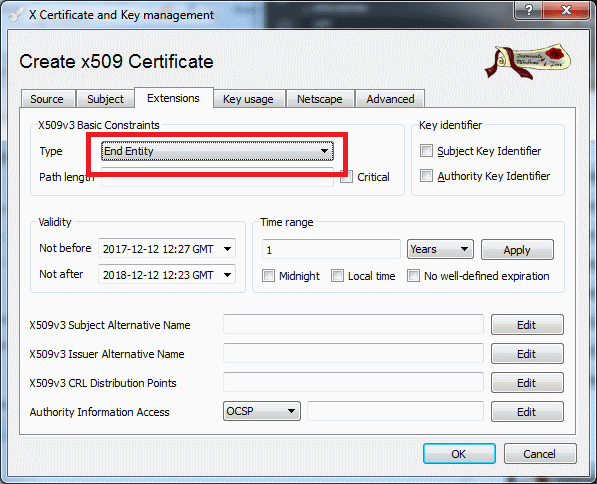
Figure 8: Extension configuration / derived certificates
In the Key-usage , it is important to select:
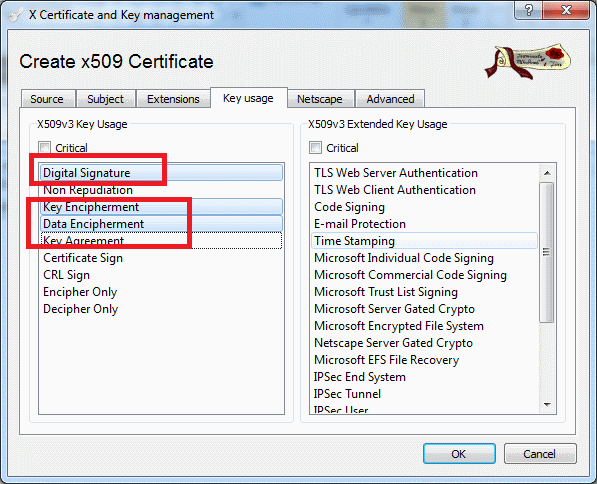
Figure 9: Key usage configuration / derived certificates
- Digital Signature
- Key Encipherment
- Data Encipherment
We need to do the same for the Client certificates!
Server Configuration
Our server (in this exapmle) is a linux workstation, with OpenVPN® installed
We need to take the following steps to configur this workstation properly
- Deploy our CA certificate
- Deploy a server certificate
- Deploy a server private key (the one from our server certificate
- A generated DH file
Our work-directory on this server is /etc/openvpn/
Generate our DH file
We need to generate our DH file for the server. Navigate to the work-directory and execute:
openssl dhparam -out dh2048.pem 2048
This generates our dh2048.pem, needed by OpenVPN®. Note:
- In this example, the ‘server’ is the laptop, but this could also be another AXC 2152 or router
- Generating of this DH2048 file can take a long time on a AXC 2152 (30+minutes, so you might want to generate this on a pc instead, and copy it to the ‘server’)
Add the certificates
Export our certificates from the XCA tool, in crt and unencrypted key file format. Place them in the working directory
We need:
- The CA cert in cert format (*.crt)
- The Server cert in cert format (*.crt)
- The private key in plaintext format (*.pem)
- The generated dh2048 file
The config file
The OpenVPN® program uses a configuration file to setup the connection. We deploy our configuration file onto the target, the AXC 2152. Take the following steps to configure the target properly:
My Config-directory looks like this:
 /opt/plcnext/openvpn$ ls -lsah

total 48K
4,0K drwxrwxr-x 2 vincent vincent 4,0K Dec 13 13:03 .
4,0K drwxr-xr-x 38 vincent vincent 4,0K Dec 13 13:03 ..
4,0K -rw-rw-r-- 1 vincent vincent 1,4K Dec 12 13:40 CACert.crt
4,0K -rw-rw-r-- 1 vincent vincent 424 Dec 13 08:32 dh2048.pem
4,0K -rw------- 1 vincent vincent 16 Dec 13 13:00 ipp.txt
4,0K -rw------- 1 vincent vincent 232 Dec 13 13:05 openvpn-status.log
4,0K -rw-rw-r-- 1 vincent vincent 1,3K Dec 13 08:39 server.crt
12K -rw-rw-r-- 1 vincent vincent 11K Dec 13 09:15 server.conf
4,0K -rw-rw-r-- 1 vincent vincent 2,6K Dec 12 13:46 server.p12
4,0K -rw-rw-r-- 1 vincent vincent 3,0K Dec 12 13:47 server.pem
The server-configuration looks like this (note, its a modified sample file from OpenVPN®), I left the comment as they seem useful for the novice:
Save this file as server.conf
port 1194
proto udp
dev tun

ca CACert.crt
cert server.crt
key server.pem  # This file should be kept secret
dh dh2048.pem
server 10.8.0.0 255.255.255.0
ifconfig-pool-persist ipp.txt
keepalive 10 120
cipher AES-256-CBC
comp-lzo
user nobody
group nogroup
tls-server
persist-key
persist-tun
status openvpn-status.log
verb 3
Note the User and group attributes, this is to drop privileges of the OpenVPN® process, to increase security
Starting the OpenVPN® server in the foreground
sudo openvpn --config server.conf
Wed Dec 13 13:18:06 2017 OpenVPN 2.3.10 x86_64-pc-linux-gnu [SSL (OpenSSL)] [LZO] [EPOLL] [PKCS11] [MH] [IPv6] built on Jun 22 2017
Wed Dec 13 13:18:06 2017 library versions: OpenSSL 1.0.2g  1 Mar 2016, LZO 2.08
Wed Dec 13 13:18:06 2017 NOTE: your local LAN uses the extremely common subnet address 192.168.0.x or 192.168.1.x.  Be aware that this might create routing conflicts if you connect to the VPN server from public locations such as internet cafes that use the same subnet.
Wed Dec 13 13:18:06 2017 Diffie-Hellman initialized with 2048 bit key
Wed Dec 13 13:18:06 2017 WARNING: file 'server.pem' is group or others accessible
Wed Dec 13 13:18:06 2017 Socket Buffers: R=[212992->212992] S=[212992->212992]
Wed Dec 13 13:18:06 2017 ROUTE_GATEWAY 192.168.1.1/255.255.255.0 IFACE=enp0s3 HWADDR=08:00:27:cb:5a:60
Wed Dec 13 13:18:06 2017 TUN/TAP device tun0 opened
Wed Dec 13 13:18:06 2017 TUN/TAP TX queue length set to 100
Wed Dec 13 13:18:06 2017 do_ifconfig, tt->ipv6=0, tt->did_ifconfig_ipv6_setup=0
Wed Dec 13 13:18:06 2017 /sbin/ip link set dev tun0 up mtu 1500
Wed Dec 13 13:18:06 2017 /sbin/ip addr add dev tun0 local 10.8.0.1 peer 10.8.0.2
Wed Dec 13 13:18:06 2017 /sbin/ip route add 10.8.0.0/24 via 10.8.0.2
Wed Dec 13 13:18:06 2017 GID set to nogroup
Wed Dec 13 13:18:06 2017 UID set to nobody
Wed Dec 13 13:18:06 2017 UDPv4 link local (bound): [undef]
Wed Dec 13 13:18:06 2017 UDPv4 link remote: [undef]
Wed Dec 13 13:18:06 2017 MULTI: multi_init called, r=256 v=256
Wed Dec 13 13:18:06 2017 IFCONFIG POOL: base=10.8.0.4 size=62, ipv6=0
Wed Dec 13 13:18:06 2017 ifconfig_pool_read(), in='client,10.8.0.4', TODO: IPv6
Wed Dec 13 13:18:06 2017 succeeded -> ifconfig_pool_set()
Wed Dec 13 13:18:06 2017 IFCONFIG POOL LIST
Wed Dec 13 13:18:06 2017 client,10.8.0.4
Wed Dec 13 13:18:06 2017 Initialization Sequence Completed
Wed Dec 13 13:18:10 2017 event_wait : Interrupted system call (code=4)
Wed Dec 13 13:18:10 2017 /sbin/ip route del 10.8.0.0/24
Wed Dec 13 13:18:10 2017 ERROR: Linux route delete command failed: external program exited with error status: 2
Wed Dec 13 13:18:10 2017 Closing TUN/TAP interface
Wed Dec 13 13:18:10 2017 /sbin/ip addr del dev tun0 local 10.8.0.1 peer 10.8.0.2
You will also notice the warning regarding the private key, you might want to change the ownership attributes using the command ‘chmod’ and ‘chown’
This starts the openvpnserver with:
- Listing on any IP
- Listening on port 1194
- Listing on UDP protocol
- Accepting all connections from CA-signed certificates
- Using LZO-compression
- NOT forwarding traffice beyond the 10.2.x.x range, this requires enabling ip-forwarding and pushing routes to clients.
- NO dns services
Client Configuration
The client initiates the connection. In my test-environment, the server is listening on 192.168.1.2, UDP on port 1194, this is obviously reflected in the the configuration file.
The config file
save this file as client.config
client
dev tun
port 1194
proto udp
remote 192.168.1.2 1194
tls-client
verify-x509-name server name
ca CACert.crt
cert client.crt
key client.pem
cipher AES-256-CBC
keepalive 10 120
comp-lzo
cipher AES-256-CBC
persist-key
persist-tun
verb 3
#for improved security uncomment the two lines below, note that the TUN after closing cannot be removed
#user nobody
#group nogroup
Of course, do we need to have the following files in place:
- The CA cert in cert format (*.crt)
- The Client cert in cert format (*.crt)
- The Client private key in plaintext format (*.pem)
- The generated dh2048 file
As mentioned before the client will check the common-name of the server-certificate, hence this line:
verify-x509-name server name
which could be read as: verify-x509-name <COMMON_NAME> name. If you deviate from the ‘server’ name, you obviously need to change this line in the client configuration as well.
This prevents Man in the middle attacks.
Starting the OpenVPN client in the foreground
execute:
cd /opt/plcnext/openvpn
openvpn –config client.config
You are now able to communicate with the VPN server’s services, via 10.2 0.1 ip. Additional configuration on the server enables you to have more elaborate functionality
Improvements
In order to make your VPN configuration more resilient to DDOS, you might look into useing TLS_auth. but to keep things more straight-foreword it’s omitted from this guide.
Takeaway
The PKI infrastructure is build on the principle of trust, the CA certificate signes only trusted certificates (in our case client & server). The server therefore trusts the client certificate, as it has been signed by this CA certificate. NEVER share/leak your CA-certificate’s private key, as doing so, will allow anyone with to sign their own certificate, and use that to login into the server, by presenting his then valid certificate.
Leave a Reply
You must be logged in to post a comment.