

Summary
In this tutorial I will show you how to connect to- and use a cloud-based database while on your PLCnext AXCF 2152 controller. We will use Microsoft Azure as the cloud-service provider and perform queries using HTTP requests. These requests will be performed in a thread so they won’t affect the real-time system. I’ll go through the different steps to take and explain why these steps are needed, furthermore I’ll include all used code and the side-notes concerning the use of Azure with PLCnext and HTTP requests in general. The tutorial is mainly focused on C++, IEC61131-3, JSON and SQL and will not include languages as C#, python or Java.
As for the thread concerned, I will not be going into detail about how to set up a worker thread.
The PLCnext community has its own github page on which C++, C#, java and MQTT sample codes are available toghether with a short explanation. This includes sample codes for threading. To implement a thread, look at the github tutorial describing how to do so. I highly recommend you to take a look on there anyway!
Introduction
Connecting your device to a database can have multiple benefits. For example, you can store and retrieve predefined configurations, upload and download user data, share input/output data with other controllers and keep track of the status of controllers itself.
Of course, we want to use a database which is flexible and with as little maintenance as possible, this leads us to cloud-based databases provided through a cloud-service. One of these cloud-service providers is Microsoft Azure, which you may have heard of and offers a wide variety of cloud services and resources such as virtual networks, virtual machines, machine learning and many more, not just databases. Azure is a pay-as-you-go provider which lets you pay only for the services and resources you use and for the frequency you use them at, this means you can make it as cheap or as expensive as you’d like.
To keep the communication between Azure and the controller asynchronous and as simple as possible without multiple messages being sent back and forth during a single request for data, I chose to make use of HTTP. HTTP is a request response protocol for asynchronous communication, it enables you to sent a request for data or information (depending on the method) to an endpoint which in turn sends a response with the requested data or information. To be able to use this protocol i’ve installed libcurl on my controller. This a third-party open-source library which facilitates the functionality for making these requests.
NOTE: During the tutorial, some parts are left out, these parts already have a good tutorial written on them and this one is big enough as it is already. I will link these tutorials in the chapters where they are needed.
Prerequisites
The following hardware and software was used during the writing of this tutorial
Hardware:
- AXC F 2152 PLCnext controller
- Firmware version 2019.0.04-22338
- Libcurl v7.67 library installed
- Internet connection
- Laptop with Linux installed (see software)
Software:
- Ubuntu 18.04.3 development environment with the following installed:
- CMake 3.15.5
- sshpass 1.06
- virtualbox-guest-dkms
- Microsoft Azure subscription
- SQL Server resource
- SQL database single instance
- Logic App resource
- API connector
- PLCnext SDK for linux 64 bit 2019.0.4 LTS (software development kit)
NOTE: When using third-party software, it is the responsibility of the user to ensure that all license conditions are complied with.
Procedure Overview
Following is an overview of the steps that I will explain in this tutorial:
Step 1 – Setting up your database
- Create the SQL database
- Add contents
- Create a stored procedure
- Check contents & stored procedure
Step 2 – Setting up your Logic App
- Create the workflow
- Configure the workflow
Step 3 – Setting up the C++ code
- Make a new PLCnext project
- Add the C++ code
- Add input/output ports
- Build the project
Step 4 – Setting up PLCnext Engineer & the EHMI webserver
- Configure the project
- Create the IEC program
- Link the input/output ports
- Make a EHMI webserver
Step 5 – Test the functionality
- Test method
- Debug methods
Appendix – Used codes
- C++ codes
- CMake codes
- IEC codes
Procedure
Step 1: Setting up your database
We will kick the tutorial off with creating a SQL database to which we can add contents.
NOTE: Please keep in mind that Microsoft is still busy developing Azure and its functionality, some options may not be the same anymore opposed to when the tutorial was written.
Create the SQL database
We start with a basic Azure account without any resources or services in use, next navigate in the menu-bar on the left and choose SQL databases. This wil open an overview with the current existing databases. Choose the Add option and the following window will open.
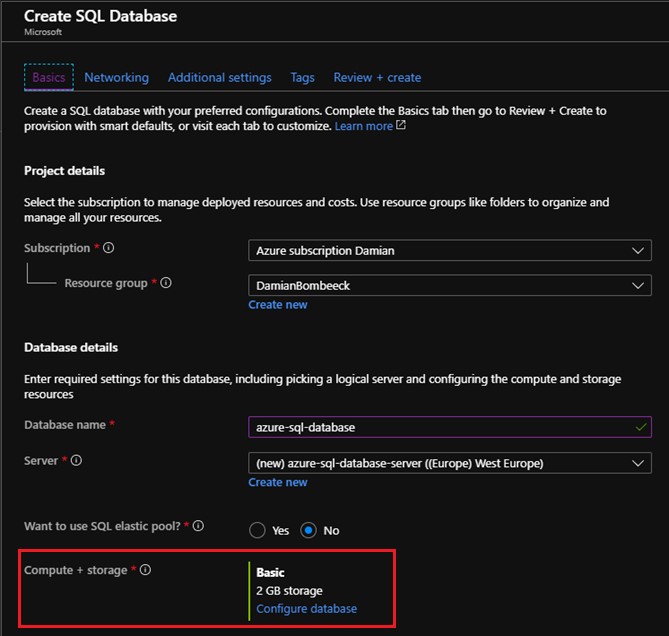
Fill in the fields and choose your current resource group in the drop-down menu. At the database details, fill in a database name which is easy recognizable and next choose Create new for a new SQL server. This will open the window depicted below.
Again, choose a name that is easy recognizable. Fill in the rest of the form and complete the creation by clicking OK. Remember your credentials, you will need them later on in the tutorial. Next, choose no for the elastic pool. An elastic pool consists of multiple databases with different sizes and use intensities, we will be using a single database so this option is not applicable to us.
At the bottem, the Compute + storage option let’s us choose the performance we want to achieve with our database. When clicking on configure database a new window will open. With this option you are free to choose whatever suits your needs, it won’t affect this tutorial. Do keep in mind that the more advanced you want the database to be, the more you will have pay for it. On the right you can keep track of the costs a month with the chosen performance tier.
I chose to use the Basic tier with 5 DTU’s and 2Gb of storage which ammounts to €4.21 a month. The meaning of the word DTU is quite vaque, it stands for Database Throughput Unit and according to the Azure documentation DTUs provide a way to describe the relative capacity of a performance level of Basic, Standard, and Premium tier databases. They are based on a blended measure of CPU, memory, reads and writes. As DTUs increase, the power offered by the performance level increases.
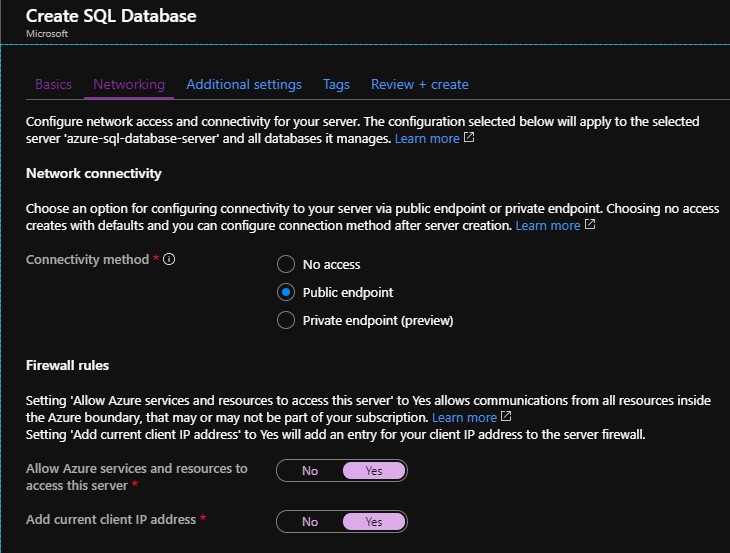
When everything is filled in correctly, click on Next: Networking and configure your network settings. Make sure that Connectivity method is set to public endpoint and that Allow Azure services and resources to access this server and Add current client IP address are set to yes. These options can also be configured after the database has been created.
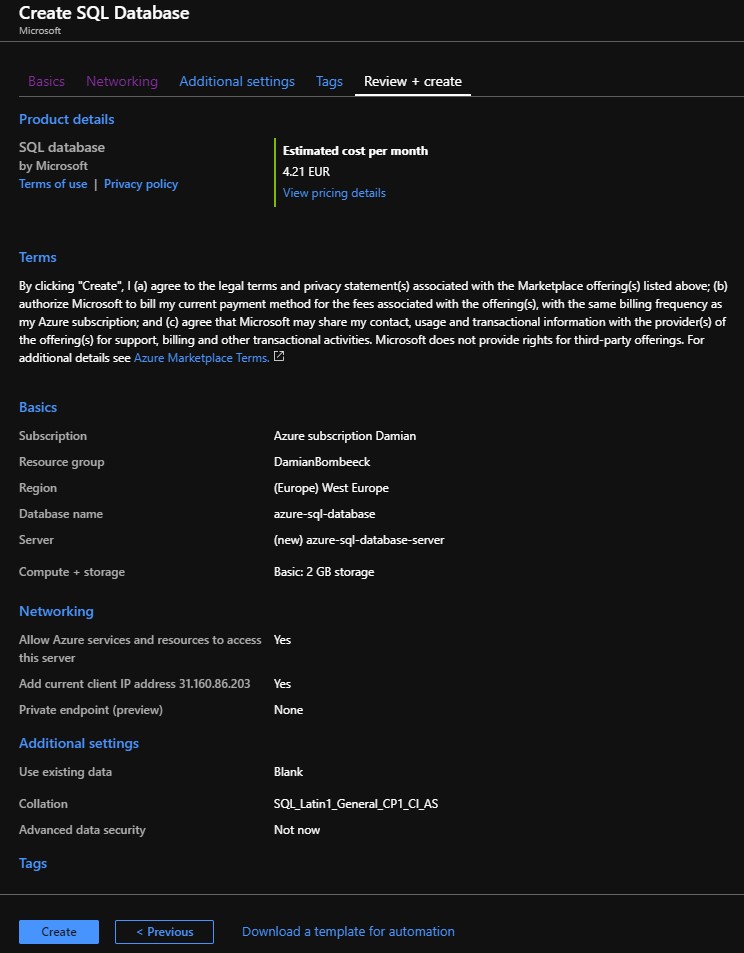
The following tabs Additional settings and Tags stay unaltered and can be left as they are. The last tab is Review + create which let’s you see your chosen configuration. If everything is correct, click Create to deploy your database.
Add contents
Now that we have our database and server up and running, we can add some contents to work with for the remainder of the tutorial. Navigate to your database instance and choose the Query editor (preview) from the menu on the left.
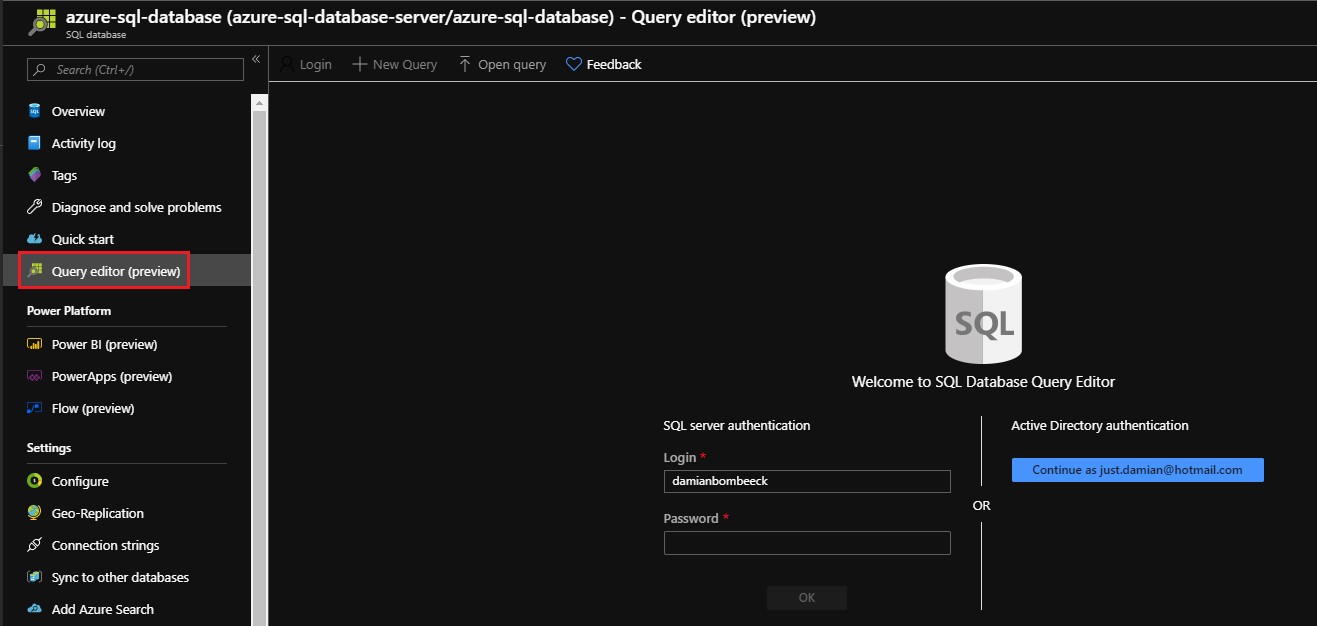
We are required to log in before we can make any changes. Remember the credentials you filled in when making the SQL server? It’s time to use those credentials. If you are unable to log in because of denied access, click on Set server firewall ([server_name]) which will take you to the firewall configuration of your server.
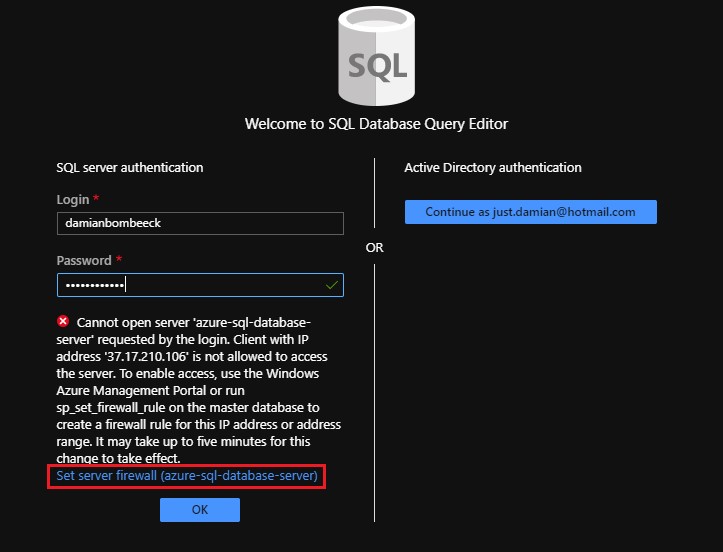
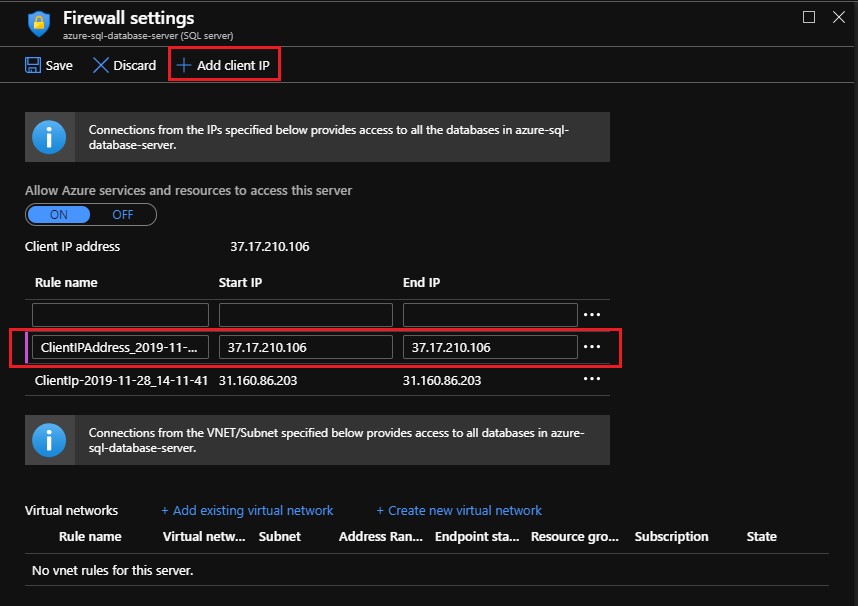
Here you can make new firewall rules to make sure your IP address has access privilages. You can either enter your IP adress manually or let Azure do it automatically by choosing + Add client IP. Be sure to check that Allow services and resources to access this server is enabled. Save the configuration and try to log in again.
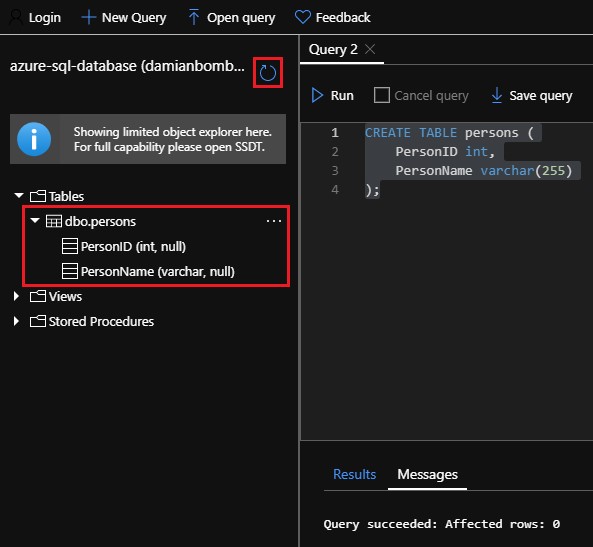
If you succesfully added your IP adress to the firewall and are able to log in, the next window will open. This window lets us use SQL (Structured query language) and execute queries to alter the database. Write the SQL statement shown below into the query editor and execute the query by clicking on the Run button.
CREATE TABLE persons (
    PersonID int,
    PersonName varchar(255));
After execution the message Query succeeded: Affected rows: 0 wil show at the bottom. We can check to make sure a table named persons with the columns PersonID and PersonName was created. Refresh the editor and expand the tables tab in the drop-down menu, this should now show your created table and its columns.
We now have a database with a table and some columns, but those are still empty. To actually put some data into the table we have to execute another query. Insert the statement below into the editor and execute it.
INSERT INTO persons (PersonID, PersonName)
VALUES ('1', 'Damian');
This will insert the number 1 into column PersonID and the name Damian into column PersonName within the table persons. If the query was executed succesfully the message Query succeeded: Affected rows: 1 will show at the bottom. Execute this query a few times with different values to add more data to the database.
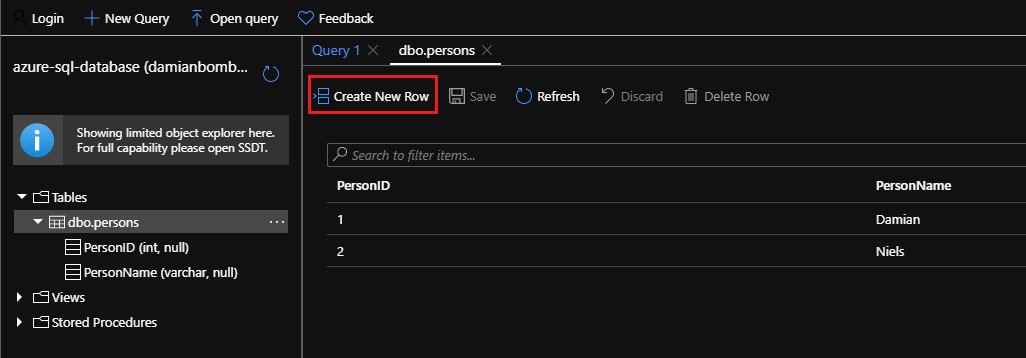
An alternative way to add data is through the Edit data (preview) option. You can find this option after a table is created. Expand the tables tab and after that the dbo.persons tab in the tree menu, click on the dots on the right and there you will find this option.

Before the new editor opens, you first have to agree with some terms. Check the checkbox and click on OK. The editor will now open which visually shows the database with its columns and rows. You can add rows with Create New Row or alter existing rows by clicking on them.
Create a stored procedure
Because we want to be able to search for data through our database, we are going to create a so called stored procedure. At the bottom of the drop-down menu you can view all stored procedures, at the moment only the system stored procedures exist.

With the query below we can add a new one. In this query we define the name of the procedure, the variable we want to use for searching and the SQL statement we want to execute. We declare the variable to be of type char and is max 30 characters long. We link this variable to the column we want to search through with the line PersonName = @name. The SQL statement you want to execute needs to be typed between AS and GO, at the moment this is a SELECT statement, but this could be any SQL statement you want. With the SELECT statement, we select every row from the column PersonName which complies with the value of search variable @name. Type the query below in the editor and execute it.
CREATE PROCEDURE seekElement @name nvarchar(30)
AS
    SELECT * FROM persons WHERE PersonName = @name
GO;
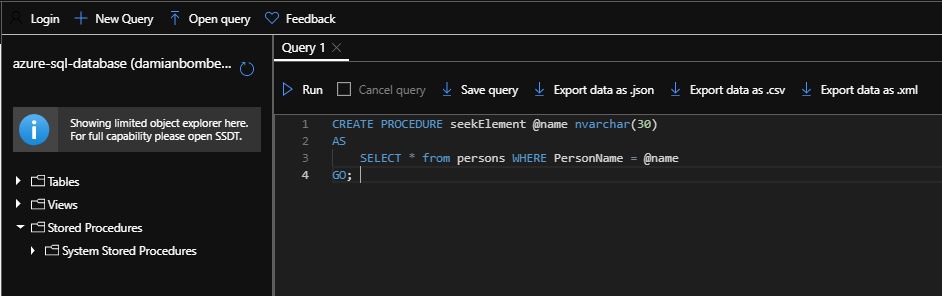
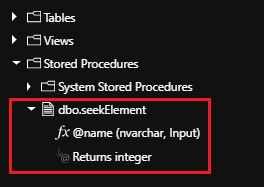
The * sign is a wildcard character, this means the SELECT statement will select any and all data it finds which are the same as the value of the search variable. If everything went according to plan we should now have one custom stored procedure that can be used by other resources.
Check contents & stored procedure
To check the content of the database we can execute the SELECT statement. Type in the following statement in the editor and execute it. This will return all the contents of the table persons in the results at the bottom.
SELECT * FROM persons;
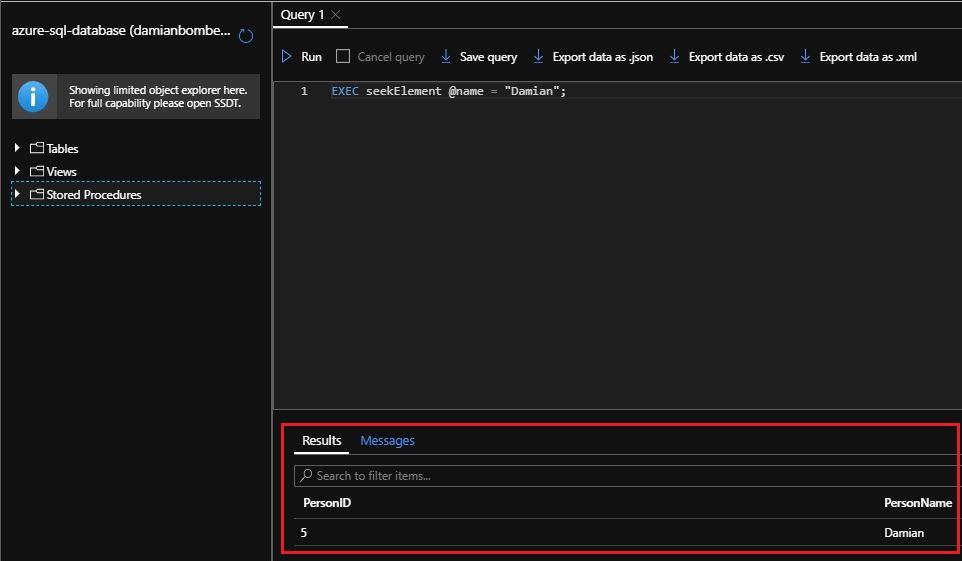
We can also check the functionality of the stored procedure. We do this by executing the procedure and giving the variable @name a value. If the search variable exists in the table, it will return the row with the corresponding value.
EXEC seekElement @name = "Damian"
Step 2: Setting up your Logic App
To be able to use the database remotely we are going to implement a workflow with the Logic App resource from Azure. A workflow is a sequence of actions/steps and is executed from initiation till the end of the workflow and its actions/steps. It is a repeatable proces which can be initiated by a trigger and this trigger can be anything like incoming data, a received mail, an updata of the database, new RSS feeds etc.
Create the workflow
Start by searching in the top search box for Logic app. Once found, select the resource to open it, this wil open an overview with the current logic apps. Choose the Add option and the following window will open.
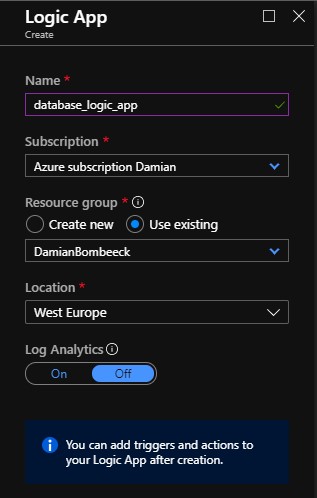
Give your logic app a recognizable name, select your subscription and choose Use existing for the resource group. Make sure that you choose a location closest to you for the best performance. After this click on Create, the window will close and you will be brought back to the Logic App overview. Refresh the overview to see your newly made logic app, click on it to open the resource. This will immediately open the Logic app designer, which will hapen only the first time.
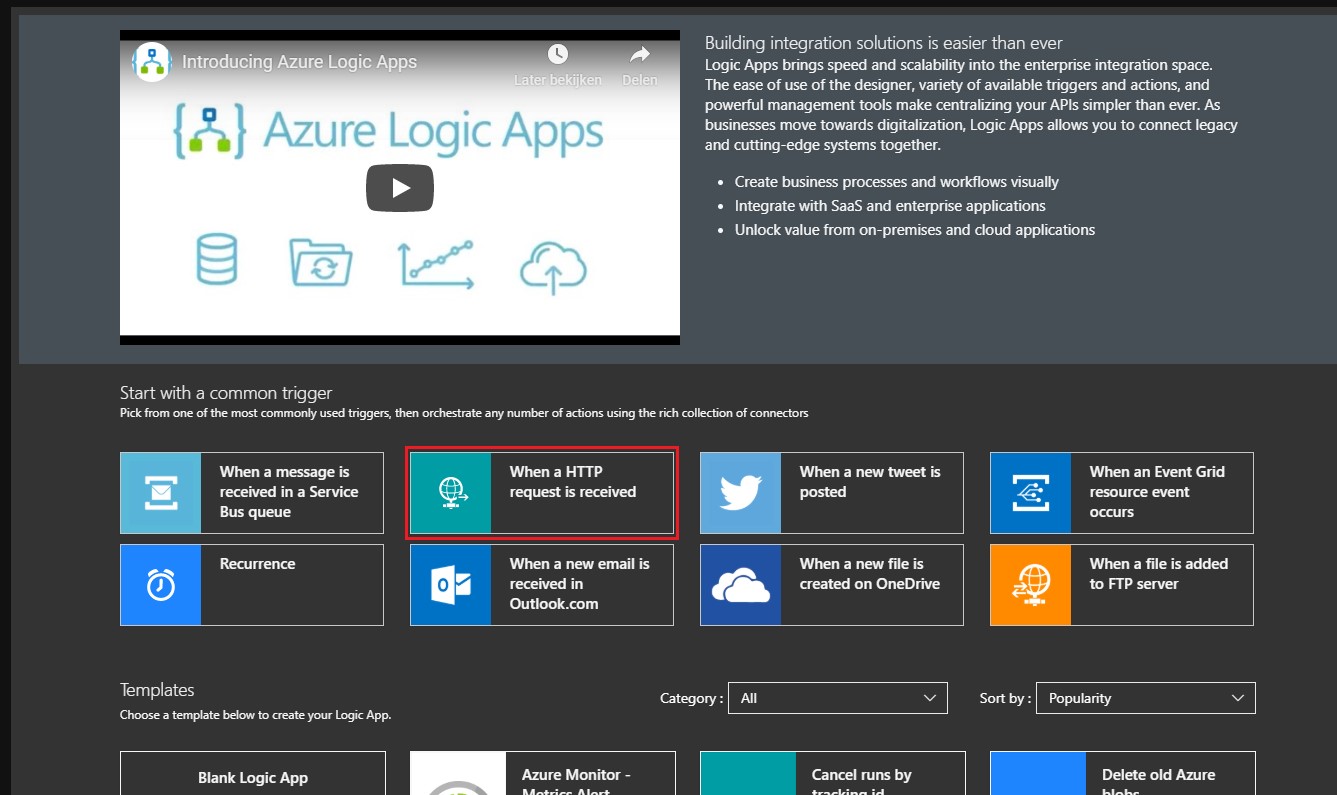
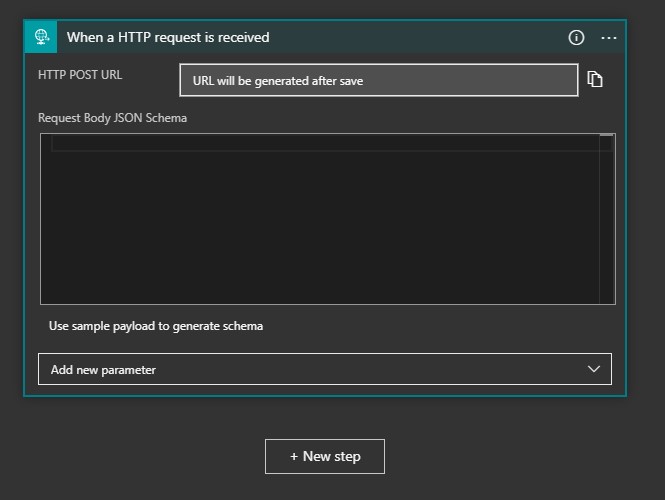
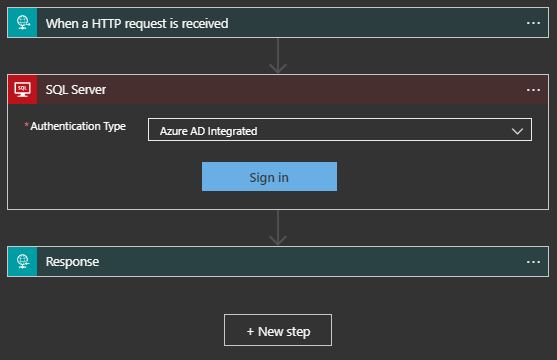
This starting window shows a list of common triggers and much used workflow templates. Select the When a HTTP request is received trigger to start designing your workflow. You will be presented with a opened trigger ready for configuration.
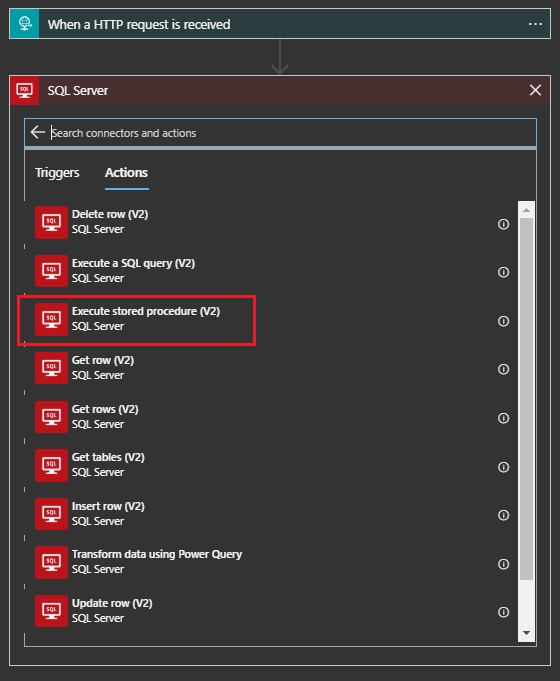
Next, click on + New step to add an action to the workflow. This will open up a window which lets you search through all the usable actions. If an action is unusable in the workflow, it won’t be shown in this list. As mentioned before, we will make us of the stored procedure so we have to choose the Execute stored procedure (V2) action.
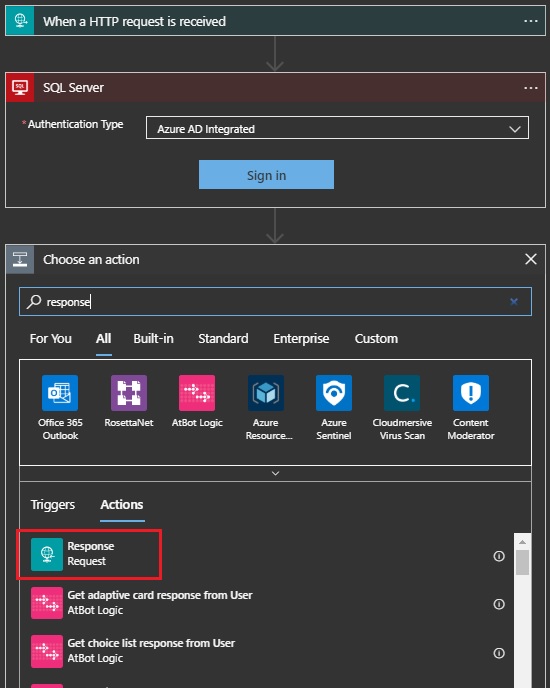
The last action/step we need to add is the HTTP response to send the results from the stored procedure back to the C++ code. Again, click on + New step and search for response in the search box.
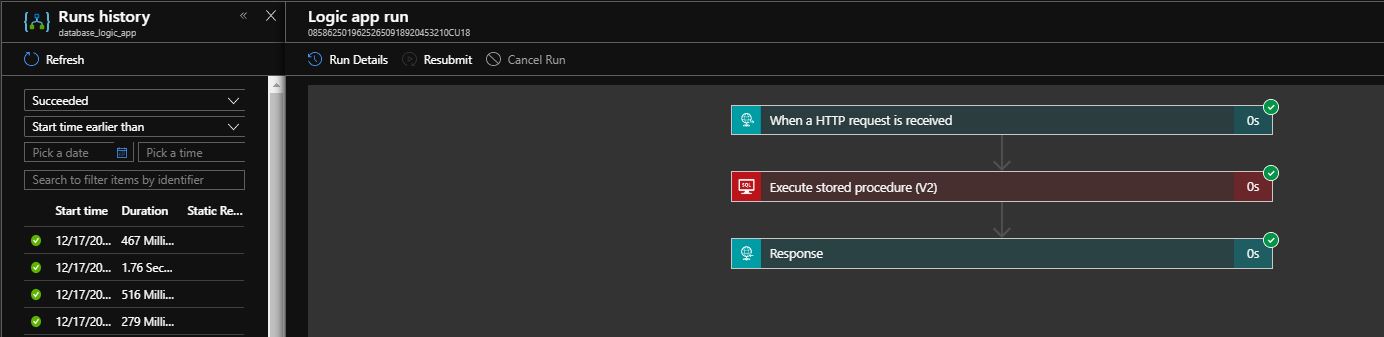
That’s all for the structure of the workflow. You should now have three steps consisting of one trigger and two actions. The finished workflow should look like this:
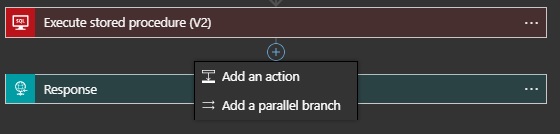
You can expand this workflow if you’d like and add other actions. Thats the nice thing about this service, its very versatile and you are able to design it to your needs. In this tutorial we use a HTTP trigger to reach the SQL database, but you could also reach other resources of Azure in this manner or use different triggers to execute the workflow. For example, if you want to receive an Email notification when someone retrieves information, you can add a parallel branch with a new step and assign an office 365 action like Send an email (V2). Just keep your mouse in between two actions/steps and a blue + sign will appear which lets you add add a new step between the two or lets you make a parallel branch to which you can add new actions.
Configure the workflow
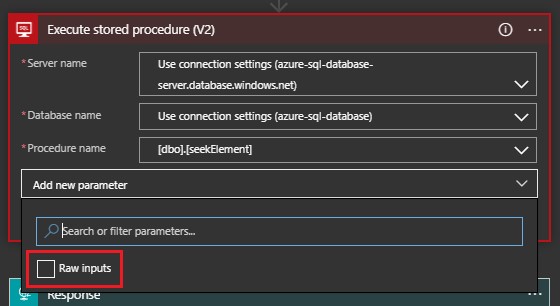
The next thing we have to do is configure the Execute stored procedure (V2) and Response action, our trigger is already configured correctly.
For the stored procedure action we must link our database and table to the workflow action, such a connection is called an API connection and will be visable as a resource once created. Select SQL server authentication in the drop-down menu of the stored procedure action. The window will expand showing a form.
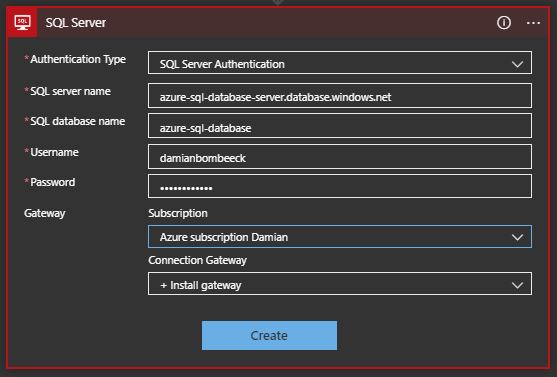
Fill in the form according to the names you’ve given your SQL database and server, the full server name can be found at the resource itself. Fill in the credentials you’ve made during the creation of the server, choose your subscription and select + install gateway for the connection gateway. This will immediately open up a website with the Azure documentation, you can close this and click on Create to finish the setup.
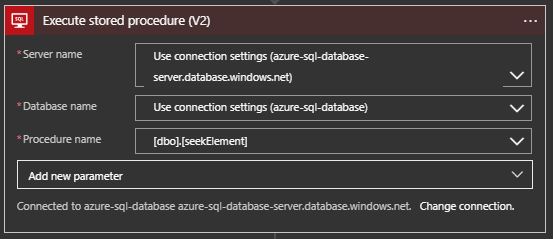
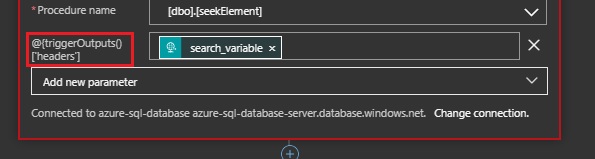
The stored procedure action window will look different now. You can choose your server name, database name and procedure name. Because we configured the API connector, we can just click on the drop-down menu’s and select the Use connection settings option. For the procedure name, choose the created procedure named [dbo].[seekElement].
Save the workflow and go back to your dashboard, go back to your workflow again and open the Logic App designer. We do this to give the workflow the change to update its variables. If we would not do this, we wouldn’t be able to use the variables from the output of the trigger.
We can now add our variable to use for the stored procedure. The biggest issue concerning this is that the syntax for an SQL variable is denoted with an @ sign, but JSON does not allow us to begin a key with this sign. So "@name": "Damian" is not allowed. To solve this we are going to create two JSON pairs in our C++ code, each pair is assigned to a variable and each pair contains a part of the key/value pair we want to end up with.
variable1 = "search_pointer: @name";      //pair one, containing the needed key "@name"
variable2 = "search_variable: Damian";    //pair two, containing the needed value "Damian"
NOTE: I use the name/value
Damianas an example for the search variable, this variable could be any name/value you would like.
These pairs/variables are passed to the workflow during the HTTP request using headers. This will be discussed when adding the C++ code. We can take out the values @name and Damian of these JSON pairs and these values are then put together as one new JSON pair.
"@name": "Damian"
Click on the drop-down menu Add new parameter, this will show Raw inputs as the only option. Select it and a new input line will appear.
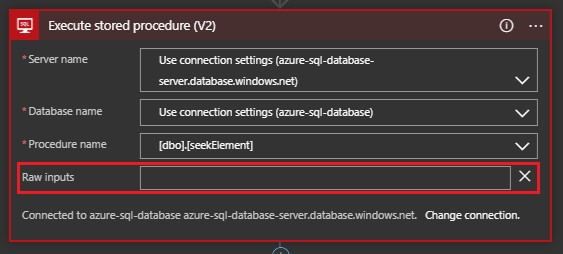
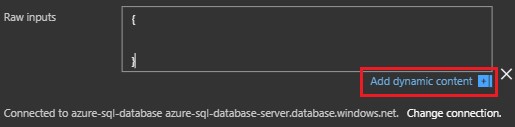
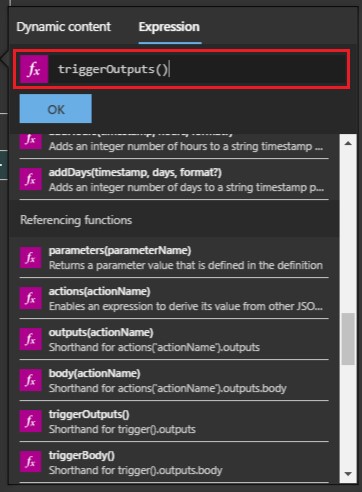
Next we are going to add a body to the raw input. The most important thing to know is that this input only accepts valid JSON pairs and objects, else you won’t be able to save the workflow. Start by entering two accolades.This creates the beginning of the JSON object, which is always between accolades. Stand on the empty line between the accolades and type a quotation mark, then click on the option Add dynamic content to add variable content to your body. Click on Expression on the right and scroll down to Referencing functions. Select the option triggerOutputs(), this will show the function at the top which enables you to edit it.
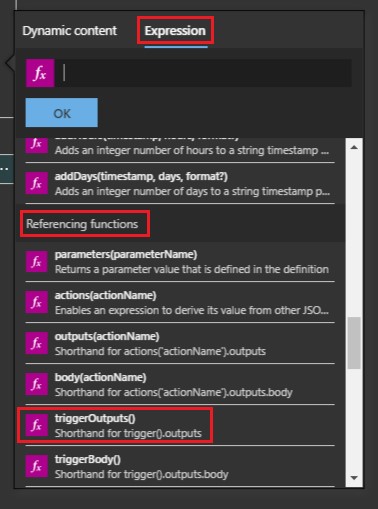
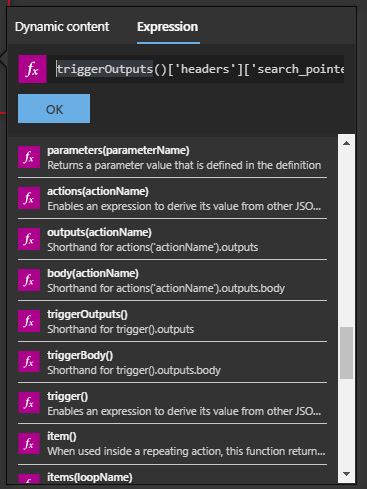
We need to first specify that we want to use the the headers which are sent along with the HTTP request. We do this by appending ['headers'] behind the function. After that we specify which key/value JSON pair we want to use from these headers, append ['search_pointer'] to choose the key from the first C++ variable which contains the key/value pair with the value "@name". The workflow automatically ignores the key and only uses the value attached to it.
triggerOutputs()['headers']['search_pointer']
After you’ve entered the line specifying the headers, click on OK to add the variable to your raw input. Enter a quotation mark again to finish the key.
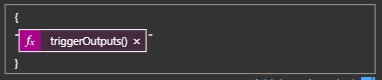
We now have a key and need to add a value to that key to finish the JSON pair. Enter a colon and after that a space, click on Add dynamic content and do the same as before. This time we specify the key from the second C++ variable search_variable which contains the key/value pair with the value Damian attached to it. Again, the key is ignored and only the value attached to it will be used.
triggerOutputs()['headers']['search_variable']
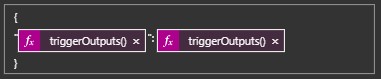
The raw input is complete and should look like this. It is a valid JSON object which will extract the values from both keys in the C++ variables containing the JSON pairs and turn them into a new single key/value JSON pair.
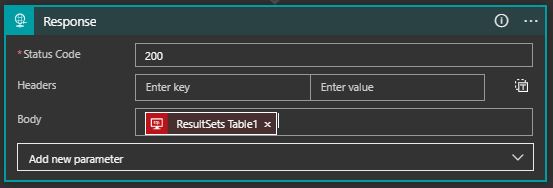
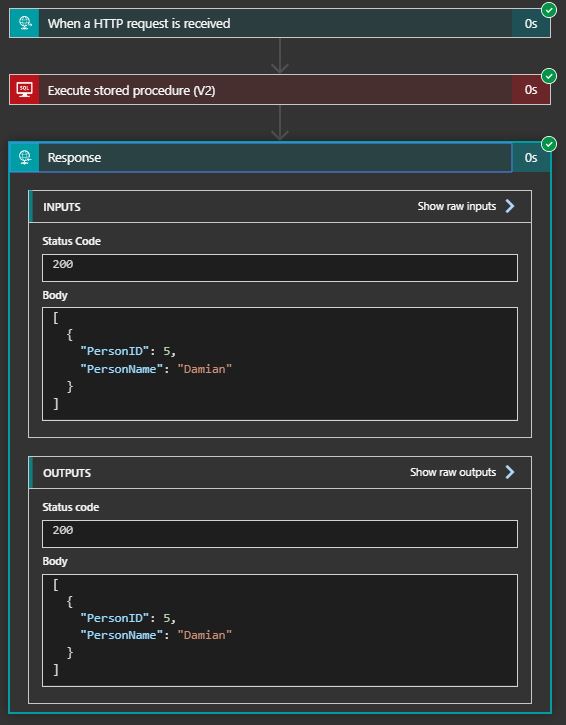
The results from the stored procedure needs to be sent back using the HTTP response. We are going to add content to the body of this last action/step. Click on the input line and choose Add dynamic content, we are presented with a list of outputs from the stored procedure. Choose the output ResultSets Table1, this will return only the tables of the results from the stored procedure and will leave out any other information like the statuscode or parameters.
Save your finished workflow again and you are finished configuring Azure. One important thing to note is that you should not alter the workflow from now on or you will have to add the raw inputs again. When the workflow is saved and opened again, the Logic App designer implements the key of the JSON pair into the form, so it won’t be variable anymore and will just display the bare syntax @triggerOutputs()['headers'] as the key.
Step 3: Setting up the C++ code
Now that we have our SQL database configured in the cloud, we can start focussing on reaching this service using the AXCF 2152 controller. We need to create a C++ code for the controller which executes the HTTP requests and passes the incoming and outcoming data to a IEC program. We will create this IEC program in step 4, it facilitates the user input and the communication between the GUI (graphical user interface) and the C++ program.
NOTE: These requests will be executed within a thread, the implementation of this thread will not be shown. Please look at the summary for the link to the github tutorial.
Make a new PLCnext project
First we have to prepare our environment on which we are going to create our C++ code. I chose to use a Linux system, Ubuntu 18.04.3 in particular. The reason I chose Linux is the ease of use when working with it, but before we can continue using this environment we first need to install the PLCnext SDK. We use the SDK (software development kit) to set up and build our project specifically for the PLCnext controller. For more information on setting up a PLCnext C++ project look at the guides on the PLCnext community
Download the PLCnext SDK for Linux 64bit, watch out for the version you are downloading. After you have downloaded the SDK, install it using the shell script, do this by entering the following command in your terminal:
Linux-PC$ sudo ./pxc-glibc-x86_64-axcf2152-image-sdk-cortexa9t2hf-neon-toolchain-2019.0.sh -d /usr/programs/pxc/sdk/AXCF2152/2019.04
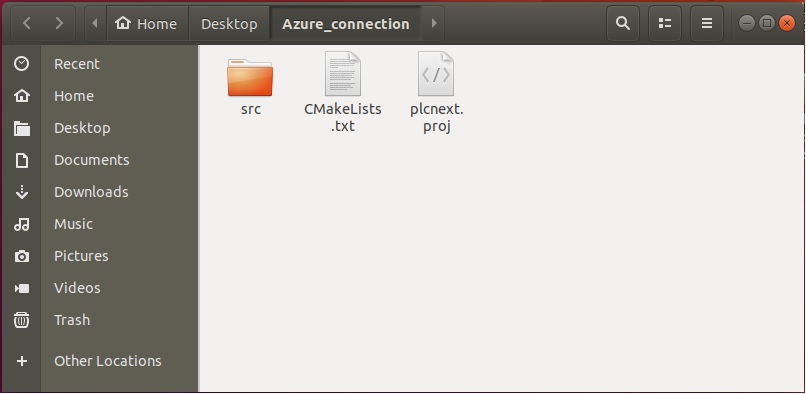
The option -d is the directory you want the SDK to be installed to. Choose a directory fitting to your needs. After that, create a new folder named Azure_connection for your PLCnext project. Navigate to this folder and open a terminal within it. Using the SDK to create the project, enter the commands below.
Linux-PC$ plcncli new project --component MyComponent --name "Azure_connection_cpp" --program MyProgram --ouput /home/damian/Desktop/Azure_connection
Linux-PC$ plcncli set target --add --version 19.0.4.22338 --name AXCF2152 --path /home/damian/Desktop/Azure_connection
NOTE: If you can’t execute the shell script, Right-click on the file and open the properties. Navigate to the Permissions window and make sure the
Executebox at the bottom is checked.
the --output option in the first command is the path to the directory you’ve just made. I’ve made mine on my desktop so the path to this folder is /home/damian/Desktop/Azure_connection. The --version option in the second command is the firmware version you are using on your controller. If you are using a different firmware version, make sure you specify this version here.
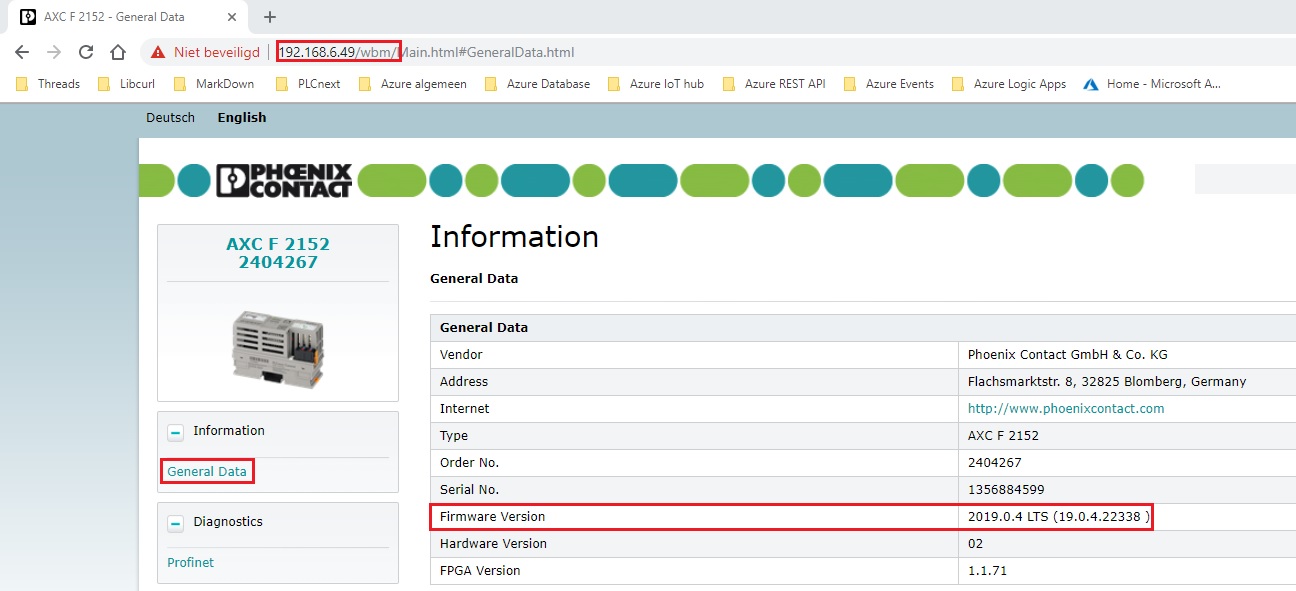
If you don’t know which version is running on your controller, go to your internet browser and type in the IP address of your controller followed by wbm. My controller uses the IP address 192.168.6.49, so it would be 192.168.6.49/wbm/.
This will open up the wbm (web-based manager) of your specific controller. Log in using the name and password of the controller and you will be redirected. You will find the firmware version in the General Data tab. Keep in mind that this method only works while your controller is connected to the local network and has a known IP address
We should now have a folder named Azure_connection and within that folder the PLCnext project named Azure_connection_cpp consisting of multiple files and the source directory.
Within the src directory you will find the header and source files for the program and component. We won’t be working in the MyProgram.cpp or MyProgram.hpp and only focus on the MyComponent.cpp and MyComponent.hpp.
Add the C++ code
Our project is all set up and we can begin to add code to the project. The files in the “src” directory already contain code, leave this be as much as you can and only change what you know and what is necessary. The created source code also facilitates system functions, not just the functions you implement, breaking one of these system functions might result in the controller not functioning.
Navigate to the src directory, open a terminal and type in the command shown below.
Linux-PC$ code MyComponent.hpp MyComponent.cpp
NOTE: Don’t forget to include the
#include "curl.h"header for the curl libray and the#include <string>header for the use of strings!
This will open up visual studio code with the MyComponent.hpp and MyComponent.cpp opened. I chose to write my code using Visual Studio Code, but you can use any text editor like Eclipse, notepad or Atom for the following steps.
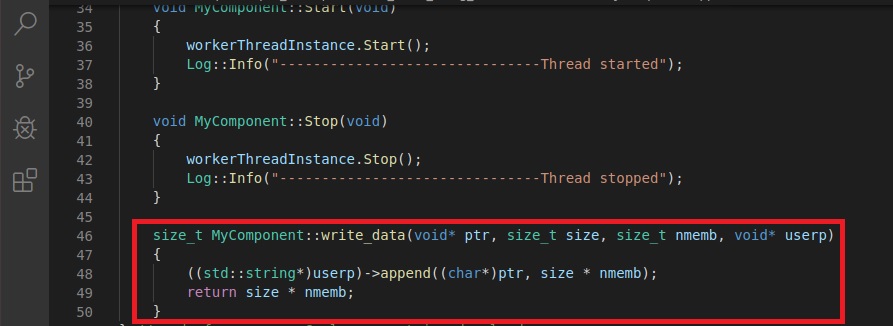
We will begin in the header file. It is constructed of a class with multiple inheritances and within this class there are public and private function declarations. Scroll down to the static factory operations which are public functions. Add the new function write_data() below the other static function. This function is used to write the incoming data from the HTTP request to a string buffer.
static size_t write_data(void* ptr, size_t size, size_t nmemb, void* userp);

After you’ve added this line, go to the MyComponent.cpp and scroll down. We declared the function in the header file and are going to implement the functionality in the source file. Insert the code shown below as a new function.
size_t MyComponent::write_data(void* ptr, size_t size, size_t nmemb, void* userp)
{
     ((std::string*)userp)->append((char*)ptr, size * nmemb);
     return size * nmemb;
}
That is all for the write function, we can now begin with the thread body. If you’ve followed the tutorial on github, you should have a function declaration called workerThreadBody(void) in the header file and a function body called void MyComponent::workerThreadBody(void) in the source file. This last one is your thread body, everything that the thread needs to execute should be put here and It should look like this:
/// Thread Body
void MyComponent::workerThreadBody(void)
{
        const char* input_search_variable = reinterpret_cast<char*>(search_var_byte);
        const char* var_syntax = "search_variable: ";
        char variable_buffer[256];

        strncpy(variable_buffer, var_syntax, sizeof(variable_buffer));
        strncat(variable_buffer, input_search_variable, sizeof(variable_buffer));

        if (start_download_input == true)
        {
            struct curl_slist* headers = NULL;
            CURL* curl;
            CURLcode res;

            const char* url = "[the url of your endpoint/trigger]";
            const char* Content_Type = "Content-Type: application/json";
            const char* Content_Length_H = "Content-Length: 0";
            const char* search_pointer = "search_pointer: @name";
            const std::string HTTP_buffer;
            headers = NULL;

            curl = curl_easy_init();
            if (curl)
            {
                curl_easy_setopt(curl, CURLOPT_URL, url);
                curl_easy_setopt(curl, CURLOPT_POST, 1L);

                headers = curl_slist_append(headers, Content_Type);
                headers = curl_slist_append(headers, Content_Length_H);
                headers = curl_slist_append(headers, Search_pointer);
                headers = curl_slist_append(headers, variable_buffer);

                curl_easy_setopt(curl, CURLOPT_HTTPHEADER, headers);
                curl_easy_setopt(curl, CURLOPT_WRITEFUNCTION, write_data);
                curl_easy_setopt(curl, CURLOPT_WRITEDATA, &HTTP_buffer);

                res = curl_easy_perform(curl);
                curl_easy_cleanup(curl);
                curl_slist_free_all(headers);
            }

            sizeof_result_string = HTTP_buffer.size();
            for (int i = 0; i <= sizeof_result_string; i++)
            {
                result_string_byte[i] = HTTP_buffer[i];
            }
            start_buffer = true;
            start_download_output = true;
        }

        if(start_download_input == false)
        {
            start_buffer = false;
            start_download_output = false;
        }
}
In the code I first create a buffer and two variables, this part is to append the search variable to the JSON pair i’m going to pass to Azure using headers. Remember the two JSON pairs we broke apart in the workflow to create a new key/value pair? The variables search_pointer and variable_buffer contain these JSON pairs we break apart in the workflow.
I take the input from the IEC program and transfer it to my buffer using the strncpy() and strncat() functions. After that I start my IF statement, which will be executed if the variable start_download_input equals true. This variable is passed from the IEC program to the C++ program and is an user input.
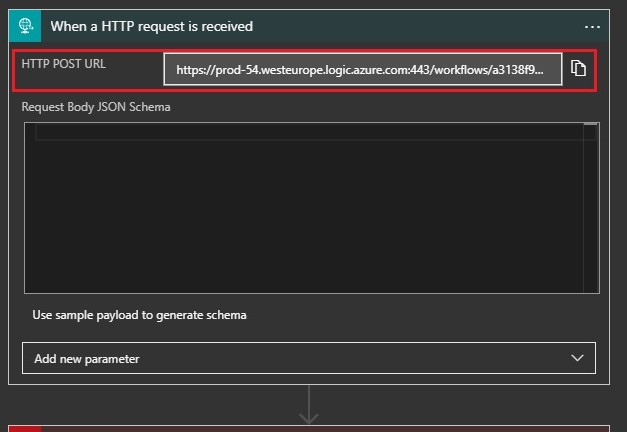
In my IF statement I start with declaring my variables. I begin with a struct to contain the headers I am going to send along with the request. After that come the variables, Content_Length and Content_Type are mandatory for a POST request in Azure and must not be removed or altered. The most important variable that MUST be altered is url, this is the URL of your endpoint and can be found in the workflow of your Logic App. Open the Logic App designer and click on the trigger. This wil expand it and at the top of the window you will find the URL needed to reach the trigger.
Next I create a handle for curl to use with the curl_easy_setopt options to set up the HTTP request. I do this with the curl_easy_init() function and link the handle to the variable curl. I then make a IF statement which will only be executed when the handle is created and exists. Within this statement I call the curl_easy_setopt() function, this function enables me to configure the behaviour of the request with all the necessary options. In the function I first specify on which handle the options must take effect, which is curl. I then declare the option I want to alter and lastly I specify which value or function (depending on the chosen option) I want to give the option. The meaning of the different options can be found here. Notice that one of the curl_easy_setopt() functions uses the write_data function we added earlier. Furthermore I add the headers to my struct using the curl_slist_append() function and at the end of the IF statement I free my handle using the curl_easy_cleanup() function and empty my struct using the curl_slist_free_all() function.
After I have closed my IF statement, the HTTP request has been executed and the HTTP_buffer variable contains the results from the database in the form of a string. I can now request the size of the string containing my results using the size() function. This information is necessary to transfer the results to the IEC program, as I use it in my FOR statement. I use a FOR statement with a ranged loop to transfer the result to a buffer variable named result_string_byte of the type byte array. This enables me to send the string to my IEC program as a byte array filled with individual ascii-characters. The reason I do this is because the IEC program does not recognize a C++ string type, I first have to convert the string to an array of bytes, then pass that array over and covert it back to a IEC string in my IEC program.
The last IF statement in the code is to reset the variables. As soon as the user input becomes false or the request has been executed the start_download_output and start_buffer variables become false, stopping the variables and buffers from changing.
Add input/output ports
Next, we are going to declare our ports. These ports are used to pass data between the C++ and IEC program such as the search variable the user enters and the results from the database which are returned.
Open the MyComponent.hpp, scroll down to the public port declarations and add the following pieces of code to declare the ports. I’ve added an explanation above the code as to what the port is going to be used for.
This port is used to pass the user input from the GUI and IEC program to the C++ program which is used to start the execution of the HTTP request.
//#port
//#attributes(Input)
//#name(start_download_input)
bool start_download_input = false;
This port is used to pass the status of the request to the IEC program, this is necessary to make sure the request is only executed once and won’t keep on executing. After the execution is started and completed, this variable will become true, so the IEC program knows it has executed the request.
//#port
//#attributes(Output)
//#name(start_download_output)
bool start_download_output = false;
The data we pass between the C++ and IEC program is often of the type string, the problem is that a string type in C++ is different then a string type in IEC. To solve this, we use a buffer function which devides/converts the string into individual ascii-characters of type char and writes these to a buffer. That buffer is then passed to the C++ program. We use this port and variable to signal that the conversion process in the IEC program can start.
//#port
//#attributes(Output)
//#name(start_buffer)
bool start_buffer = false;
As mentioned before, the results from the database that are returned are of type string and can only be passed to the IEC program using a buffer. The buffer we are talking about is created here with this port. The buffer is a simple byte array consisting of maximal 200 bytes, each byte representing one ascii-character.
//#port
//#attributes(Output)
//#name(result_string_byte)
uint8 result_string_byte[200];
The search variable from the input of the user that we pass to the C++ program is of type string and is first converted to a buffer as a byte array in the IEC program. We need a buffer in our C++ code to be able to receive the array of bytes from the IEC program. That is what this input buffer is for. The buffer is a simple byte array consisting of maximal 200 bytes, each byte representing one ascii-character.
//#port
//#attributes(Input)
//#name(search_var_byte)
uint8 search_var_byte[200];
To convert a series of elements from a buffer back to a string in the IEC program, we need to know how many elements are in the buffer. To find this out, I ask for the size of the string (containing the results from the database) in my C++ code using the size() function and send this size to the IEC program. This way the IEC program now knows the number of elements and can start the conversion from the buffer to a string.
//#port
//#attributes(Output)
//#name(sizeof_result_string)
int16 sizeof_result_string = 0;
After you’ve added all the ports, save the header file and close it. We are done with the C++ code for this tutorial and can start building the project.
Build the project
For this next part of the tutorial it is very important that you know how to cross-compile a library from source files, as we need the curl library built for an ARM architecture. If you follow my other tutorial you should manage to do this and end up with a libcurl.so file. Alternatively, you could go to my github where I uploaded all project files to and download the files from there.
In the project directory on my Linux pc I’ve made two new folders. One folder is named external and contains the cross-compiled libcurl library, the other folder is named cmake and contains a cmake module to find this library. I expect you to have the external folder with the built library ready, I’m only going to show you how to edit the CMakeListst.txt and create the cmake module.
While in the root of your project, open the CMakeListst.txt and scroll down to the include arp cmake module path part, insert the following line of code at the bottom of that part.
list(APPEND CMAKE_MODULE_PATH "${PROJECT_SOURCE_DIR}/cmake")
This line serves to find the cmake module in the cmake folder and use that module to find the library files needed to built the project. Next, scroll down to the part add link targets and add the following line below it.
find_package(CURL REQUIRED)
below that line you see a line that starts with target_link_libraries..., add curl::curl at the end of this line. It should look like the following line:
target_link_libraries(Azure_connection_cpp PRIVATE ArpDevice ArpProgramming curl::curl)
You can then save and close this file. Navigate to the newly made cmake folder and make a new text file by opening a terminal and entering code. Visual Studio Code will open at the start menu and you need to choose New file to open an empty file. Add the code below to it and save the file as findCURL.cmake. You can name it whatever you want, just make sure it has the .cmake filename extension.
set(CMAKE_FIND_ROOT_PATH_MODE_INCLUDE BOTH)
set(CMAKE_FIND_ROOT_PATH_MODE_LIBRARY BOTH)

find_path(CURL_INCLUDE_DIR
    NAMES curl.h
    PATHS external/curl_build_ARM/include/curl
)
find_library(CURL_LIBRARY
    NAMES curl
    PATHS external/curl_build_ARM/lib
)

include(FindPackageHandleStandardArgs)

find_package_handle_standard_args(curl
    DEFAULT_MSG
    CURL_INCLUDE_DIR CURL_LIBRARY
)

if(CURL_FOUND)
    set(CURL_LIBRARIES ${CURL_LIBRARY})
    set(CURL_INCLUDE_DIRS ${CURL_INCLUDE_DIR})
endif()

if(CURL_FOUND AND NOT TARGET curl::curl)
    add_library(curl::curl UNKNOWN IMPORTED)
    set_target_properties(curl::curl PROPERTIES
        IMPORTED_LOCATION "${CURL_LIBRARY}"
        INTERFACE_INCLUDE_DIRECTORIES "${CURL_INCLUDE_DIR}"
    )
endif()

mark_as_advanced(
    CURL_INCLUDE_DIR CURL_INCLUDE_DIRS
    CURL_LIBRARY CURL_LIBRARIES)
There are two lines in this code that need attention. The first one is the PATHS in find_path and the second one is the PATHS in find_library. The first one should be the path to your include file curl.h, the second one should be the path to your shared library file libcurl.so. If you followed along and chose the same names as me, you can leave this code as it is. If not, make sure to check that the paths are set correctly. You can leave the rest of the code as it is. For more information, look at this tutorial about including open-source libraries in your C++ project.
We now have the project all set up and ready to be build. Open a terminal and enter the following commands one after each other. Keep in mind that the option -p specifies your project folder and is different for everyone, in my case it’s /home/damian/Desktop/Azure_connection.
Linux-PC$ sudo plcncli generate code -p /home/damian/Desktop/Azure_connection/ --sources "src"

Linux-PC$ sudo plcncli generate config -p /home/damian/Desktop/Azure_connection/ --sources "src"

Linux-PC$ sudo plcncli build -p /home/damian/Desktop/Azure_connection/ -b Release

Linux-PC$ sudo plcncli generate library -p /home/damian/Desktop/Azure_connection/ --sources "src"

After you’ve done this, you should be left with a few more folders inside your project root directory. One of these folders’s is the bin folder, navigate to this folder and you will see another folder and one file. The file, named after your project and of the type .pcwlx, is the one we are going to need and can be seen as a library.
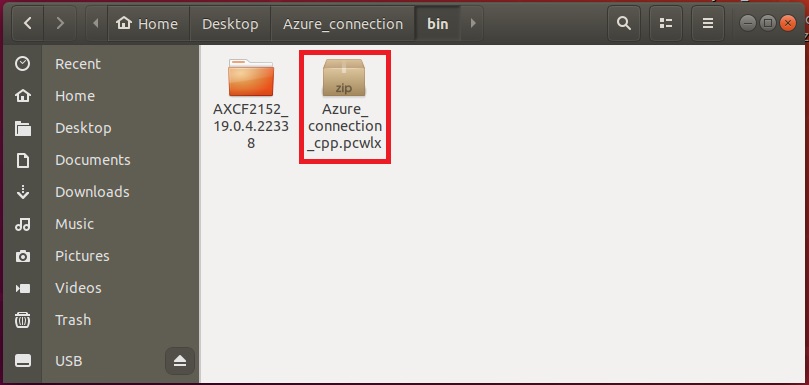
This file contains the entire project and the C++ program you just built. Copy this file to your PC which has PLCnext Engineer installed on it and we are ready to move on to the next step.
Step 4: Setting up PLCnext Engineer & the EHMI webserver
The basic functionality for the user input and visual representation of the returned data is realized using a IEC program. This program is linked to the C++ code with ports and linked to the EHMI webserver with variables using special tags.
Configure the project
Start by opening PLCnext engineer, I use version 2019.6. At the welcome screen, in the tab Try one of our sample projects, choose the empty project for version 2019.0.0. I’m not going to go over the details of setting up the project. For more information on this, take a look at one of these tutorials.
Next, on the right hand side in the components pane expand the tab Libraries. Right-click on the folder that shows up and click on Add User Library.... We are going to import our created library from step 3, selecht the .pcwlx file and click on open. After that, expand the tab PLCnext Components & Programs under te programming tab and keep on expanding the tabs untill you see your program called MyProgram.
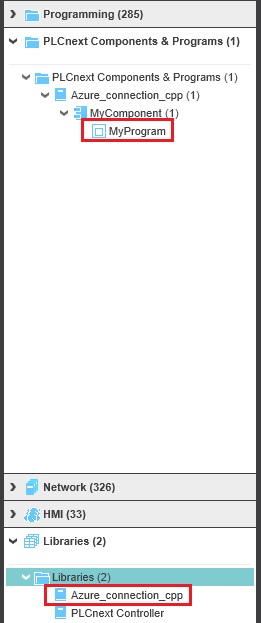
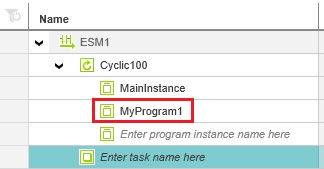
Drag the program to ESM1 under the cyclic100 task to add it to your project. By doing this we have made the C++ code part of our PLCnext project.
We also need to add two custom data-types for the IEC program. Remember the buffers we made when we added our ports? These buffers could hold a max of 200 bytes, which was specified by me. The max length of a IEC string is 80 bytes, I find this to be on the low side and it could result in missing parts of the returned results if the length of the results exceeds the 80 bytes.
To solve this, I make a custom string data type which is specified to hold a max of 200 bytes. This is done to make sure no parts of the returned results are lost. The other custom data type we are going to make is a byte array to store the user input to. The search variable coming from the user input needs to be passed over to the C++ code as individual ascii-characters, IEC does not include byte arrays big enough to make such a buffer so we have to implement this ourselves.
On the right-hand side under components expand the tab programming, then expand the tab Local. Right-click on the tab Data Types and click on Add Data Type Worksheet. This will add a worksheet below the tab.
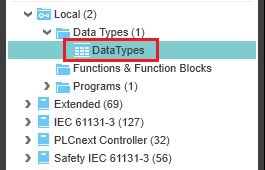
Open this worksheet by double-clicking and a file should open with no types declared.
Insert the following code between TYPE and END_TYPE.
byteArray200 : ARRAY[0 .. 199] OF BYTE;
String200: STRING[200];
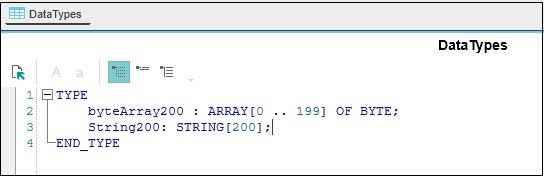
We first declare the name of the type, then declare the type itself by using a existing data type or structure and lastly specify the type to our needs. For the byte array we choose the data structure array with a specified range from 0 to 199 and of the data type byte. For the string we use the data type string with a max specified amount of 200 ascii-characters.
Save the worksheet and close it as we don’t need to alter this anymore. Now that we have our project configured, our C++ code imported and the custom data types set up we can begin with writing the IEC program.
Create the IEC program
Start by expanding the tab programming and Local again, then expand the tab Programs. You will see a program called Main, double-click on this and the start-screen should open which lets you choose the language for programming.
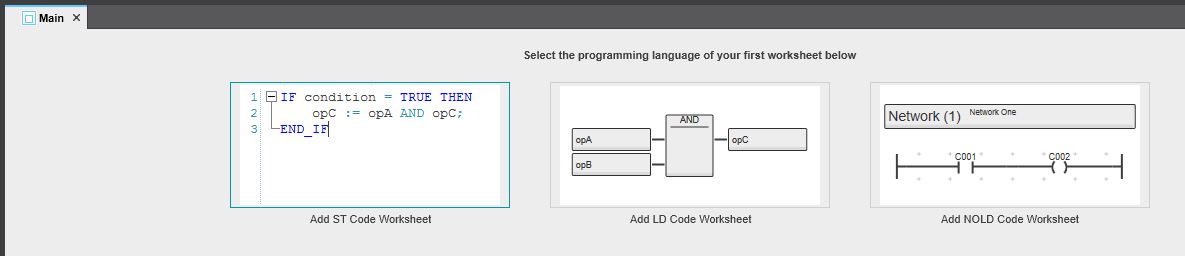
Choose for the option Add ST Code Worksheet and the screen changes to the tab with your variables, which is empty ofcourse. Click on the tab Code at the top and a empty text file will open. Insert the following code.
IF (start_download_input_cpp = TRUE) THEN
    start_download_output_IEC := FALSE;
END_IF

IF (search_button = TRUE) THEN
    xStart_String_to_Buf := TRUE;
END_IF

IF (xDone_String_to_Buf = TRUE) THEN
    xStart_String_to_Buf := FALSE;
    start_download_output_IEC := TRUE;
END_IF

sizeof_search_variable := TO_UDINT(LEN(input_search_variable));

BUF_TO_STRING1
(
    REQ := xStart_Buf_to_String,
    BUF_CNT := TO_DINT(sizeof_result_string_IEC),
    DONE => xDone_Buf_to_String,
    BUFFER := result_string_byte_IEC,
    DST := Result_string200
);

STRING_TO_BUF1
(
    REQ := xStart_String_to_Buf,
    BUF_CNT := TO_DINT(sizeof_search_variable),
    DONE => xDone_String_to_Buf,
    SRC := input_search_variable,
    BUFFER := output_search_variable
);
The first IF statement prevents the request from executing again. The request will be executed when the IEC port variable start_download_output_IEC becomes true and thus the variable start_download_input in the C++ code becomes true. This variable is set to true through user input. When the request is done, the port variable start_download_output in the C++ code will become true (see step 3 – Add input/output ports) and start_download_input_cpp becomes true. This will execute the IF statement and make the variable start_download_output_IEC false, stopping the request from executing again.
The second IF statement takes the user input and uses that input to start the conversion from string to buffer. The search variable entered by the user must be converted to a buffer only after the user is done. To do this, the string to buf conversion will only start when the variable xStart_String_to_Buf is true. If the button is pressed by the user, the variable search_button will become true and the IF statement will execute, making the variable xStart_String_to_Buf true which starts the conversion.
The third IF statement is used to solve the problem that the HTTP request can only be executed when the conversion is done, else the request could possibly be executed before the conversion is done. The variable xDone_String_to_Buf will become true as soon as the conversion is done, the IF statement will be executed and the variable start_download_output_IEC in turn will become true. This makes the variable start_download_input in the C++ code true and the request will execute. The variable xStart_String_to_Buf is made false to stop the conversion from starting over.
After the IF statements comes a line of code with the function LEN(), this function passes the length of the search variable string and gives this value to the variable sizeof_search_variable. This information is needed to make the conversion from string to buffer work.
As last we have the two conversion functions, one for string to buffer and one for buffer to string. We use STRING_TO_BUF to convert the search variable of the type string to a buffer and we use BUF_TO_STRING to convert the returned results from the buffer of the C++ code back to a string.
The function takes multiple variables as input and gives one variable as output. As input it expects the lenght of the string, the required signal to start the conversion, the source string or buffer to be converted and the string or buffer to which the converted output must go. As a output it gives one variable to indicate if the conversion is done or not.
The next thing we need to do is add all the variables we are going to use. Ignore all errors, save the code and go to the tab Variables. Enter all variables and make sure the type is set correctly, if you cannot find a type by scrolling, try to enter it manually and it should show up. After you are done, save the project and check the IEC code to make sure no errors exist.
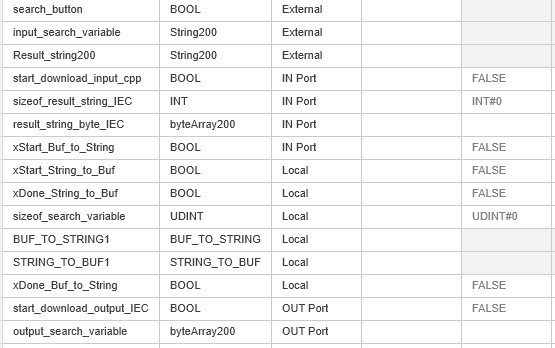
The variables can have different usages. When a variable is local, you can only use it in the IEC code itself and nowhere else. When a variable is external, the variable is locally usable but also able to be linked to a EHMI webserver. When a variable is defined as in- or output, the variable is locally usable but can also be connected as a port to in- and outputs from the C++ code. This last usage, variables as a port, is what I am going to show you next.
Link the input/output ports
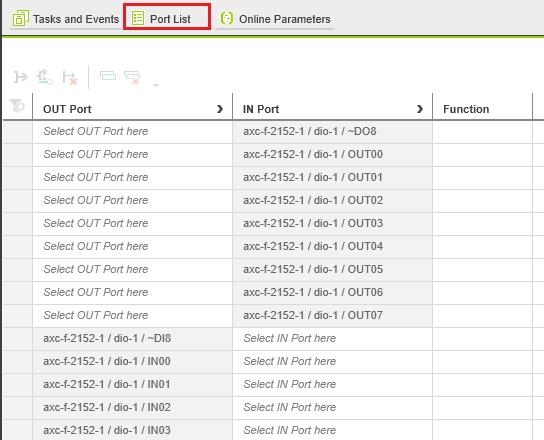
To pass variables from one program to another we use ports. These ports need to be connected to eachother in the Port List of PLCnext Engineer. On the left hand side under Plant double-click on the tab PLCnext, this opens the Tasks and Events in the main window. Navigate to the tab Port List to find all connectable ports of your IEC and C++ program.
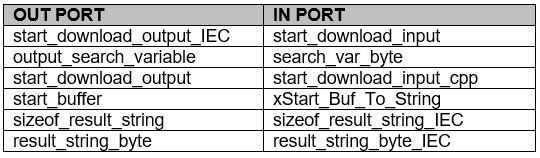
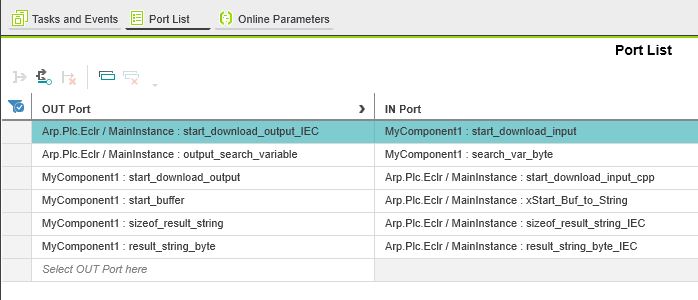
Scroll down till you see your variables/ports listed, the ports of your C++ program are denoted with MyComponent1 and the ports of the IEC program are denoted with Arp.Plc.Eclr/MainInstance.
Here, the ports need te be connected as shown below. To get an easy overview of which ports are connected and which are not, click on the filter on the left of the search bar and select the wanted filter. As a quick overview of which variables are linked to eachother I also made a table with all ports sorted
Make a EHMI webserver
We are almost done with all the functionality. The last thing that we need to do is make a GUI to be able to enter the search variable, to start the HTTP request and to show the returned results. We are going to use the EHMI webserver of PLCnext Engineer, this enables us to easily make a GUI which is accessed through a webserver
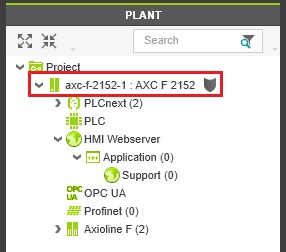
The first thing we need to do is add special tags to our variables. These tags are called HMI Tags and are used to signal that the variable is open for use in the EHMI webserver. Navigate to your controller, click on the tab axc-f-2152-1 : AXC F 2152 and in the main window navigate to the Data List. This will show you all variables you’ve created and specified as External for usage.
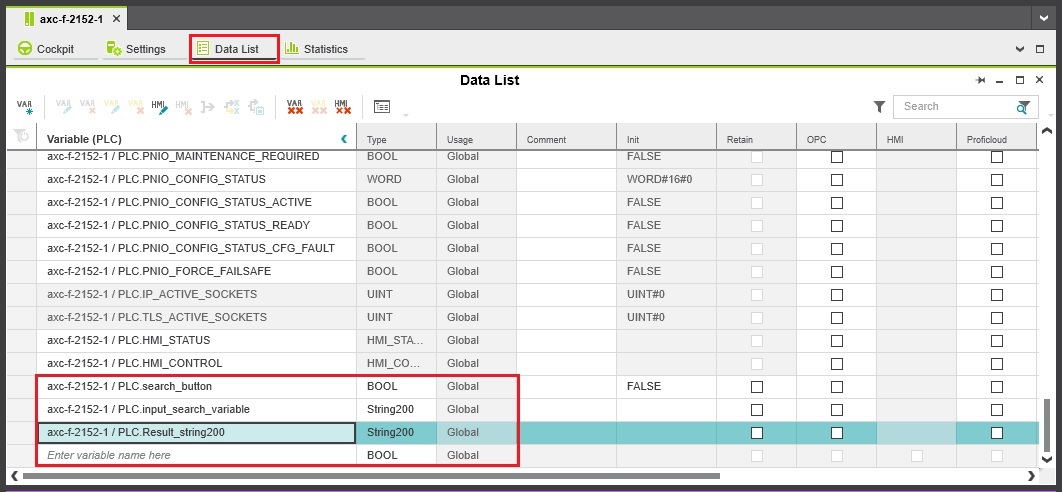
Right click on a variable and choose Add HMI Tag from the pop-up window. Do this for all three variables, the name of the tag can be found in the table at the column HMI Tag. You can also add the tag by clicking on the HMI logo at the top.

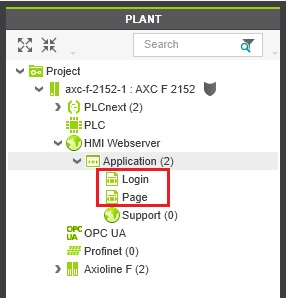
That is all for the variables. The next thing we are going to do is make the webserver and link the variables. Expand the tab HMI Webserver on the left-hand side, right-click on Application and choose Add HMI Page. This will create two pages, one you created and one PLCnext Engineer created as a login page. You can not delete this page, as it will pop back up just as fast as you can delete it.
This created login page is used to access the webserver, but can be turned off to make access to the webserver easier and faster. To do this, double-click on the tab HMI Webserver, all the settings will open including the setting Enforcement of user levels under the tab Security. Set the option to none to turn off the login, you can now delete the login page permanently. If you want to use the login page again, just turn on the security and the page should be created immediately.
You can name the created page as you like, I leave mine the way it is. Set the page as your homepage by right-clicking on the page and selecting Set HMI Page as Startup. After that, double-click on the page to open the editor in the main window.
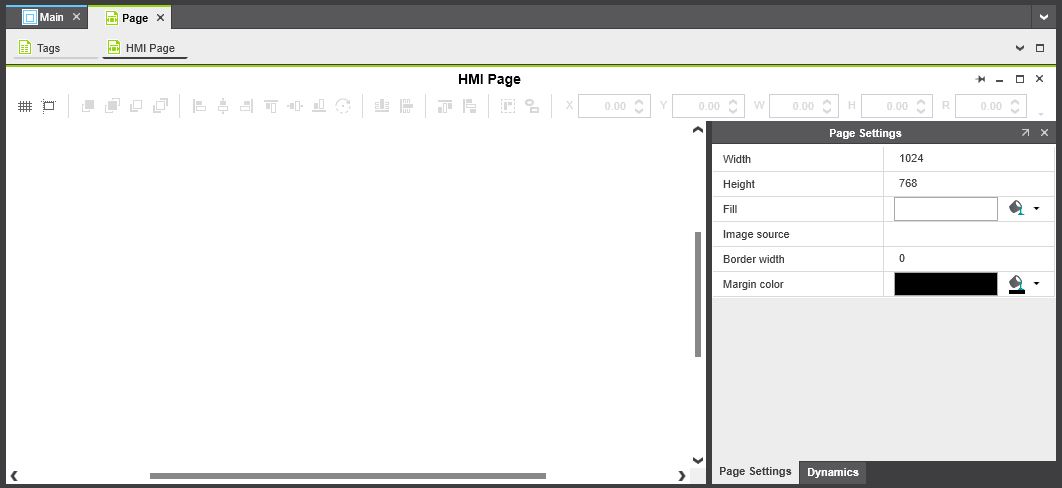
Here, you can design the webpage to your liking. You can change the background, add images, make multiple pages through which you can navigate and much more. Take a look at this HMI tutorial to get an idea of the possibilities.
On the right side of the editor in the components pane, expand the tab HMI. This gives you all the usable objects, images, symbols and templates for your wegpage. Expand the tab objects and drag the object Text Input into the main window.

Now do the same for the objects Text and Button, these are all the objects we are going to need. place the objects in a logical fashion, the text input and button grouped toghether and the text below it. Make the textbox for the text object a bit bigger to make sure the results fit in the textbox. To allign objects with eachother or to change their position using coördinates you can use the options at the top of the editor.
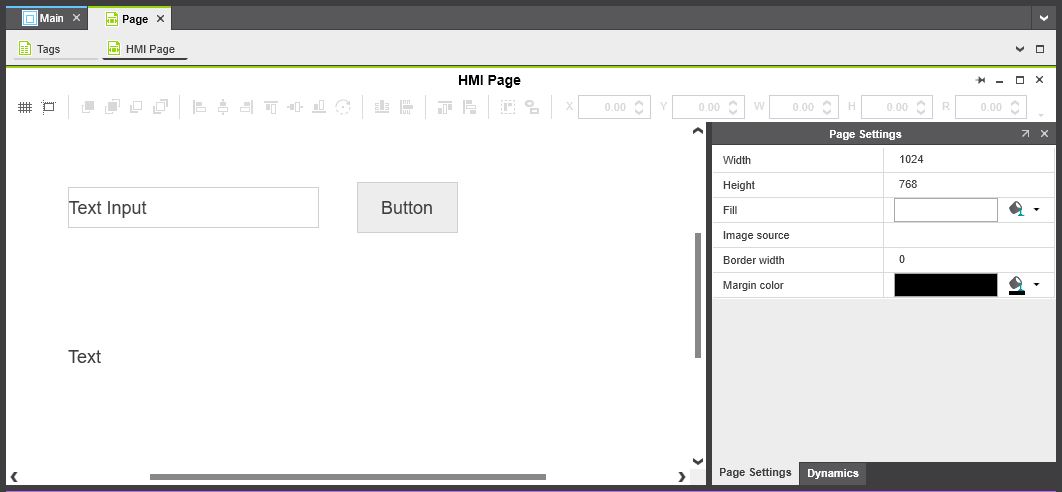
To be able to use these objects for our IEC code we have to link the variables from the code to the objects. Objects have two tabs for the options, one tab is named after the object which is for the appearence and the static behaviour and one tab is is named Dynamics which is for the dynamic behaviour. With dynamic behaviour I mean a behaviour that is dependend on the state of other variables, objects or inputs. Select the text input object and go to this tab, click on the New dynamic option and choose Text.
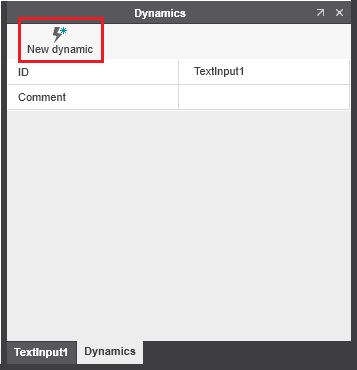
This will add the behaviour to the list and lets us choose a variable to link to it. Select the variable input_search_variable from the drop-down menu. Do the same for the text object but this time select the Result_string200 variable.
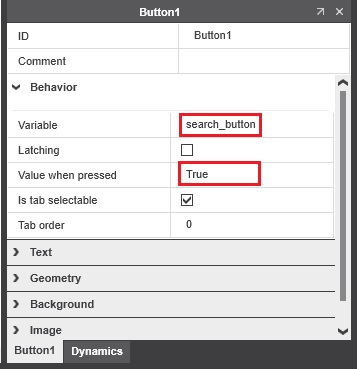
The button works a little different. Because it expects a user input the button takes a variable as normal behaviour, not as dynamic behaviour. Select the button object and expand the Behaviour tab, choose search_button as the variable and set the Value when pressed to true.
After you’ve done this, write the project to your controller and start it up by using the cockpit in PLCnext Engineer.
Step 5 – Test the functionality
Congratulations! You are finished setting up and configuring the entire project and its functionality. It is now time to test it and possibly debug it if something is wrong or not working.
Test method
Navigate to the cockpit by double-clicking the tab axc-f-2152-1 : AXC F 2152 and opening the cockpit at the top of the main window. Here, you can access the HMI webbrowser by clicking on the page icon.

This will open up the webserver in your default browser. You can also access the HMI by writing the IP address of the controller in your browser and appending /ehmi/hmiapp.html to it. For my controller this would be 192.168.6.49/ehmi/hmiapp.html.
Next, type in your search variable in the textbox and click on the button. Enter a variable which you know to be existent in the database to make sure the test returns results. The HTTP request will be executed. If everything went according to plan the results should be showed on screen with the personID and the personName.
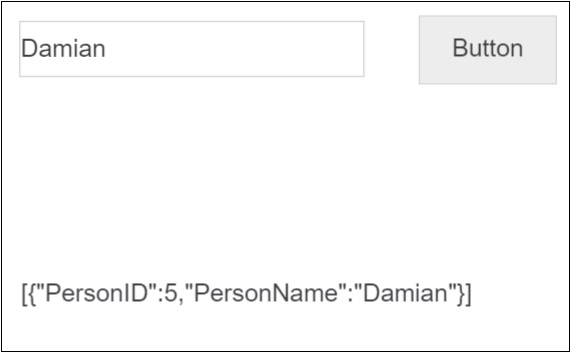
Please have some patience as it can take a little while before the results are shown in the textbox. If you think it takes too long, press the button again.
Debug methods
If you think something is going wrong, check the values of the variables to make sure all change accordingly. To do this, expand the tab PLCnext in the Plant pane and expand the ESM1 and Cyclic100 tabs after that. This shows the programs running under Cyclic100, double-click on the program MainInstance : Main and the main window will open up.
In this main window we can look at the variables with three differen methods, all methods are real-time. The first method is by looking in the Port List tab, here you can see all used ports and their respective values. This method enables you to see which values are passed to the C++ program, but it does not show the local variables.
The second method is by looking at the Variables list. This will show you all the variables of the IEC program, local and external, but not the variables of the C++ program.
The third method is by looking at the code in the code tab, this shows you the code with the value of the variables written behind them.
We can also check the request in Azure. Go to your Logic App and open the overview. The overview shows the ammount of times the workflow has been executed and if this execution succeeded or failed.
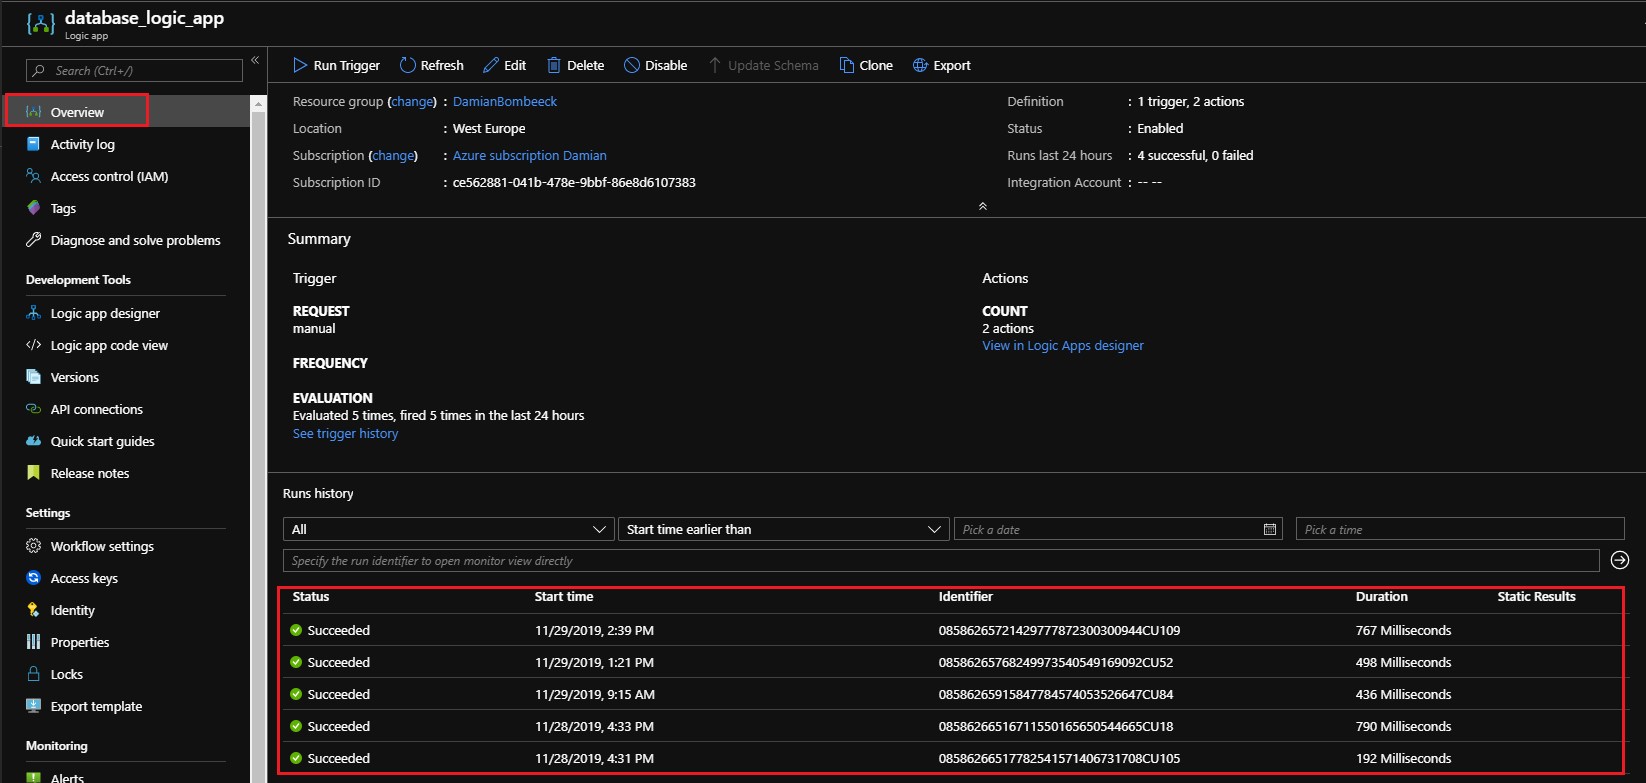
Click on one of these executions and the workflow will open, not to alter the design but to view the data that has been passed during the execution. You can also see green check marks which indicate if the action was executed correctly, this way you can easily see at what action the execution went wrong.
If you expand one of these actions by clicking on it you can see the in- and outputs that the action used. This can come in handy to see how the headers were used in the workflow and which search variable was used for the stored procedure.
That was all for this tutorial. I want to thank you for taking the effort to read it and I hope you found it to be helpful. All files I used can be found on my github page, feel free to download them and use them as you wish!
Appendix – Used codes
C++ program – MyComponent.cpp
#include "MyComponent.hpp"
#include "Arp/Plc/Commons/Esm/ProgramComponentBase.hpp"
#include <string>
#include <string.h>

namespace Azure_connection_cpp
{
    void MyComponent::Initialize()
    {
        // never remove next line
        ProgramComponentBase::Initialize();
        // subscribe events from the event system (Nm) here
    }

    void MyComponent::LoadConfig()
    {
        // load project config here
    }

    void MyComponent::SetupConfig()
    {
        // never remove next line
        ProgramComponentBase::SetupConfig();
        // setup project config here
    }

    void MyComponent::ResetConfig()
    {
        // never remove next line
        ProgramComponentBase::ResetConfig();
        // implement this inverse to SetupConfig() and LoadConfig()
    }

    void MyComponent::Start(void)
    {
        workerThreadInstance.Start();
        Log::Info("-------------------------------Thread started");
    }

    void MyComponent::Stop(void)
    {
        workerThreadInstance.Stop();
        Log::Info("-------------------------------Thread stopped");
}

    /// Thread Body
    void MyComponent::workerThreadBody(void)
    {
        const char* input_search_variable = reinterpret_cast<char*>(search_var_byte);
        const char* Search_syntax = "search_variable: ";
        char variable_buffer[256];

        strncpy(variable_buffer, Search_syntax, sizeof(variable_buffer));
        strncat(variable_buffer, input_search_variable, sizeof(variable_buffer));

        if (start_download_input == true)
        {
            Log::Info("-------------------------------Thread HTTPS REQUEST: REQUEST STARTED");
            struct curl_slist* headers = NULL;
            CURL* curl;
            CURLcode res;

            const char* url = "https://prod-54.westeurope.logic.azure.com:443/workflows/a3138f986cb3499dabc5d1ecc42a8c38/triggers/manual/paths/invoke?api-version=2016-10-01&sp=%2Ftriggers%2Fmanual%2Frun&sv=1.0&sig=01stU3opM0XlI2kU55l6jxVqhQy1rxIgi1HErSEIFo4";
            const char* Content_Type = "Content-Type: application/json";
            const char* Content_Length_H = "Content-Length: 0";
            const char* Search_pointer = "search_pointer: @name";
            const std::string HTTP_buffer;
            headers = NULL;

            curl = curl_easy_init();
            if (curl)
            {
                curl_easy_setopt(curl, CURLOPT_URL, url);
                curl_easy_setopt(curl, CURLOPT_POST, 1L);

                headers = curl_slist_append(headers, Content_Type);
                headers = curl_slist_append(headers, Content_Length_H);
                headers = curl_slist_append(headers, Search_pointer);
                headers = curl_slist_append(headers, variable_buffer);

                curl_easy_setopt(curl, CURLOPT_HTTPHEADER, headers);
                curl_easy_setopt(curl, CURLOPT_WRITEFUNCTION, write_data);
                curl_easy_setopt(curl, CURLOPT_WRITEDATA, &HTTP_buffer);

                res = curl_easy_perform(curl);
                curl_easy_cleanup(curl);
                curl_slist_free_all(headers);
                Log::Info("-------------------------------Thread HTTPS REQEUST: RESPONSE RECEIVED");
            }

            sizeof_result_string = HTTP_buffer.size();
            for (int i = 0; i <= sizeof_result_string; i++)
            {
                result_string_byte[i] = HTTP_buffer[i];
            }

            start_buffer = true;
            start_download_output = true;
        }

        if(start_download_input == false)
        {
            start_buffer = false;
            start_download_output = false;
        }
    }

    size_t MyComponent::write_data(void* ptr, size_t size, size_t nmemb, void* userp)
    {
        ((std::string*)userp)->append((char*)ptr, size * nmemb);
        return size * nmemb;
    }
} // end of namespace Azure_connection_cpp
C++ program – MyComponent.hpp
#pragma once
#include "Arp/System/Core/Arp.h"
#include "Arp/System/Acf/ComponentBase.hpp"
#include "Arp/System/Acf/IApplication.hpp"
#include "Arp/Plc/Commons/Esm/ProgramComponentBase.hpp"
#include "MyComponentProgramProvider.hpp"
#include "Azure_connection_cppLibrary.hpp"
#include "Arp/Plc/Commons/Meta/MetaLibraryBase.hpp"
#include "Arp/System/Commons/Logging.h"

//ADDED
#include "Arp/System/Acf/IControllerComponent.hpp"
#include "Arp/System/Commons/Threading/WorkerThread.hpp"
#include "Arp/System/Commons/Threading/Thread.hpp"
#include "Arp/System/Commons/Threading/ThreadSettings.hpp"
#include "curl.h"
#include <string>

namespace Azure_connection_cpp
{
    using namespace Arp;
    using namespace Arp::System::Acf;
    using namespace Arp::Plc::Commons::Esm;
    using namespace Arp::Plc::Commons::Meta;

    //#component
    class MyComponent : public ComponentBase
                    , public ProgramComponentBase
                    , public IControllerComponent
                    , private Loggable<MyComponent>
    {
    public: // typedefs

    public: // construction/destruction
        MyComponent(IApplication& application, const String& name);
        virtual ~MyComponent() = default;

    public: // IComponent operations
        void Initialize() override;
        void LoadConfig() override;
        void SetupConfig() override;
        void ResetConfig() override;

    public: // IControllerComponent operations
        void Start(void);
        void Stop(void);

    public: // ProgramComponentBase operations
        void RegisterComponentPorts() override;

    private: // methods
        MyComponent(const MyComponent& arg) = delete;
        MyComponent& operator= (const MyComponent& arg) = delete;

    public: // static factory operations
        static IComponent::Ptr Create(Arp::System::Acf::IApplication& application, const String& name);
        static size_t write_data(void* ptr, size_t size, size_t nmemb, void* userp);

    // Added: IProgramComponent operations
    public:
        IProgramProvider & GetProgramProvider(bool useBackgroundDomain) override;

    // Added: IMetaComponent operations
    public:
        IDataInfoProvider & GetDataInfoProvider(bool isChanging) override;
        IDataNavigator*     GetDataNavigator() override;

    private: // fields
        MyComponentProgramProvider programProvider;
        DataInfoProvider           dataInfoProvider;

        // Worker Thread Example
        WorkerThread workerThreadInstance;
        bool startflag = false;

        void workerThreadBody(void);

    public: // Ports

            //#port
            //#attributes(Input)
            //#name(start_download_input)
            bool start_download_input = false;

            //#port
            //#attributes(Output)
            //#name(start_download_output)
            bool start_download_output = false;

            //#port
            //#attributes(Output)
            //#name(start_buffer)
            bool start_buffer = false;

            //#port
            //#attributes(Output)
            //#name(sizeof_result_string)
            int16 sizeof_result_string = 0;

            //#port
            //#attributes(Output)
            //#name(result_string_byte)
            uint8 result_string_byte[200];

            //#port
            //#attributes(Input)
            //#name(search_var_byte)
            uint8 search_var_byte[200];
    };

    ///////////////////////////////////////////////////////////////////////////////
    // inline methods of class MyComponent
    inline MyComponent::MyComponent(IApplication& application, const String& name)
    : ComponentBase(application, ::Azure_connection_cpp::Azure_connection_cppLibrary::GetInstance(), name, ComponentCategory::Custom)
    , programProvider(*this)
    , ProgramComponentBase(::Azure_connection_cpp::Azure_connection_cppLibrary::GetInstance().GetNamespace(), programProvider)

    // Added: data info provider
    , dataInfoProvider(::Azure_connection_cpp::Azure_connection_cppLibrary::GetInstance().GetNamespace(), &(this->programProvider))

    // Worker Thread Example
    , workerThreadInstance(make_delegate(this, &MyComponent::workerThreadBody) , 5000, "WorkerThreadName")
    {
    }

    #pragma region IProgramComponent implementation
    inline IProgramProvider& MyComponent::GetProgramProvider(bool /*useBackgroundDomain*/)
    {
        return this->programProvider;
    }
    #pragma endregion

    #pragma region IMetaComponent implementation
    inline IDataInfoProvider& MyComponent::GetDataInfoProvider(bool /*useBackgroundDomain*/)
    {
        return this->dataInfoProvider;
    }

    inline IDataNavigator* MyComponent::GetDataNavigator()
    {
        return nullptr;
    }
    #pragma endregion

    inline IComponent::Ptr MyComponent::Create(Arp::System::Acf::IApplication& application, const String& name)
    {
        return IComponent::Ptr(new MyComponent(application, name));
    }
} // end of namespace Azure_connection_cpp
CMake – CMakeLists.txt
cmake_minimum_required(VERSION 3.13)

project(Azure_connection_cpp)

if(NOT CMAKE_BUILD_TYPE)
    set(CMAKE_BUILD_TYPE Release)
endif()

################# create target #######################################################

set (WILDCARD_SOURCE *.cpp)
set (WILDCARD_HEADER *.h *.hpp *.hxx)

file(GLOB_RECURSE Headers src/${WILDCARD_HEADER} intermediate/code/${WILDCARD_HEADER})
file(GLOB_RECURSE Sources src/${WILDCARD_SOURCE} intermediate/code/${WILDCARD_SOURCE})
add_library(Azure_connection_cpp SHARED ${Headers} ${Sources})

#######################################################################################

################# project include-paths ###############################################

target_include_directories(Azure_connection_cpp
    PUBLIC
    $<BUILD_INTERFACE:${CMAKE_CURRENT_SOURCE_DIR}/intermediate/code>
    $<BUILD_INTERFACE:${CMAKE_CURRENT_SOURCE_DIR}/src>)

#######################################################################################

################# include arp cmake module path #######################################

list(INSERT CMAKE_MODULE_PATH 0 "${ARP_TOOLCHAIN_CMAKE_MODULE_PATH}")
list(APPEND CMAKE_MODULE_PATH "${PROJECT_SOURCE_DIR}/cmake")

#######################################################################################

################# set link options ####################################################
# WARNING: Without --no-undefined the linker will not check, whether all necessary    #
#          libraries are linked. When a library which is necessary is not linked,     #
#          the firmware will crash and there will be NO indication why it crashed.    #
#######################################################################################

target_link_options(Azure_connection_cpp PRIVATE LINKER:--no-undefined)

#######################################################################################

################# add link targets ####################################################

find_package(ArpDevice REQUIRED)
find_package(ArpProgramming REQUIRED)
find_package(CURL REQUIRED)

target_link_libraries(Azure_connection_cpp PRIVATE ArpDevice ArpProgramming curl::curl)

#######################################################################################

################# install ############################################################

string(REGEX REPLACE "^.*\\(([0-9]+\.[0-9]+\.[0-9]+\.[0-9]+).*$" "\\1" _ARP_SHORT_DEVICE_VERSION ${ARP_DEVICE_VERSION})
install(TARGETS Azure_connection_cpp
    LIBRARY DESTINATION ${ARP_DEVICE}_${_ARP_SHORT_DEVICE_VERSION}/$<CONFIG>/lib
    ARCHIVE DESTINATION ${ARP_DEVICE}_${_ARP_SHORT_DEVICE_VERSION}/$<CONFIG>/lib
    RUNTIME DESTINATION ${ARP_DEVICE}_${_ARP_SHORT_DEVICE_VERSION}/$<CONFIG>/bin)
unset(_ARP_SHORT_DEVICE_VERSION)

#######################################################################################
CMake – FindCURL.cmake
set(CMAKE_FIND_ROOT_PATH_MODE_INCLUDE BOTH)
set(CMAKE_FIND_ROOT_PATH_MODE_LIBRARY BOTH)

find_path(CURL_INCLUDE_DIR
    NAMES curl.h
    PATHS external/curl_build_ARM/include/curl
)
find_library(CURL_LIBRARY
    NAMES curl
    PATHS external/curl_build_ARM/lib
)

include(FindPackageHandleStandardArgs)

find_package_handle_standard_args(curl
    DEFAULT_MSG
    CURL_INCLUDE_DIR CURL_LIBRARY
)

if(CURL_FOUND)
    set(CURL_LIBRARIES ${CURL_LIBRARY})
    set(CURL_INCLUDE_DIRS ${CURL_INCLUDE_DIR})
endif()

if(CURL_FOUND AND NOT TARGET curl::curl)
    add_library(curl::curl UNKNOWN IMPORTED)
    set_target_properties(curl::curl PROPERTIES
        IMPORTED_LOCATION "${CURL_LIBRARY}"
        INTERFACE_INCLUDE_DIRECTORIES "${CURL_INCLUDE_DIR}"
    )
endif()

mark_as_advanced(
    CURL_INCLUDE_DIR CURL_INCLUDE_DIRS
    CURL_LIBRARY CURL_LIBRARIES)
IEC program – Main
IF (start_download_input_cpp = TRUE) THEN
    start_download_output_IEC := FALSE;
END_IF

IF (search_button = TRUE) THEN
    xStart_String_to_Buf := TRUE;
END_IF

IF (xDone_String_to_Buf = TRUE) THEN
    xStart_String_to_Buf := FALSE;
    start_download_output_IEC := TRUE;
END_IF

sizeof_search_variable := TO_UDINT(LEN(input_search_variable));

BUF_TO_STRING1
(
    REQ := xStart_Buf_to_String,
    BUF_CNT := TO_DINT(sizeof_result_string_IEC),
    DONE => xDone_Buf_to_String,
    BUFFER := result_string_byte_IEC,
    DST := Result_string200
);

STRING_TO_BUF1
(
    REQ := xStart_String_to_Buf,
    BUF_CNT := TO_DINT(sizeof_search_variable),
    DONE => xDone_String_to_Buf,
    SRC := input_search_variable,
    BUFFER := output_search_variable
);
Leave a Reply
You must be logged in to post a comment.